Overview
The Submittals module in Arkan provides end-to-end management of project submittals -- from defining submittal types and creating plans, through document submission and approval tracking, to performance analytics and PDF report generation. The module integrates with Primavera scheduling and supports workflow-based approval processes.
Prerequisites
Before working with submittals, ensure the following:
- You have logged in and selected a project (see Getting Started)
- Your user role has the SubmittalTypesDashboard permission with at least Retrieve access
- Submittal types have been configured in project settings (or you have Insert permission to create them)
- For Primavera integration, the project must have an active Primavera schedule imported
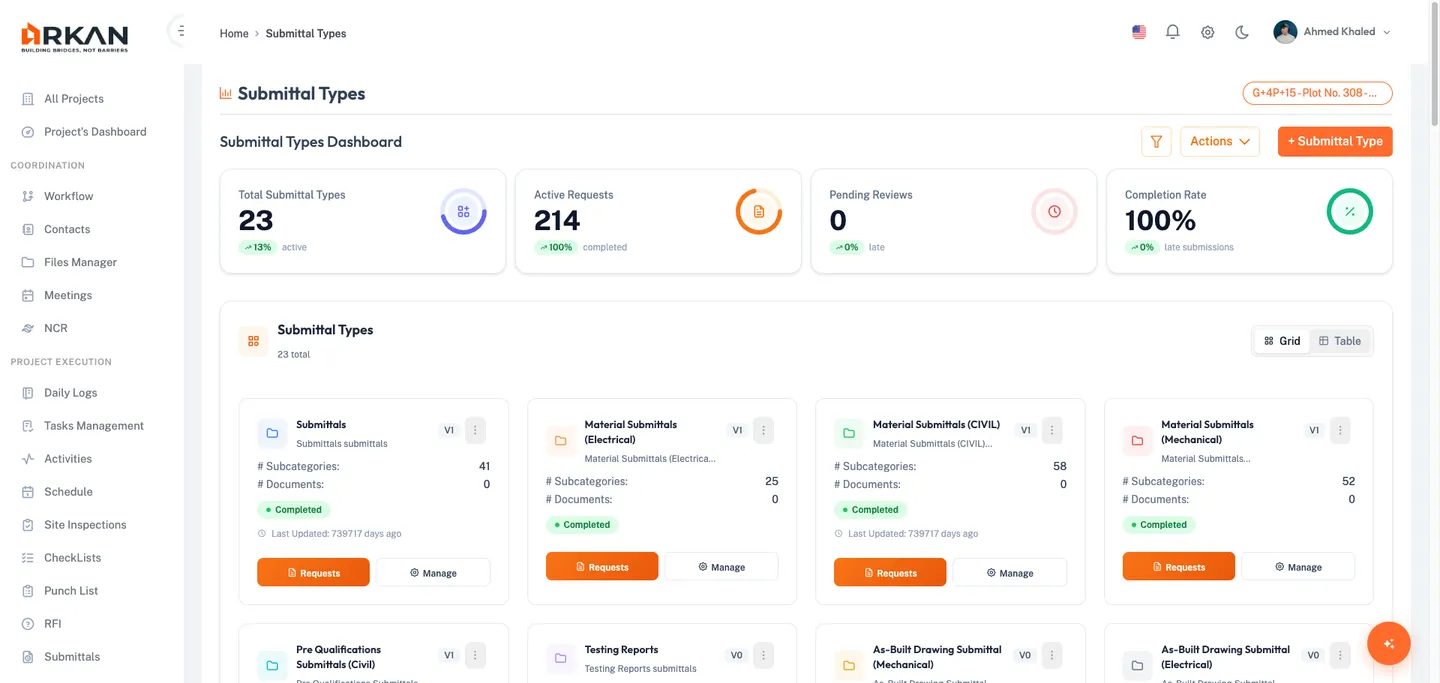
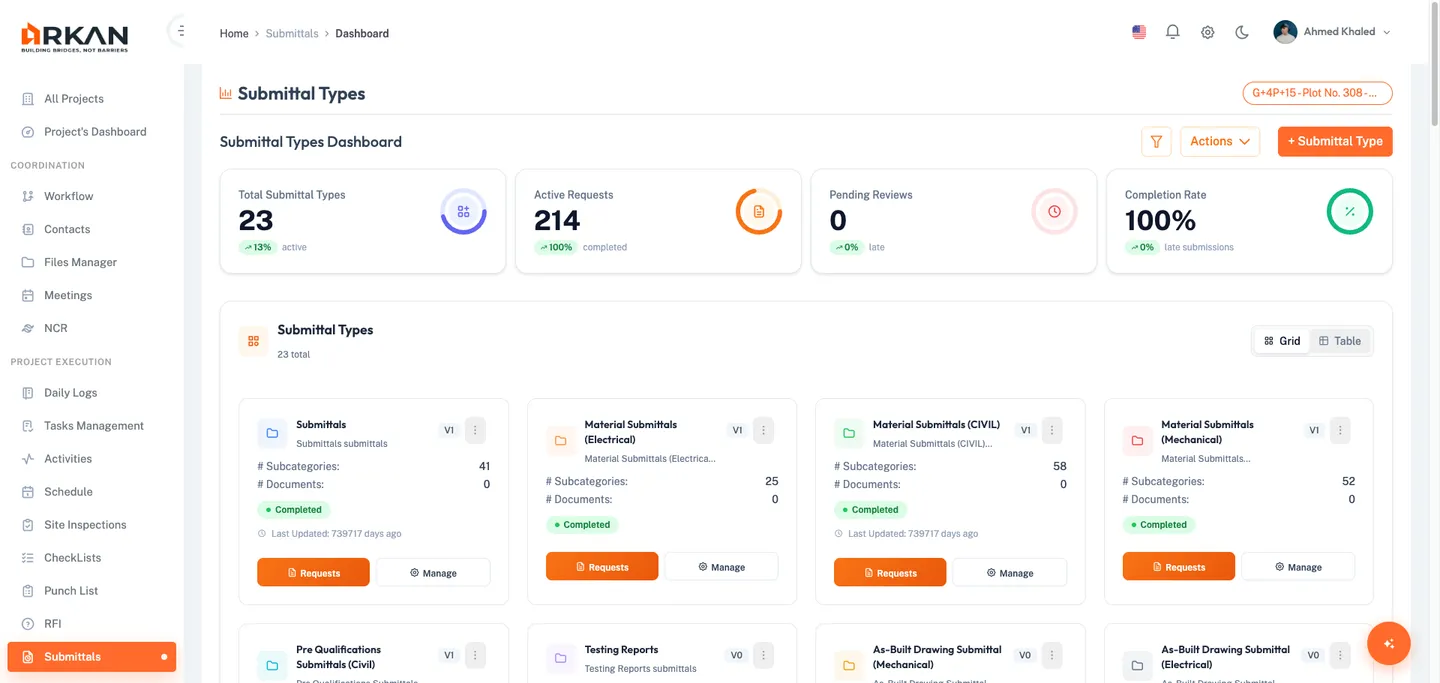
Submittals Dashboard
The Submittals Dashboard is the central hub for monitoring all submittal activity within your project.
Navigating to the Dashboard
- Navigate to Sidebar > Submittals.
- The system loads the Submittal Types Dashboard at
/submittals/dashboard.
The dashboard displays project information, KPI summary cards, submittal type cards, analytical charts, and a submittal log grid.

Tip: If you see an "Access Denied" message, contact your administrator to grant you Retrieve permission for the Submittals module.
KPI Summary Cards
The dashboard displays eight key performance indicators in the Submittal Summary panel:
| KPI Card | Description |
|---|---|
| Submittal Types Count | Total number of submittal types configured for the project |
| Submittal Requests | Total subcategory requests across all submittal types |
| Expected Documents | Sum of all expected document counts across submittals |
| Upcoming Requests | Requests with a due date within the next 14 days |
| Completed | Subcategories with a completed status |
| Under Process | Subcategories currently under review |
| Late/Delayed | Subcategories that have exceeded their planned submission date |
| Done Late | Subcategories that were completed but after their planned deadline |
Submittal Type Cards
Below the KPI panel, each submittal type is displayed as a card showing:
- Type Name with a Version Badge (e.g., V1, V2)
- Subcategories count and Documents count
- Status Badge -- one of: New (purple), Pending (warning), Not Posted (warning), or Completed (green)
Each card includes three action buttons:
- Add from Primavera (calendar icon) -- Link submittal plan items from Primavera schedule activities. Only visible when the type does not have an active settings-based plan.
- Add from Settings (cog icon) -- Create a submittal plan using the settings-based workflow. Only visible when the type does not have an active Primavera-based plan.
- Preview Current Plan (eye icon) -- Open a read-only view of the current submittal plan.
Warning: You cannot use both Primavera-based and settings-based plans for the same submittal type simultaneously. Choose one approach per type.
Charts and Analytics
The dashboard provides six analytical visualizations:
- Submittal by Type (Donut Chart) -- Distribution of subcategories across submittal types
- Delayed Submittals by Type (Donut Chart) -- Breakdown of late completions by type
- Submittals Progress (Stacked Progress Bars) -- Completion percentage for each submittal type, color-coded by status:
- Green = Completed
- Amber = Completed Late
- Blue = Under Process
- Red = Under Process Late
- Progress Timeline (Gantt-style Range Bar) -- Shows the duration between submission and approval dates, filtered by submittal type
- Submittals by Status (Pie Chart) -- Overall status distribution of all submittals
- Days to Close (Radial Gauge) -- Average number of days from submission to approval, color-coded: green (<80 days), yellow (80-119), orange (120-149), red (150+)
Filtering Charts by Type
- Locate the Submittal Type dropdown filter above the status and timeline charts.
- Select a specific submittal type from the dropdown.
- The Progress Timeline, Status Pie Chart, and Days to Close gauge update to reflect only the selected type.
- To reset, select the default option from the dropdown.
Submittal Log Grid
At the bottom of the dashboard, the Submittal Log grid lists individual submittal records.
Grid Columns:
| Column | Description |
|---|---|
| ID | Clickable link that opens the submittal document request |
| Name | Submittal subcategory name |
| Type | Clickable link to the submittal type follow-up requests view |
| Status | Color-coded badge (green = Completed, yellow = Under Process, red = Late) |
| Submit Date | Planned submission date |
| Approved Date | Planned or actual approval date |
| Docs | Number of attached documents |
| Actions | Eye icon to view submittal details |
Navigating Grid Pages
- Use the pagination controls at the bottom of the grid.
- Select page size from the dropdown: 5, 10, 20, 50, or 100 records per page.
- Click page numbers or the previous/next arrows to navigate.
Managing Submittal Types
Navigating to Submittal Types Settings
- From the Submittals Dashboard, click the Manage Submittal Types button in the top-right corner.
- A dialog opens with the Submittal Types Settings panel.
Creating a New Submittal Type
- Verify you have Insert permission (the New Submittal Type button is visible).
- Click New Submittal Type.
- A modal form opens with two fields.
- Enter the Code for the submittal type (required).
- Enter the Description for the submittal type (required).
- Click Save.
- The new type appears in the list. A success notification appears.
Filtering Submittal Types
- Click the Filter toggle button (funnel icon) in the section header.
- The filter panel expands.
- Enter a search term in the Search field to filter by name or code.
- Click Clear to reset all filters.
Submittal Types Dashboard View
Navigate to Sidebar > Submittal Types (route: /submittal-types) for a dedicated dashboard view with:
- Metrics Summary -- Types count, total subcategories, total documents, on-time vs. late percentages
- Types List -- All submittal plan types with edit and delete capabilities
- Status Chart -- Visual breakdown of submittal statuses
- Trends Chart -- Submittal trends over time
Creating a Submittal Plan
A submittal plan defines which subcategories and documents are required, along with their planned submission and approval dates.
Creating a Plan from Settings
- On the Submittals Dashboard, locate the desired submittal type card.
- Click the Add from Settings button (cog icon).
- The system validates that you can create a plan for this type. If a plan already exists and is under process, an error message displays.
- The Submittal Plan Request page opens at
/submittals/SubmittalPlanRequest. - The system pre-fills the Request No, Request Date, Submittal Type, Request Creator, and Company fields.
- Review the tree of submittal types, subcategories, and documents.
- Check the checkbox next to each submittal type you want to include.
- For each selected subcategory:
- Set the Submit Date using the date picker.
- Set the Approved Date using the date picker.
- Optionally enter a Note.
- For each document, check the checkbox and select the required Options from the multi-select dropdown.
- Click Save Plan to save the submittal plan.
- A success message confirms the plan has been saved.
Tip: Use the Add Submittal button in the plan header to add new subcategories not yet included in the plan tree.
Creating a Plan from Primavera
- On the Submittals Dashboard, locate the desired submittal type card.
- Click the Add from Primavera button (calendar icon).
- The Primavera Submittal page opens at
/submittals/primavera. - Review the pre-filled plan header with Request No, Request Date, Submittal Type, Request Creator, Company, and Version.
- Click Add New Subcategory to add subcategories linked to Primavera activities.
- For each subcategory, expand the accordion panel and:
- Set the Submit Date (required).
- Set the Approved Date (required).
- Enter an optional Note.
- Click Add Document to attach required documents, selecting document options from the dropdown.
- Click Save to save the plan as a draft.
- Once ready, click Post to finalize and post the Primavera-linked submittal plan.
- A success message confirms the plan has been posted.
Warning: Once a plan is posted, its submission and approval dates become locked. Use Update Approval Dates only for new plans (Request No = 0) if you need to recalculate dates from Primavera.
Previewing a Submittal Plan
- On the Submittals Dashboard, locate the desired submittal type card.
- Click the Preview Current Plan button (eye icon).
- The Plan Display page opens at
/submittals/SubmittalPlanDisplayshowing read-only plan information. - Review the Plan Information section with request number, date, type, creator, and company details.
- Review the subcategories and their associated documents, dates, and statuses.
- Click Back to return to the dashboard.
Follow-Up Dashboard
The Follow-Up Dashboard (route: /submittals/followup-dashboard) provides a card-based overview of each submittal type's progress.
- Navigate to Sidebar > Submittals > Follow-Up Dashboard.
- Cards display for each submittal type with progress indicators.
Each card shows: type name with version badge, stats (Total, Completed, Under Process, Late to Approve, Completed with Late, Late to Submit), four circular progress knobs, and an overall progress bar.
- Click the Apply for Request button on a card to open the follow-up requests grid for that type.
Tip: You can also double-click any card to navigate to its follow-up requests.
Follow-Up Requests Grid
The Follow-Up Requests grid shows all subcategory-level submittal requests for a specific type.
Navigating to Follow-Up Requests
- From the Follow-Up Dashboard, click Apply for Request on a type card, or
- From the Submittal Log grid, click a Type link.
- The Follow-Up Requests page opens at
/submittals/SubmittalFollowupRequests.
Grid Columns
| Column | Description |
|---|---|
| Actions | Request button to initiate a document request (when eligible) |
| ID | Subcategory identifier |
| Name | Subcategory name |
| Plan Submit Date | Planned submission date |
| Plan Approval Date | Planned approval date |
| Status | Color-coded status badge |
| Submitted Date | Actual submission date |
| Approved Date | Actual approval date |
| Docs | Document count (blue circle badge) |
| Days to Submit | Remaining days until planned submission (red if negative, orange if 0-3) |
| Days to Approve | Remaining days until planned approval |
| Days After Submit | Remaining days after actual submission |
| Notes | Any notes associated with the subcategory |
Filtering Follow-Up Requests
- Click the Filter button in the page header.
- A filter dialog opens.
- Set a date range for Plan Submittal Date (From / To).
- Set a date range for Plan Approval Date (From / To).
- Click Apply Filter to apply.
- Click Clear to reset all filters.
Exporting Follow-Up Data
- In the grid toolbar, click Export to Excel to download an
.xlsxfile. - Click Export to PDF to download a
.pdffile in A4 landscape format.
The exported files include all grid columns with the current filter applied.
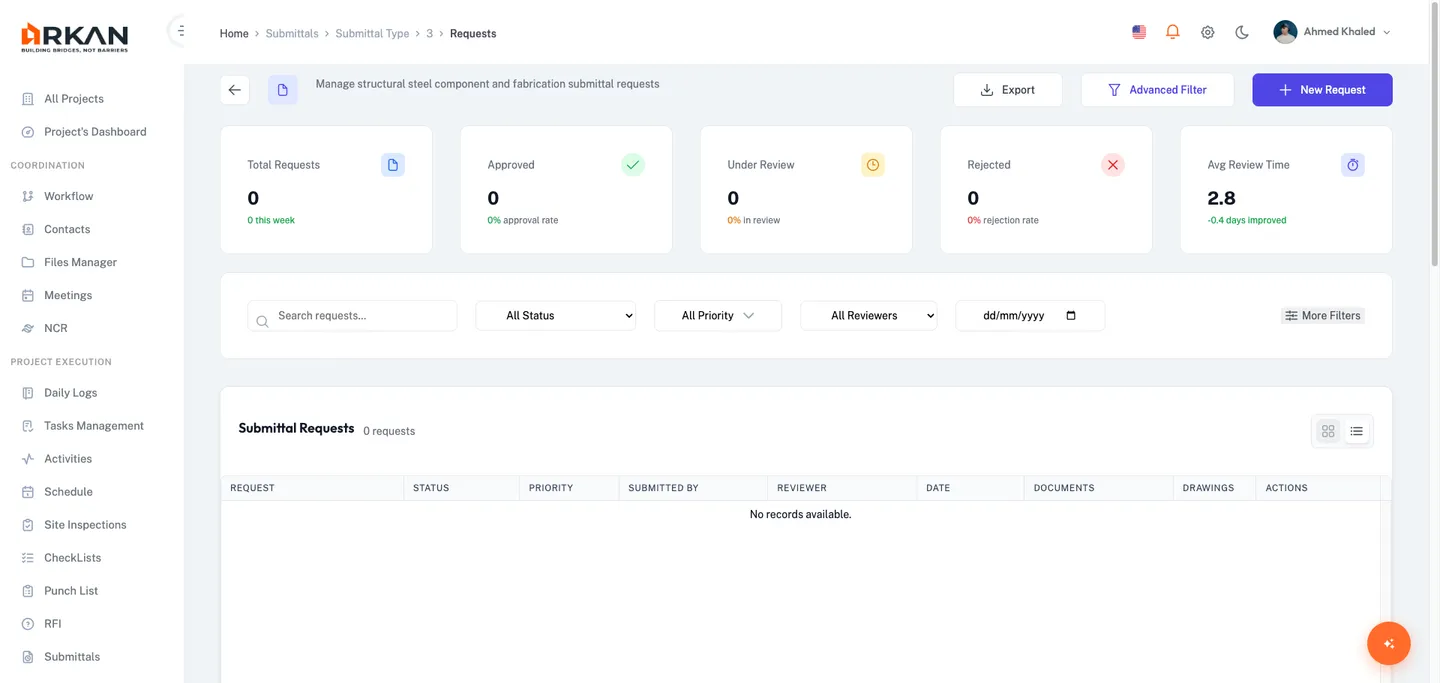
Submittal Document Request
The Document Request page is where you manage individual document submissions and route them through the approval workflow.
Opening a Document Request
- From the Follow-Up Requests grid, click the Request button on an eligible row, or
- From the Submittal Log grid, click an ID link, or click the eye icon in the Actions column.
- The Document Request page opens at
/submittals/SubmittalDocRequest.
Request Information Section
The top section displays read-only request details:
- Request No and Request Date
- Request Initiator and Initiator Company
- Submittal Type and Sub Category
- Initial Submission Date and Expected Approval Date
- Remaining Days indicators (color-coded: green = on track, orange = approaching, red = overdue)
Managing Documents
Adding a Document
- Click the Add New Document button in the Documents section header.
- The document edit dialog opens.
- Fill in the required fields: document type, reference number, priority, issue date, and expiry date.
- Upload the document file.
- Click Save.
- The document appears in the documents grid.
Editing a Document
- Click the Edit button (pencil icon) in the Actions column for the desired document row.
- The document edit dialog opens with pre-filled data.
- Modify the fields as needed.
- Click Save.
Deleting a Document
- Click the Delete button (trash icon) in the Actions column. This button only appears for new (unsaved) documents.
- The document is removed from the grid.
Warning: You can only delete documents that have not yet been saved to the server (document_id = 0). Saved documents cannot be deleted.
Previewing a Document
- Click on any cell in the Document column for a row.
- A preview dialog opens. Images display inline; PDFs render in an iframe; other file types show a download button.
- Click Close to dismiss the preview.
Checklists
Below the documents grid, the Checklists section displays checklists associated with the request. Checklists become available after the request has been saved at least once.
Workflow Actions
- Click Save Draft to save without submitting. A success notification confirms the save.
- Click Send Request to submit into the approval workflow (requires all documents attached and valid workflow status). The page enters read-only mode.
- Click Unlock Request to re-open a locked request (when available and permitted). The request returns to editable state.
When a request is read-only, the Workflow History section displays the complete approval chain with timestamps and user actions.
Submittal Status Reference
Subcategory Status Values
| Code | Status | Color |
|---|---|---|
| 0 | Not Submitted | Default |
| 1 | Completed | Green |
| 2 | Under Process | Yellow |
| 4 | Completed Late | Amber/Red |
| 5 | Not Sent and Late | Red |
| 6 | Not Sent Late Submission | Orange |
| 7 | Under Process Late | Red |
| 8 | Under Process Late Submission | Orange |
| 10 | Completed Manual | Green |
Document Request Status Values
| Status | Color | Description |
|---|---|---|
| Completed | Green | Request fully approved |
| Under Process | Yellow | Request is being reviewed |
| Revision | Purple | Returned for revision |
| Approved | Green | Individual document approved |
| Rejected | Red | Request or document rejected |
| Submitted | Cyan | Request has been submitted for review |
PDF Export
The Submittals module supports generating formatted PDF reports for submittal approval records.
Generating a PDF Report
- Navigate to a submittal record and access its PDF export page at
/submittals/:id/generate-pdf. - The page loads the submittal report data and displays a preview.
- Review the Preview section, which shows the report formatted for A4 paper with company logos and signatures.
- Click Download PDF to save the report to your local machine.
- Alternatively, click Generate & Upload PDF to create the PDF and upload it to the server.
- A progress bar shows the upload status with a percentage indicator.
Tip: The report includes client, consultant, and contractor logos and signatures. Ensure these are configured in the project settings for a complete report.
Primavera Integration
The Primavera integration links submittal plans directly to Primavera P6 schedule activities. See Creating a Plan from Primavera above for the step-by-step workflow.
To update approval dates from Primavera, open the Primavera Submittal page for a new plan (Request No = 0) and click Update Approval Dates. The system recalculates dates from the current Primavera schedule.
Tracking Performance
- Navigate to Sidebar > Submittal Types (route:
/submittal-types) for the Metrics Summary panel showing types count, total subcategories, total documents, and on-time vs. late percentages. - Review the Status Chart and Trends Chart below the metrics panel.
- On either dashboard, locate the Days to Close gauge showing average days from submission to approval. Color coding: Green (<80 days), Yellow (80-119), Orange (120-149), Red (150+).
What If...?
What if I cannot see the Submittals Dashboard? Your user role may not have the SubmittalTypesDashboard permission. Contact your administrator to grant Retrieve access.
What if the "Add from Settings" button shows an error? A plan may already exist for this submittal type that is currently under process. You must wait for the existing plan to be completed or cancelled before creating a new one.
What if I cannot see the "Add from Primavera" button on a type card? This button is hidden when the type already has an active settings-based plan under process. Only one plan source (Primavera or Settings) can be active at a time.
What if my submittal shows "Not Sent and Late" status? The planned submission date has passed without a document request being created. Navigate to the Follow-Up Requests grid and click Request to create the document request immediately.
What if the "Send Request" button is disabled? Ensure that: (a) all required documents are attached, (b) the workflow action component is valid, and (c) no other save or send operation is in progress.
What if exported Excel or PDF files are empty? Check that the grid contains data. If filters are active, try clearing them first, then re-export.
What if the Days to Close gauge shows 0? There are no completed submittals with both a submission date and an approval date. The gauge requires at least one completed (or completed late) record to calculate the average.
What if the PDF report is missing logos or signatures? Ensure the client, consultant, and contractor logos and signatures are configured in the project settings. The report pulls these images dynamically.
Next: Inspections
Back to: Help Center