Prerequisites
- You must be logged in to Arkan with a project selected. See Getting Started if needed.
- You need permission to access the Punch List module within your assigned project.
- Locations, companies, and users should be configured in project settings so that dropdowns are populated.
What Is a Punch List?
A punch list is a structured list of defects, incomplete work, or issues discovered during site walkthroughs. Each list contains individual punch items that track a defect from discovery through resolution and closure. The module provides an Overview Dashboard, a Kanban Board, a Reports view with CSV/PDF export, and detailed item views with photos, comments, and activity timelines.
Navigating to the Punch List
Navigation: Sidebar > Design & Site Data > Punch List
The Punch List Overview page opens with KPI summary cards and a grid of all punch lists.
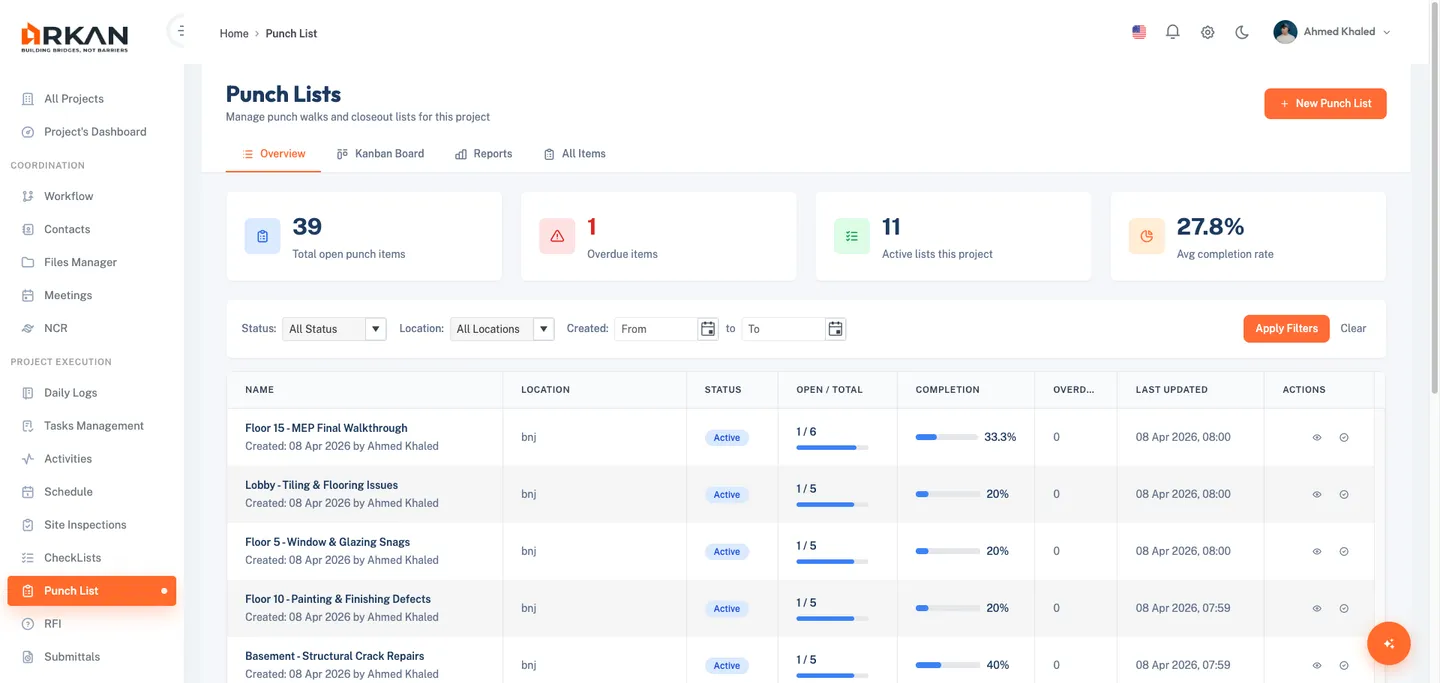
Overview Dashboard
Navigation Tabs
Four tabs at the top switch between views: Overview (default, KPI cards and grid), Kanban Board (drag-and-drop columns), Reports (summary analytics and export), and All Items (flat list of every punch item).
KPI Summary Cards
| Card | Color | Description |
|---|---|---|
| Total Open Items | Blue | Items not yet closed |
| Overdue Items | Red | Items past their due date |
| Active Lists | Green | Punch lists with Active status |
| Avg Completion Rate | Orange | Average completion percentage across all lists |
Filtering the Grid
- Select a Status from the dropdown (Active or Closed).
- Select a Location from the dropdown (type to search).
- Set Created Date From and/or Created Date To using date pickers.
- Click Apply Filters.
The grid shows only matching punch lists. Active filters appear as chip badges below the filter bar.
- Remove a single filter by clicking X on the chip.
- Click Clear to reset all filters.
Punch List Grid
The grid displays: Title, Location, Status (Active/Closed badge), Total Items, Open / In Progress, Overdue, Completion % (progress bar), Created By, Created Date, and Actions (View, Close, or Reopen). Pagination controls appear at the bottom.
Creating a Punch List
- On the overview page, click New Punch List in the top-right corner.
- Enter a Title (required).
- Optionally enter a Description.
- Optionally select a Location from the dropdown.
- Click Save.
The new punch list appears in the grid with Active status.
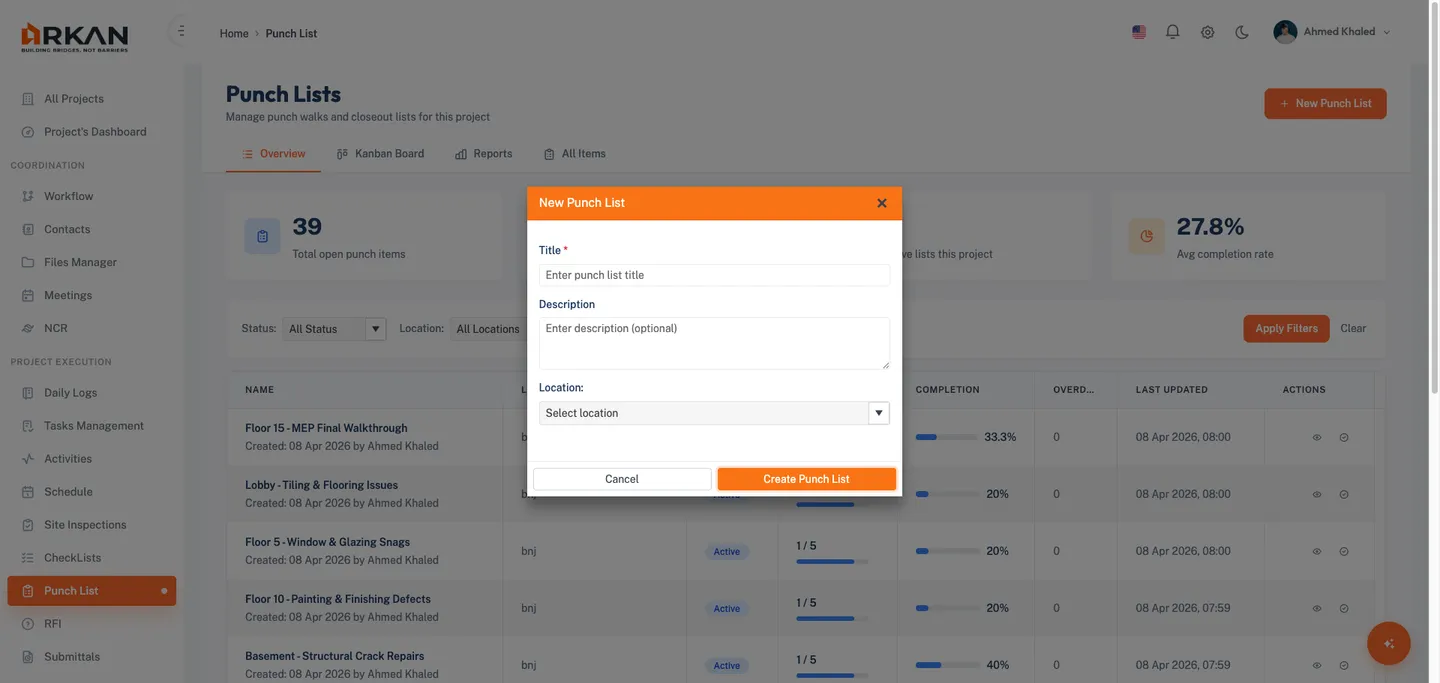
Tip: Use descriptive titles referencing the building area or inspection type (e.g., "Floor 3 - MEP Finishing Defects").
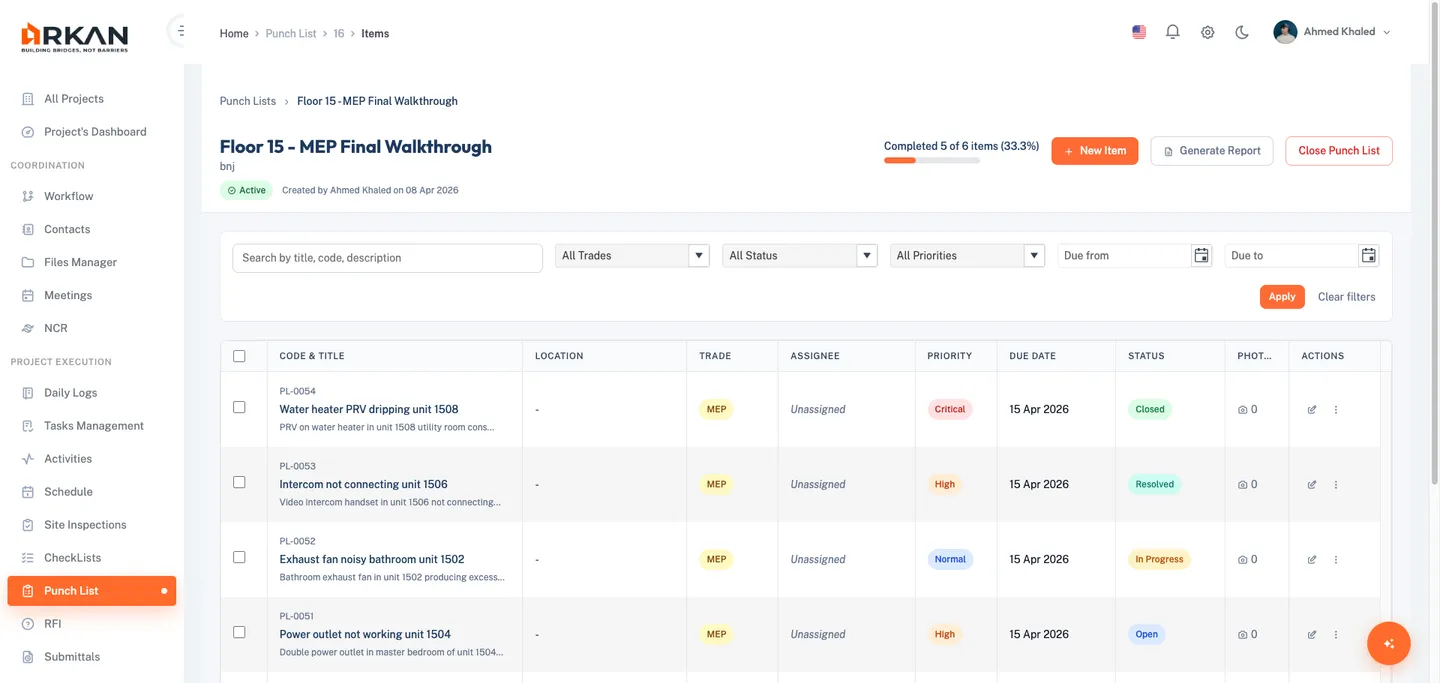
Viewing Punch List Items
- Click a punch list Title or View action in the grid.
The items view opens for that list.

The header shows a breadcrumb, the list name, location, Status badge, created-by info, and a completion progress bar. Action buttons include New Item, Generate Report, and Close Punch List.
Filtering Items
- Type in Search to filter by title, reference number, or description.
- Select a Trade (Finishing, MEP, Aluminum, HVAC, Structure, Other).
- Select a Status (Open, In Progress, Ready for Review, Closed, Void, Draft).
- Select a Priority (Low, Normal, High, Critical).
- Set a Due Date From and/or Due Date To.
- Click Apply. Click Clear Filters to reset.
Active filters appear as removable chip badges.
The grid columns include: Ref No, Title, Status, Priority, Assignee, Trade, Due Date (red if overdue), Company, and Actions (View, Edit, Delete).
Creating a Punch Item
- From the items view, click New Item.
A modal dialog opens titled "New Punch Item".
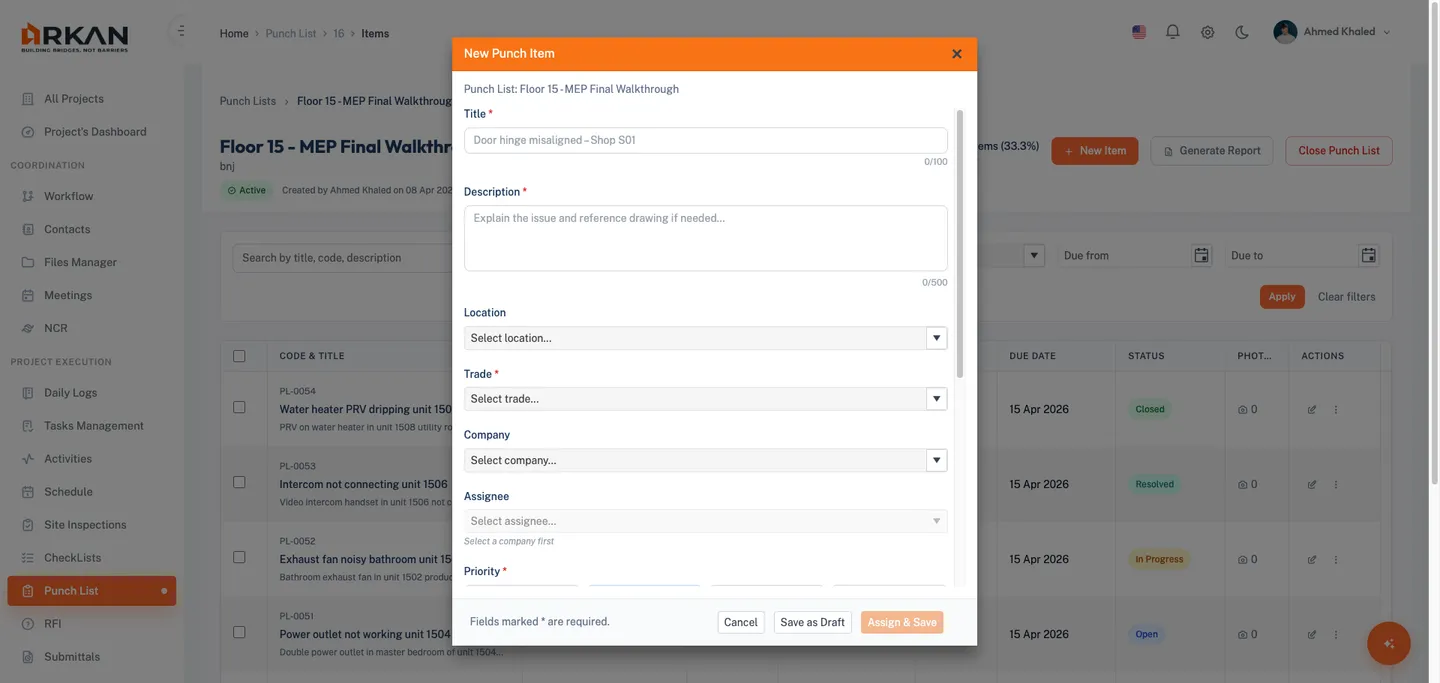
- Enter a Title (required, max 100 characters -- counter shown).
- Enter a Description (required, max 500 characters -- counter shown).
- Optionally select a Location (type to filter).
- Select a Trade (required): Finishing, MEP, Aluminum, HVAC, Structure, or Other.
- Optionally select a Company (type to filter).
- Optionally select an Assignee -- enabled only after a company is selected; shows users from that company.
- Select a Priority (required) via button group: Low, Normal, High, Critical. Default: Normal.
- Set a Due Date (required). Quick-select chips: Today, Tomorrow, 3 Days, 1 Week.
- Optionally select a Type/Category.
- Optionally attach Photos via the camera icon (images only, max 10 MB each).
- Optionally select Estimated Effort: 1 hour, Half day, 1 day, or Custom (enter your own).
- Click Save Item.
A success notification shows the new reference number. The item appears in the grid with Open status.
Tip: Click Save as Draft if you are not ready to complete all required fields. Drafts can be finished later. Saving a completed draft via Save Item automatically changes its status to Open.
Warning: The Assignee dropdown is disabled until you select a Company first.
Editing a Punch Item
- Click Edit in the items grid or from the detail view header.
- Modify any fields in the pre-populated modal dialog.
- Click Save Item.
A success notification confirms the update.
Punch Item Detail View
- Click an item Title or the View action in the grid.
The detail page opens showing all item information.
Header
Displays a back button, reference number, title, status badge, priority badge, created-by info, last updated timestamp, and Edit / Delete buttons.
Status Action Bar
| Current Status | Available Actions |
|---|---|
| Open or Draft | Start Progress |
| In Progress | Ready For Review, Put Back To Open |
| Resolved | Close Item, Put Back To Open |
| Closed or Void | No actions available |
A Reassign button is also available (disabled when Closed or Void).
Punch Information Card
Shows: Title, Trade, Description, Location, Category, Company, Assignee (avatar and name), Priority, Status, and Due Date (red if overdue).
Photos and Attachments
View photos in a gallery grid. Filter by All, Photos, or Documents. Click a thumbnail for full-size preview. Upload new photos directly. Each photo shows file name, upload date, and uploader.
Comments
Type a comment and click Post. Comments display author name, timestamp, and text in chronological order.
Activity Timeline
Shows each status transition with the user name, date/time, and any associated comment.
Status Workflow
  Draft --------+
                v
  Open --> In Progress --> Resolved --> Closed
                ^               |
                +-- Put Back ---+
| Status | Description |
|---|---|
| Draft | Created but not finalized; required fields may be incomplete |
| Open | Identified and ready to be worked on |
| In Progress | Work has started on the defect |
| Resolved | Work complete, ready for review/inspection |
| Closed | Verified and accepted as resolved |
| Void | Created in error or no longer applicable |
To transition status, open the detail page and click the appropriate button in the Status Action Bar. The timeline records each change.
Warning: Once Closed, an item cannot be reopened. Verify the defect is fully resolved before closing.
Priority Levels
| Priority | Color | When to Use |
|---|---|---|
| Low | Gray | Cosmetic issues not affecting functionality |
| Normal | Blue | Standard defects for normal workflow |
| High | Orange | Issues impacting progress or quality |
| Critical | Red | Safety hazards or blockers requiring immediate action |
Reassigning a Punch Item
- Open the item detail page.
- Click Reassign in the status action bar.
- Select a new Company.
- Select a new Assignee (filtered by company).
- Click Save.
The item is reassigned and the detail page refreshes.
Tip: Reassignment is useful when responsibility shifts between subcontractors.
Kanban Board
Navigation: Sidebar > Design & Site Data > Punch List > Kanban Board tab.
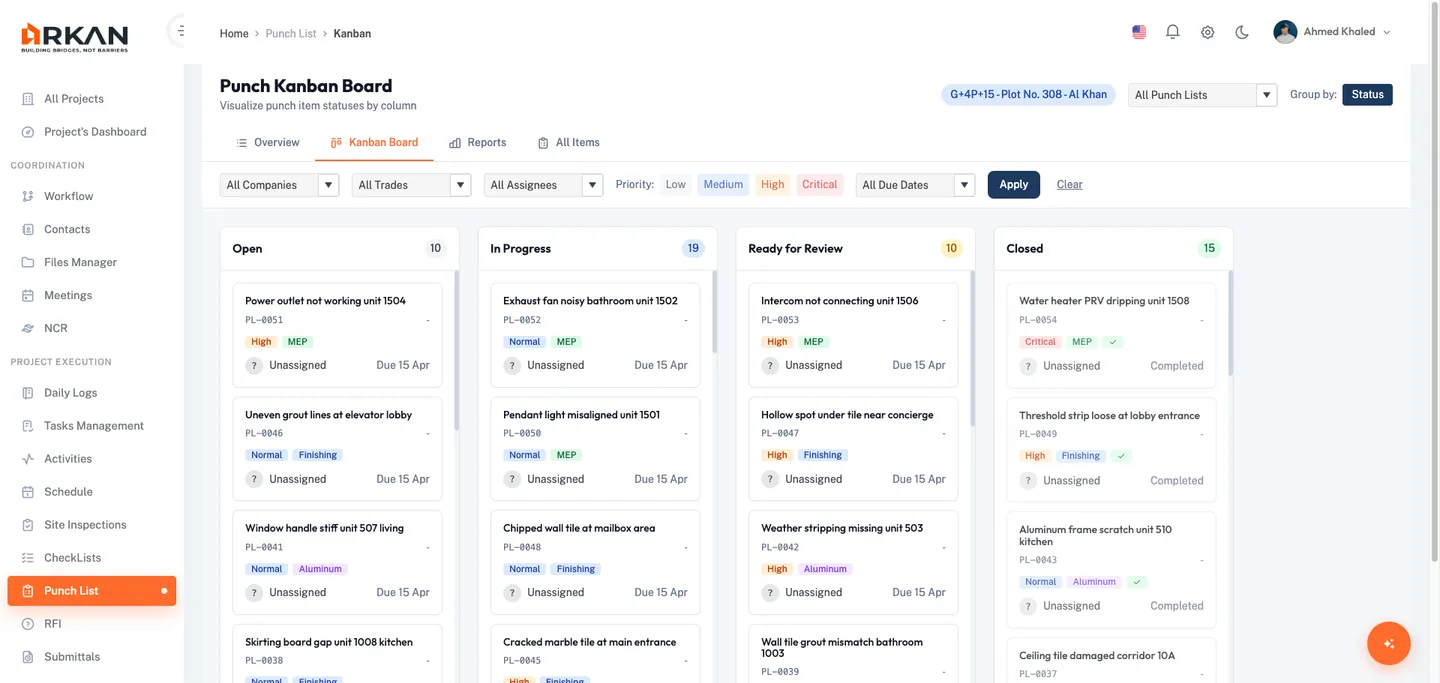
Four columns represent statuses: Open, In Progress, Ready for Review, and Closed. Each column header shows an item count badge.
Cards
Each card displays: reference number, title, trade badge, priority indicator, due date (red if overdue), assignee, company, location, category, and a photos indicator.
Drag-and-Drop
- Click and hold a card.
- Drag it to the target column.
- Release.
The status updates automatically. If the update fails, the card reverts to its original column.
Kanban Filters
- Punch List dropdown -- filter by specific list
- Company dropdown -- filter by company
- Trade dropdown -- filter by trade
- Assignee dropdown -- filter by user
- Priority toggle buttons -- select multiple priorities simultaneously
- Due Date filter -- Overdue Only or Due This Week
Click Clear to reset all filters. Click any card to open its detail page.
Reports
Navigation: Sidebar > Design & Site Data > Punch List > Reports tab.
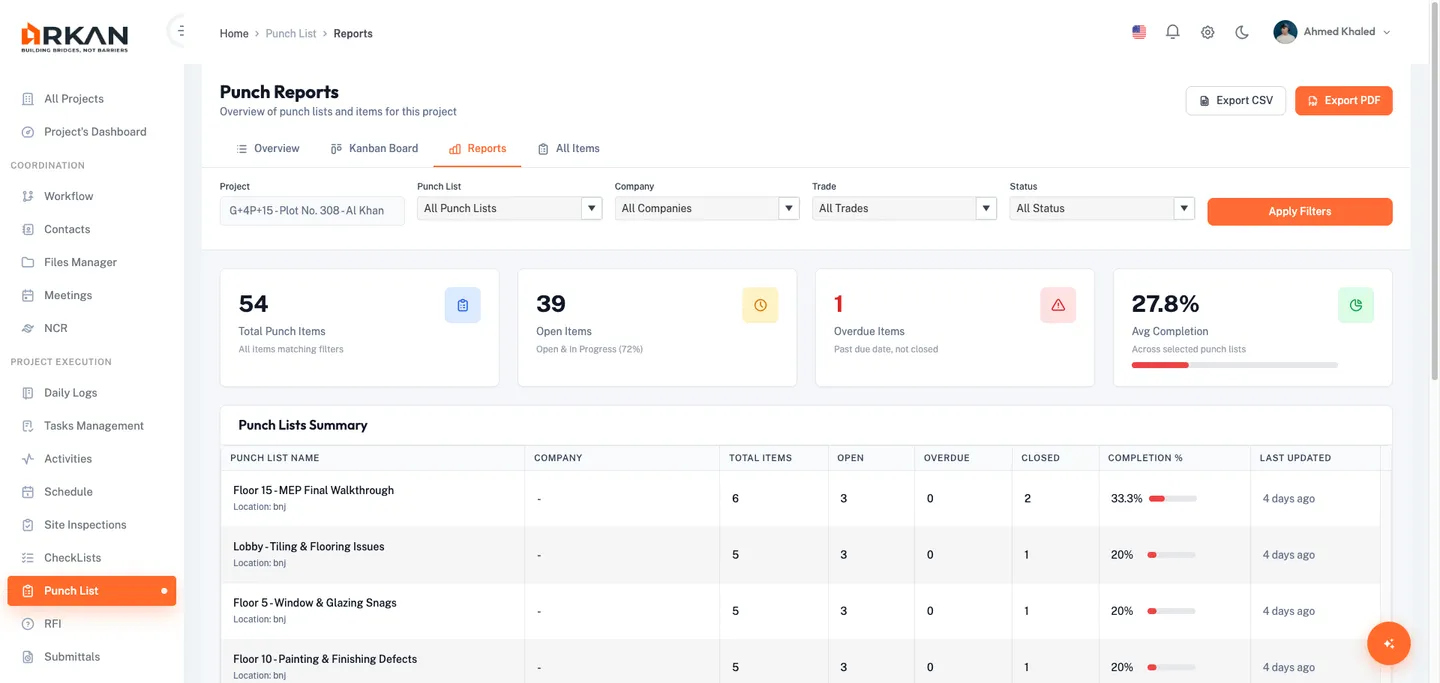
Report KPIs
Four summary metrics: Total Punch Items, Open Items (count and percentage), Overdue Items, and Avg Completion.
Report Filters
Filter by Punch List, Company, Trade, and Status. Click Apply to update. Active filters appear as removable chips; click Clear All to reset.
Summary and Detail Tables
The summary table shows each punch list with Title, Location, Total Items, Open, Overdue, Closed, and Completion %. Click a row to focus the detailed table on that list.
Click Show Detailed Items to expand the items table showing Ref No, Title, Punch List, Location, Trade, Assignee, Company, Priority, Status, Due Date, Effort, and Created Date.
Exporting
- Export CSV -- downloads a CSV with both summary and item details.
- Export PDF -- downloads a formatted PDF report with KPIs, summary table, and item details.
Tip: Apply filters before exporting to generate a focused report for a specific trade, company, or punch list.
Closing a Punch List
- Open the punch list's items view.
- Click Close Punch List in the header.
- Confirm in the dialog.
The status changes to Closed.
Warning: Verify all items are properly resolved before closing a punch list.
To reopen: find the closed list in the overview grid and click Reopen.
Deleting a Punch Item
- Open the item detail page and click Delete.
- Confirm in the dialog.
The item is permanently removed and you return to the items list.
Warning: Deletion is permanent. Consider using Void status instead to preserve a record.
Troubleshooting
I cannot see any punch lists
- Verify a project is selected (check the sidebar header).
- Confirm you have Punch List module permissions. Contact your administrator if needed.
- Click Clear to reset filters.
The Assignee dropdown is disabled
- Select a Company first. The Assignee dropdown enables only after a company is chosen and shows users from that company.
My item does not appear on the Kanban Board
- The board shows only Open, In Progress, Resolved, and Closed items. Draft and Void items are excluded.
- Reset Kanban filters by clicking Clear.
I cannot close a punch item
- Items can only be closed from Resolved status. Move the item to Resolved first, then close it.
Photo upload fails
- Only image formats are accepted (JPG, PNG, GIF, BMP, WebP, SVG).
- Maximum file size is 10 MB per photo.
I saved a draft but cannot find it
- Filter by Status: Draft in the items list or the All Items tab to locate drafts.
Next: Schedule & Primavera
Back to: Help Center