Prerequisites
- You must be logged in to Arkan with an active user account
- A project must be selected (see Getting Started)
- You need task-related permissions assigned by your administrator
- Familiarity with your project's locations and team members is helpful
Overview
The Tasks module is your central hub for managing day-to-day work items across a project. You can create tasks, assign them to team members, track progress through status transitions, and link tasks to other project items such as RFIs, submittals, inspections, drawings, and schedule activities.
Navigation: Sidebar > Tasks Management
The module provides four views, each accessible via tabs at the top of the page:
| View | Description |
|---|---|
| Task List | Full-featured data grid with sorting, filtering, pagination, and bulk actions |
| Daily Execution | Card-based view organized by urgency tabs (Today, Ready, Blocked, Overdue) |
| Calendar | Month/week/day calendar with color-coded task events by priority |
| Kanban Board | Drag-and-drop board with columns for each task status |
Task Statuses and Priorities
Every task has a status and a priority. Statuses are: Draft, Assigned, Ready, In Progress, On Hold, Completed, Overdue, and Cancelled. Priority levels are Low (gray), Medium (yellow), High (orange), and Critical (red). Both are shown as color-coded badges throughout all views.
Creating a Task
You can create a new task from any of the four views.
- Click the New Task button in the top-right header area.
The Create Task dialog opens.
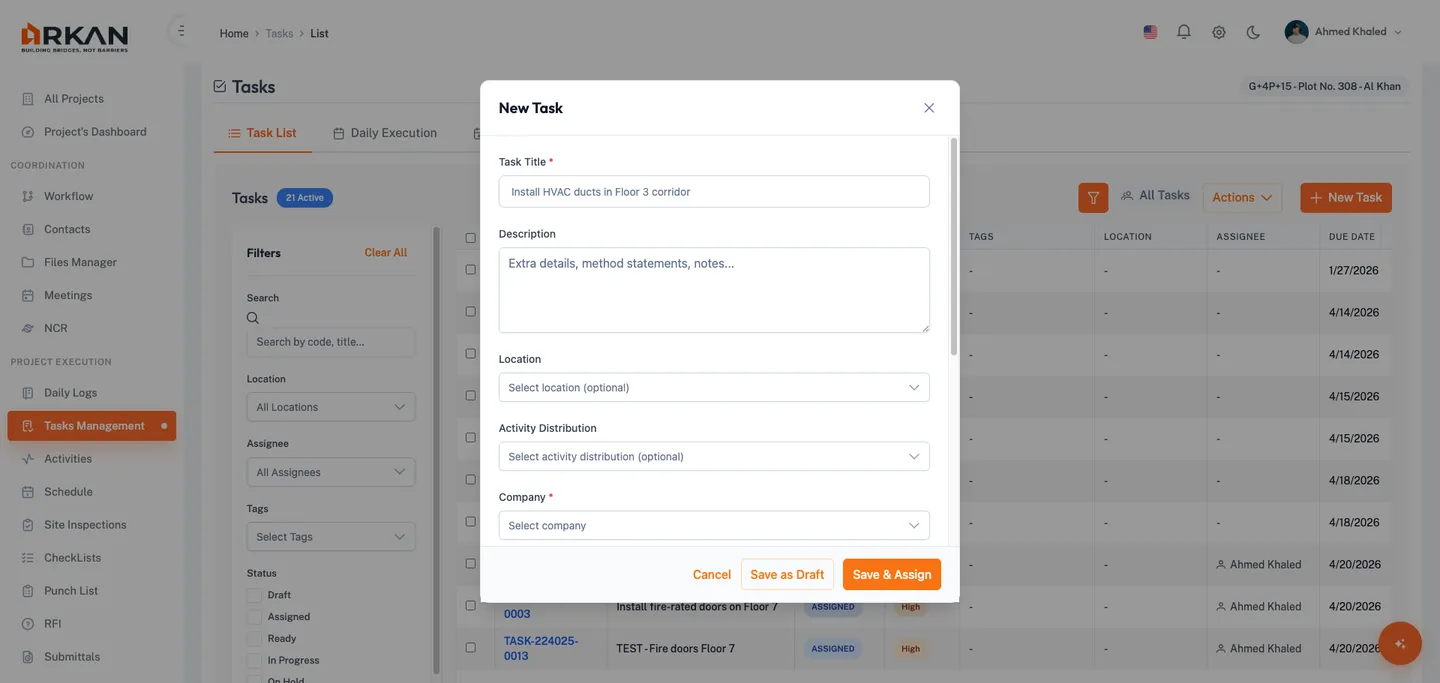
- Enter a Task Title (required, up to 500 characters).
- Optionally enter a Description in the text area.
- Select a Location from the dropdown. Use the built-in filter to search by name.
- Optionally select an Activity Distribution from the dropdown.
- Select an Assignee from the dropdown (required). Use the filter to search by name.
When you select an assignee, the Company and Role fields auto-populate with the assignee's company and job title. These fields are read-only.
- Optionally add Tags using the multi-select dropdown. Tags appear as colored chips.
- Select a Priority level by clicking one of the four buttons: Low, Medium, High, or Critical (required).
- Select a Start Date using the date picker (required, format: dd/mm/yy).
- Select a Due Date using the date picker (required, format: dd/mm/yy). The due date must be on or after the start date.
Tip: Expand the Integrations section at the bottom of the form to optionally link a RFI, Submittal, Inspection, Drawing, Activity / Schedule, or BOQ Code. All integration fields are optional and improve traceability across modules.
Saving the Task
- Click Save as Draft to create the task in Draft status without assigning it.
- Click Save and Assign to create the task and immediately set it to Assigned status.
The task is created and a success notification confirms the creation.
Warning: Required fields are marked with an asterisk (*). The form will display validation errors if you attempt to save without completing them.
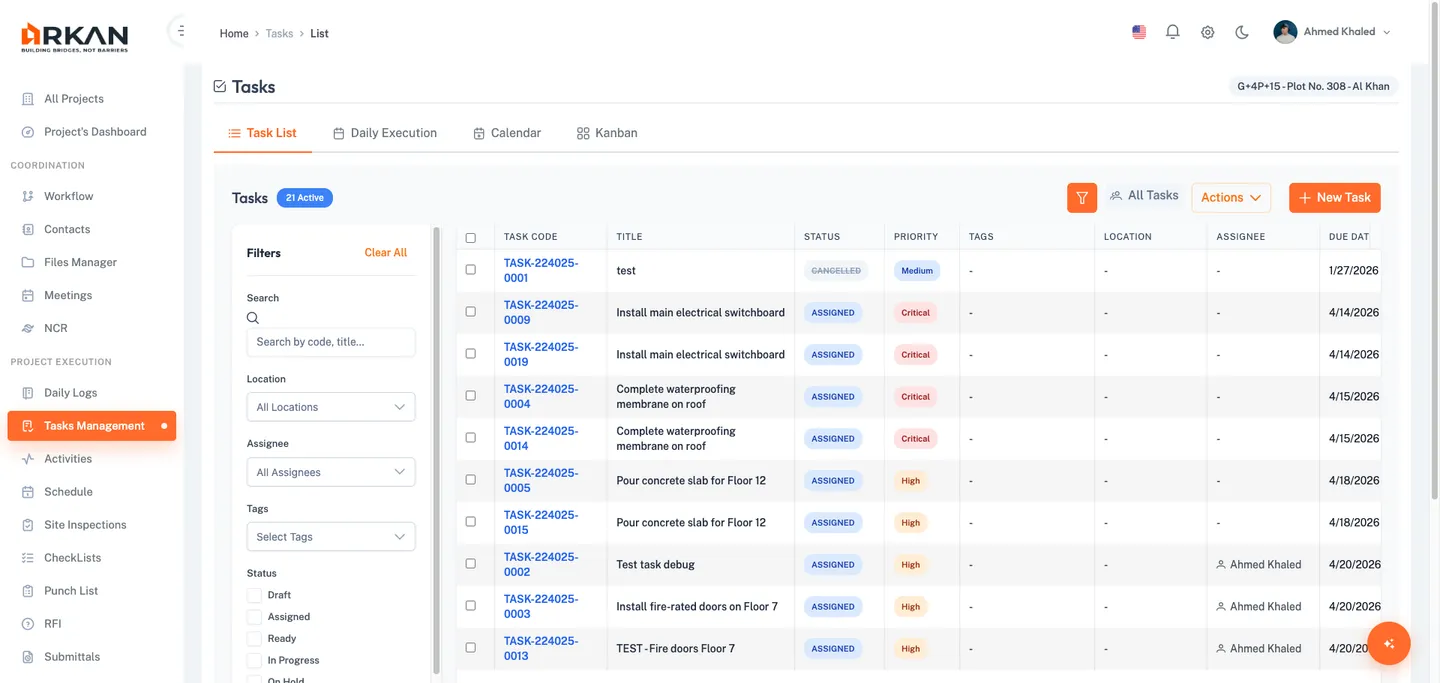
Task List View
The Task List is the default view. It presents all tasks in a sortable, paginated data grid.
Navigation: Sidebar > Tasks Management > Task List tab

Header Controls
- Active Count -- Displays the number of currently active tasks next to the page title.
- Filter Button -- Toggles the filter sidebar. Highlights when filters are active.
- My Tasks / All Tasks Toggle -- Switch between your tasks or all project tasks.
- Actions Dropdown -- Access Refresh, Export Excel, and Export PDF.
- New Task Button -- Opens the Create Task dialog.
Using the Filter Sidebar
- Click the Filter button (funnel icon) to open the filter sidebar.
The filter sidebar slides in on the left side of the grid.
- Use any combination of filters: Search (keywords), Location, Assignee, Tags (multi-select), Status (checkboxes), Priority (checkboxes), Due Date Range (From/To), and Overdue Only (checkbox).
The grid updates automatically as you adjust filters.
- Click Clear All at the top of the sidebar to reset all filters.
Grid Columns
The grid displays: Checkbox (row selection), Task Code (clickable link to detail), Title, Status (color-coded badge), Priority (color-coded badge), Tags (colored chips), Location, Assignee (with user icon), Due Date (red if overdue), Created (date), and Actions.
Row Actions
Each row provides contextual action buttons based on the task's current status:
- View (eye icon) -- Opens the task detail page.
- Edit (pencil icon) -- Opens the Edit Task dialog.
- Start (play icon, green) -- Moves the task to In Progress.
- Complete (check icon, green) -- Marks the task as Completed.
- Put on Hold (pause icon, yellow) -- Pauses the task; prompts for a block reason.
- Resume (play icon, blue) -- Resumes a held task to In Progress.
- Cancel (X icon) -- Cancels the task.
- Delete (trash icon, red) -- Permanently deletes the task after confirmation.
Bulk Actions
- Select multiple tasks using the checkboxes in the grid.
The bulk actions bar appears above the grid showing the count of selected tasks.
- Use the bulk action buttons:
- Assign To -- Reassign all selected tasks to a different team member.
- Change Status -- Change the status of all selected tasks at once.
- Delete -- Delete all selected tasks (with confirmation).

Exporting Tasks
- Click the Actions dropdown in the header.
- Select Export Excel or Export PDF.
The export includes all tasks matching the current filters.
Daily Execution View
The Daily Execution view organizes tasks into urgency-based categories using a card layout, ideal for daily stand-ups and field execution tracking.
Navigation: Sidebar > Tasks Management > Daily Execution tab
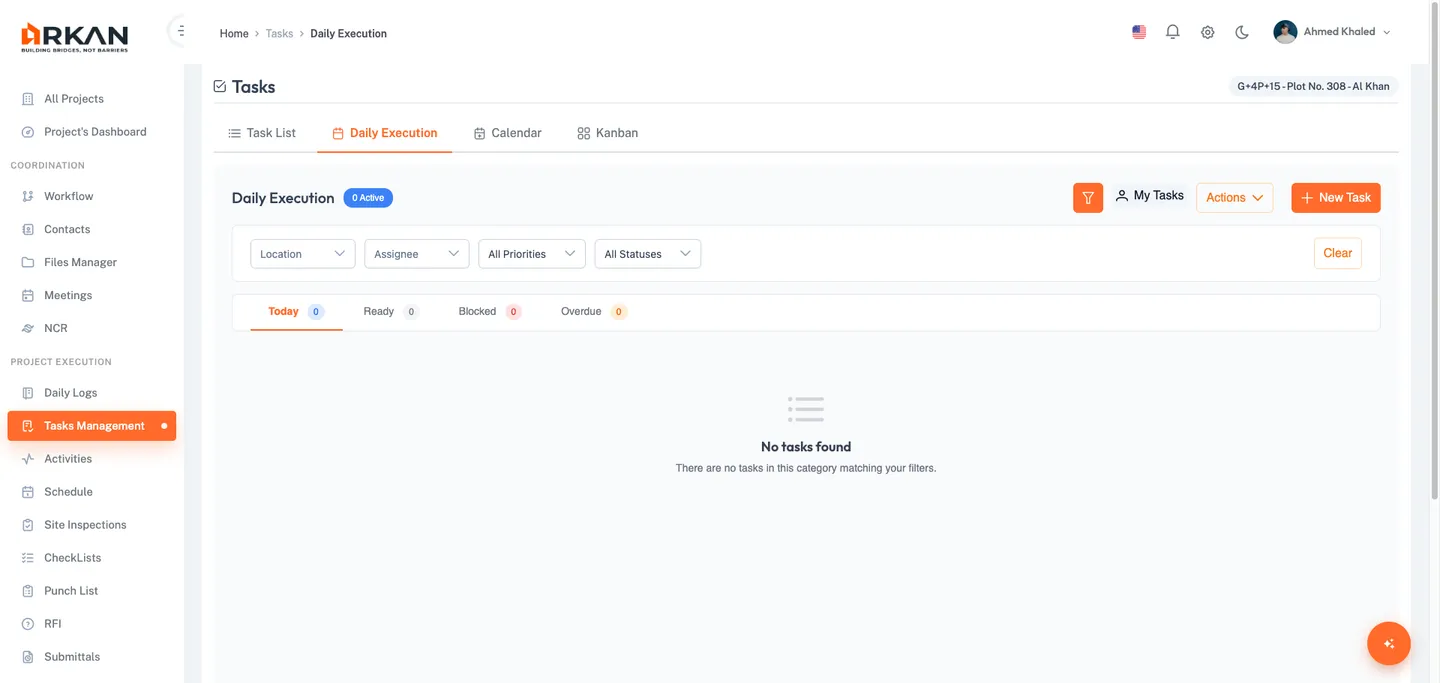
Filter Bar
- Click the Filter button to reveal the inline filter bar with dropdowns for Location, Assignee, Priority, and Status.
- Click Clear to reset all filters. A floating action button (FAB) in the bottom-right corner also allows quick task creation.
Urgency Tabs
The view is organized into four tabs, each showing a count badge:
| Tab | Description |
|---|---|
| Today | Tasks scheduled for today's date |
| Ready | Tasks in Ready status, waiting to be started |
| Blocked | Tasks currently On Hold with a block reason |
| Overdue | Tasks that have passed their due date |
- Click a tab to switch between categories.
The task cards update to show tasks matching the selected category.
Task Cards
Each card displays the Task Code, Priority Badge, Title, Location, Assignee, and Due Date (red if overdue). Quick action buttons on each card allow you to Start, Complete, Pause, Resume, or View Detail depending on the task's current status.
Calendar View
The Calendar view displays tasks as color-coded events on a full-screen calendar.
Navigation: Sidebar > Tasks Management > Calendar tab
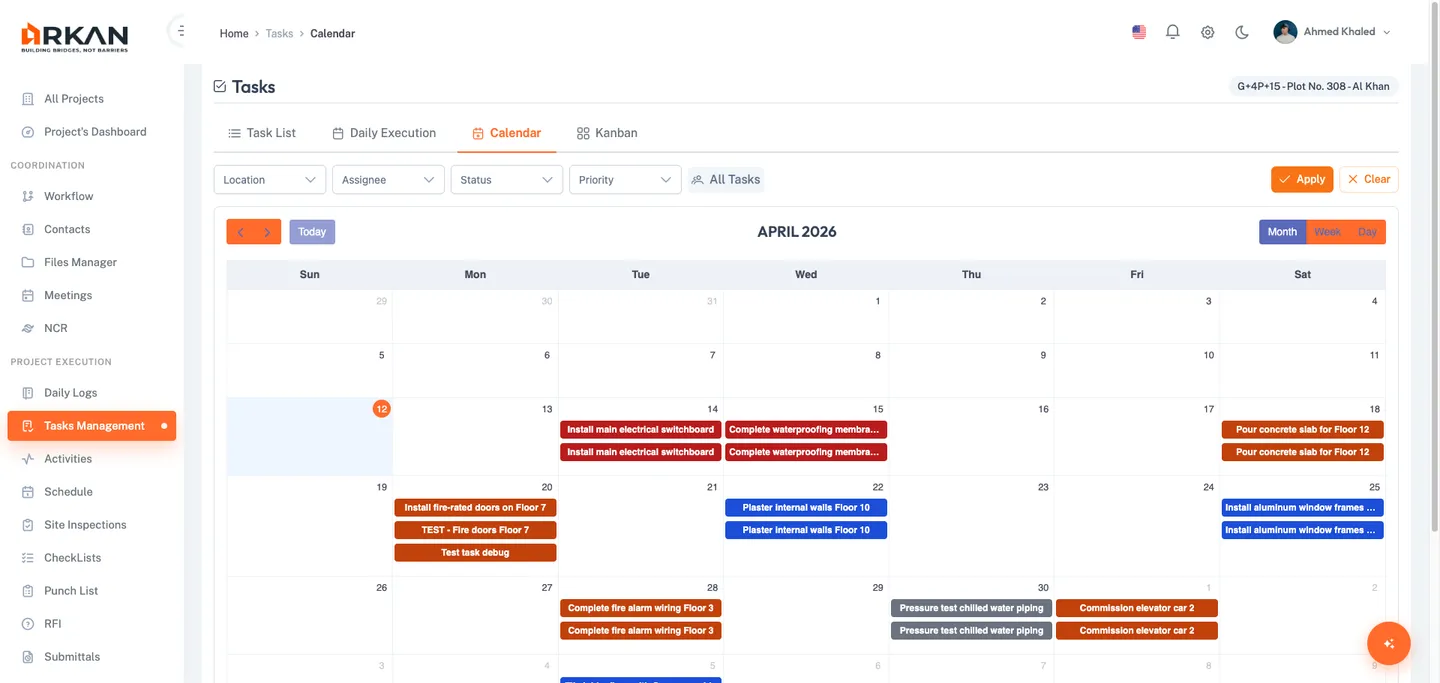
- Use the filter bar dropdowns: Location, Assignee, Status (multi-select), Priority (multi-select), and My Tasks / All Tasks toggle.
- Click Apply to refresh the calendar. Click Clear to reset filters.
- Navigate between months, weeks, or days using the Previous / Next arrows and the view selector buttons. Click Today to return to the current date.
The Priority Legend at the bottom shows the color scheme: Red (Critical), Orange (High), Yellow (Medium), Gray (Low).
Viewing Task Details from Calendar
- Click on any task event on the calendar.
A side panel slides in from the right showing a task summary with Task Code, Title, Status, Priority, Assignee, Location, Due Date, and Description.
- Click View Full Details to navigate to the complete task detail page.
Kanban Board View
The Kanban Board provides a drag-and-drop column layout where each column represents a task status.
Navigation: Sidebar > Tasks Management > Kanban tab
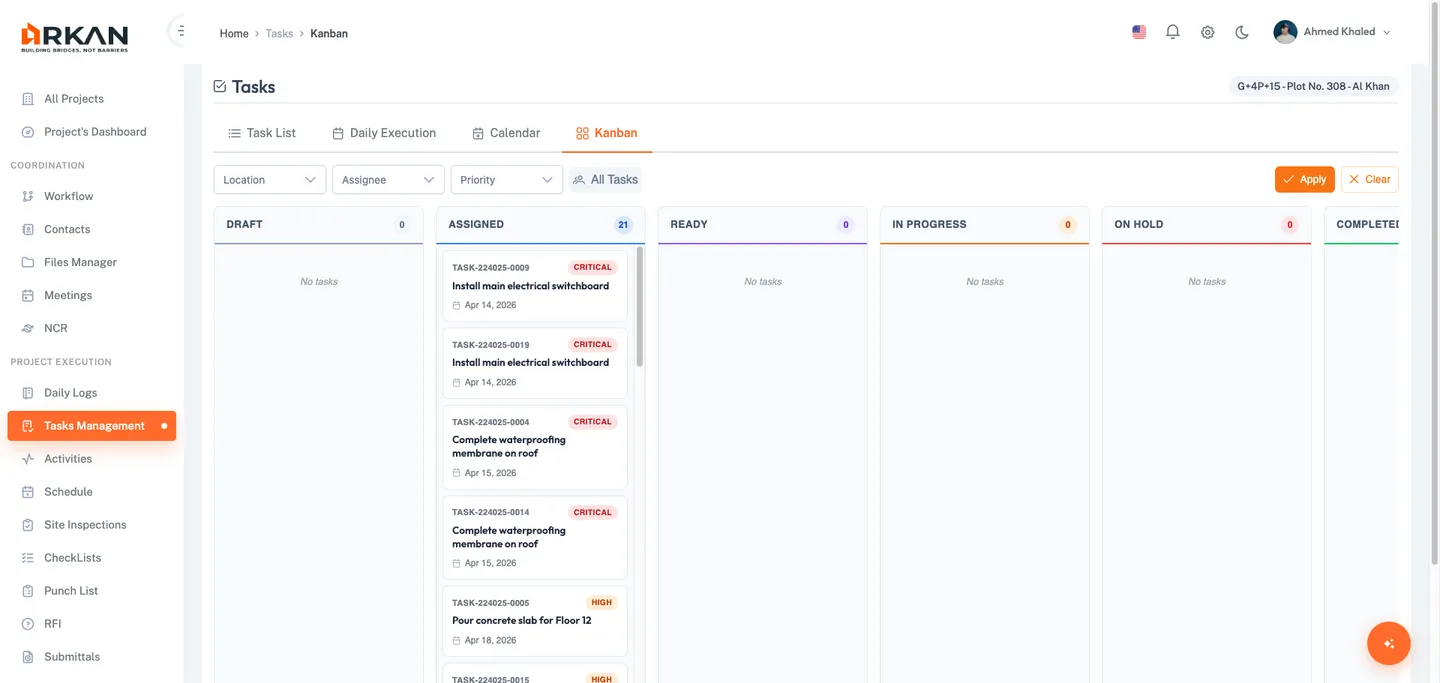
- Use the filter bar dropdowns: Location, Assignee, Priority (multi-select), and My Tasks / All Tasks toggle.
- Click Apply to update the board. Click Clear to reset filters.
The board displays eight columns: Draft, Assigned, Ready, In Progress, On Hold, Completed, Overdue, and Cancelled. Each column header shows the column name and a task count.
Each card shows the Task Code, Priority Badge, Title, Location, Assignee, Due Date, and Integration Badges (RFI, SUB, INSP) for linked items.
Drag-and-Drop Status Updates
- Click and hold a task card in any column.
- Drag the card to the target status column.
- Release the card to drop it into the new column.
The task's status updates automatically. If you drag a task to the On Hold column, a dialog prompts you to enter a block reason.
Tip: Double-click any card on the Kanban board to navigate directly to the task detail page.
Warning: Some status transitions may not be valid. Invalid drops will be rejected and the card will return to its original column.
Task Detail Page
The task detail page provides a comprehensive view of a single task with all metadata, linked items, attachments, comments, checklists, and activity history.
- Navigate here by clicking a Task Code link in the grid, View Detail on a card, or View Full Details from the calendar side panel.
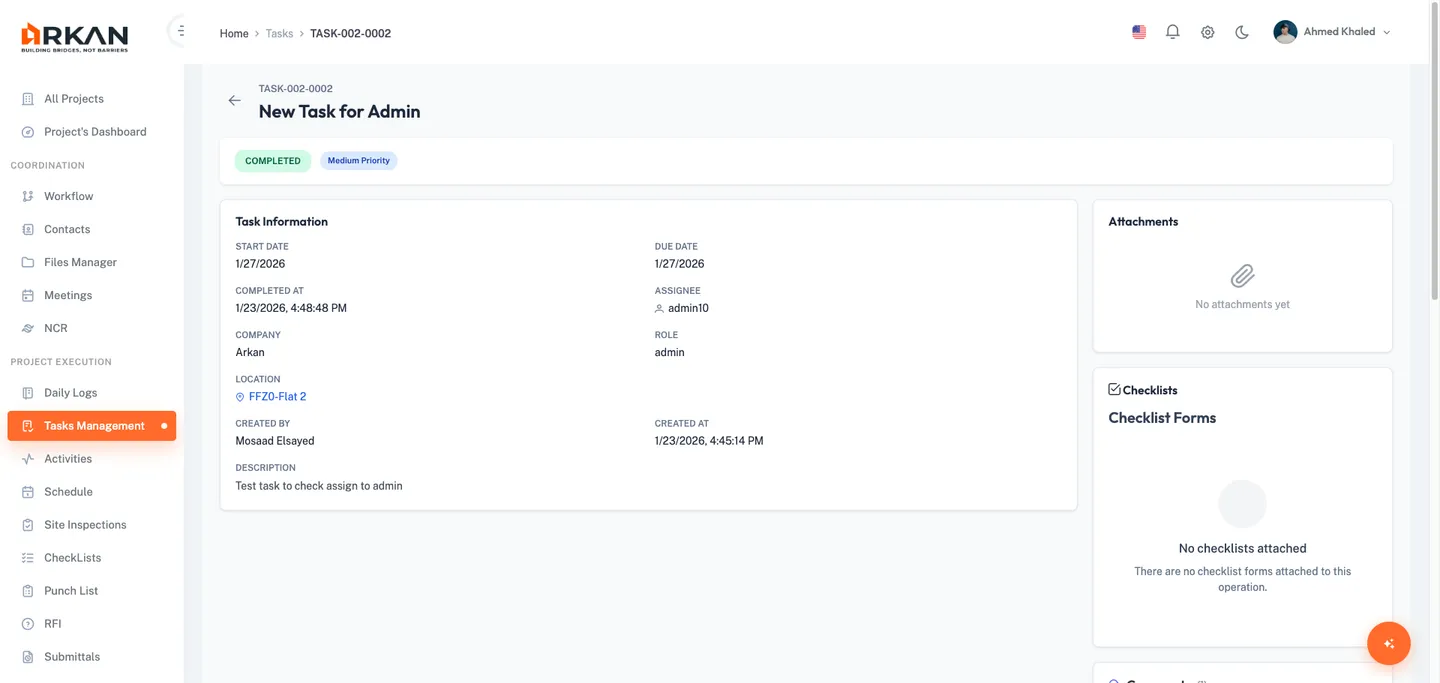
Header and Status Bar
The header shows a Back Button, the Task Code, Task Title, and Edit / Delete buttons. Below it, the status bar displays the Status Badge, Priority Badge, and an Overdue Badge (if applicable). Contextual quick action buttons appear based on the task's status: Assign Task, Start, Complete, Put on Hold, Resume, and Cancel Task.
When a task is On Hold, a prominent banner displays the block reason.
Task Information Panel (Left Column)
Displays: Start Date, Due Date (red if overdue), Completed At, Assignee (with user icon), Company, Role, Location (with map marker link), Activity Distribution, Tags (colored chips), Created By, Created At, and Description (expandable if longer than 200 characters).
Linked Items (Left Column)
If integrations were set, linked item cards appear for: RFI (reference number, subject, status, due date), Submittal (description, status), Inspection (reference number, name, location, status), Drawing (name, sheet number), Activity (code, name), and BOQ Code. Each card has a navigation link to open the related item in its own module.
Attachments Panel (Right Column)
- Click the Upload button to select and upload a file from your device.
The file uploads immediately with a progress spinner. The attachment appears in the list upon completion.
- Click the Download button (download icon) to download an attachment.
- Click the Remove button (trash icon) to delete an attachment after confirmation.
Tip: Image attachments display a thumbnail preview. Other file types show a file-type icon.
Checklists Panel (Right Column)
Attach and manage checklists for the task. See Checklists for detailed instructions.
Comments Panel (Right Column)
- Type your comment in the input area. Use @ to mention a team member.
- Click Post to submit.
The comment appears in the thread with your name and timestamp.
- Click Reply below any comment to open a reply input. Type your reply and click Reply to submit.
- Click Edit on your own comment to modify it, or Delete to remove it.
Tip: You can only edit or delete comments that you authored. Edited comments show an "(edited)" badge.
Activity History Panel (Right Column)
A chronological timeline of all changes: Action Type, Timestamp, User, Status Transition (previous and new status badges), and Notes.
Editing a Task
- Open the task detail page or locate the task in the grid.
- Click the Edit button (pencil icon).
The Edit Task dialog opens with the current values pre-filled.
- Modify any editable fields: Title, Description, Location, Activity Distribution, Assignee, Tags, Priority, Start Date, Due Date, or Integration links.
- Click Save to apply changes or Cancel to discard.
The task updates and a success notification appears.
Putting a Task on Hold
- Click Put on Hold (pause icon) from the task detail page or from a row action in the grid.
The Block Reason dialog opens.
- Enter a Block Reason explaining why the task is being paused (required).
- Click Save to confirm.
The task status changes to On Hold. A block reason banner appears on the task detail page.
- To resume the task later, click Resume on the task detail page or in the grid.
The task returns to In Progress status.
Deleting a Task
- Locate the task in the grid or open its detail page.
- Click the Delete button (trash icon).
A confirmation dialog appears.
- Click Confirm to permanently delete the task, or Cancel to keep it.
Warning: Task deletion is permanent and cannot be undone. Consider cancelling a task instead if you may need to reference it later.
Troubleshooting
| Issue | Possible Cause | Solution |
|---|---|---|
| Tasks are not loading | Network issue or session expired | Refresh the page. If it persists, log out and log back in |
| Cannot create a task | Missing required permissions | Contact your administrator to verify task permissions |
| New Task button not visible | No create permissions for this project | Ask your project administrator to grant task creation rights |
| Drag-and-drop not working on Kanban | Browser compatibility issue | Use Chrome, Firefox, or Edge. Clear your browser cache |
| Filters not returning expected results | Multiple filters active | Click Clear All to reset filters and try again |
| Exported file is empty | No tasks match current filters | Remove filters before exporting |
| Cannot edit or delete a task | Insufficient permissions | Only task creators and administrators can edit/delete. Contact your administrator |
| Block reason dialog does not appear | Dialog failed to load | Refresh the page and try again |
| Attachments fail to upload | File size exceeds server limit | Reduce file size or contact your administrator |
| Calendar events not showing | Filters excluding tasks | Click Clear then Apply to reload all tasks |
| Comments not posting | Network timeout | Check your connection, refresh the page, and try again |
Next: Punch List
Back to: Help Center