Prerequisites
- You must be logged in to Arkan with an active user account
- A project must be selected (see Getting Started)
- You need checklist-related permissions assigned by your administrator
- For executing checklists, an inspection or activity must already exist in the project
Overview
The Checklists module provides a structured system for defining, organizing, and executing quality checklists across your project. It supports five question types, hierarchical categorization through classifications and groups, and result comparison between execution rounds. Checklists can be attached to inspections, site visits, and project activities to enforce quality standards.
Navigation: Sidebar > Checklists
The module is organized into two functional areas accessible via the horizontal menu bar:
| Area | Sub-Pages | Purpose |
|---|---|---|
| Form Settings | Forms, Classification Form, Group Form, Purpose Definitions | Define and organize checklist forms |
| Question Settings | Question Bank, SubCategory Linking, Question Category, Question SubCategory | Manage questions, categories, and their relationships |
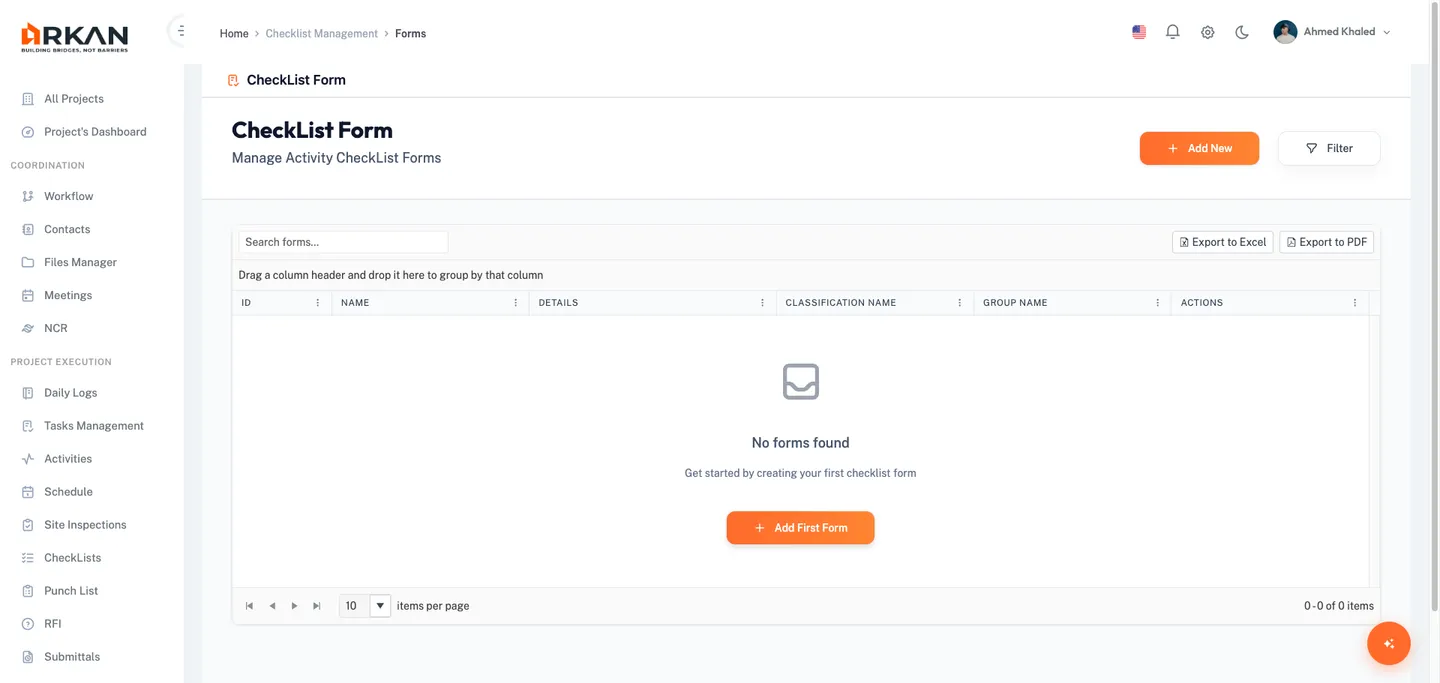
Activity Checklist Forms
The Forms page is the primary entry point for creating and managing checklist forms. Each form groups questions together under a classification and group hierarchy.
Navigation: Sidebar > Checklists > Forms
- Navigate to Sidebar > Checklists.
The Forms list loads as the default view, displaying all checklist forms in a paginated data grid.

Grid Columns
| Column | Description |
|---|---|
| ID | Auto-generated unique identifier |
| Name | The form name |
| Details | Description of the form's purpose |
| Classification Name | The classification category assigned to the form |
| Group Name | The group assigned within the classification |
| Actions | Row action buttons |
Header and Toolbar Controls
- Add New (orange button) -- Opens the dialog to create a new checklist form.
- Filter (outlined button) -- Opens the filter dialog to narrow the list.
- Search -- Type keywords in the search box to filter forms by name.
- Export Excel / Export PDF -- Downloads the current grid data.
- Pagination -- Choose 5, 10, 20, 50, or 100 rows per page.
Row Actions
- Add Questions (purple question mark icon) -- Navigates to the questions management page. Active forms only.
- Show Checklist (orange eye icon) -- Opens a preview dialog showing all linked questions. Active forms only.
- Edit (amber pencil icon) -- Opens the edit dialog with current values pre-filled. Active forms only.
- Delete (red trash icon) -- Soft-deletes the form after confirmation. Active forms only.
- Restore (green refresh icon) -- Restores a previously deleted form. Deleted forms only.
Tip: Use the Filter dialog's Show Deleted checkbox to display soft-deleted forms alongside active ones. Deleted forms appear with a red-tinted background.
Creating a Checklist Form
- Click the Add New button in the header.
The Add Form dialog opens.
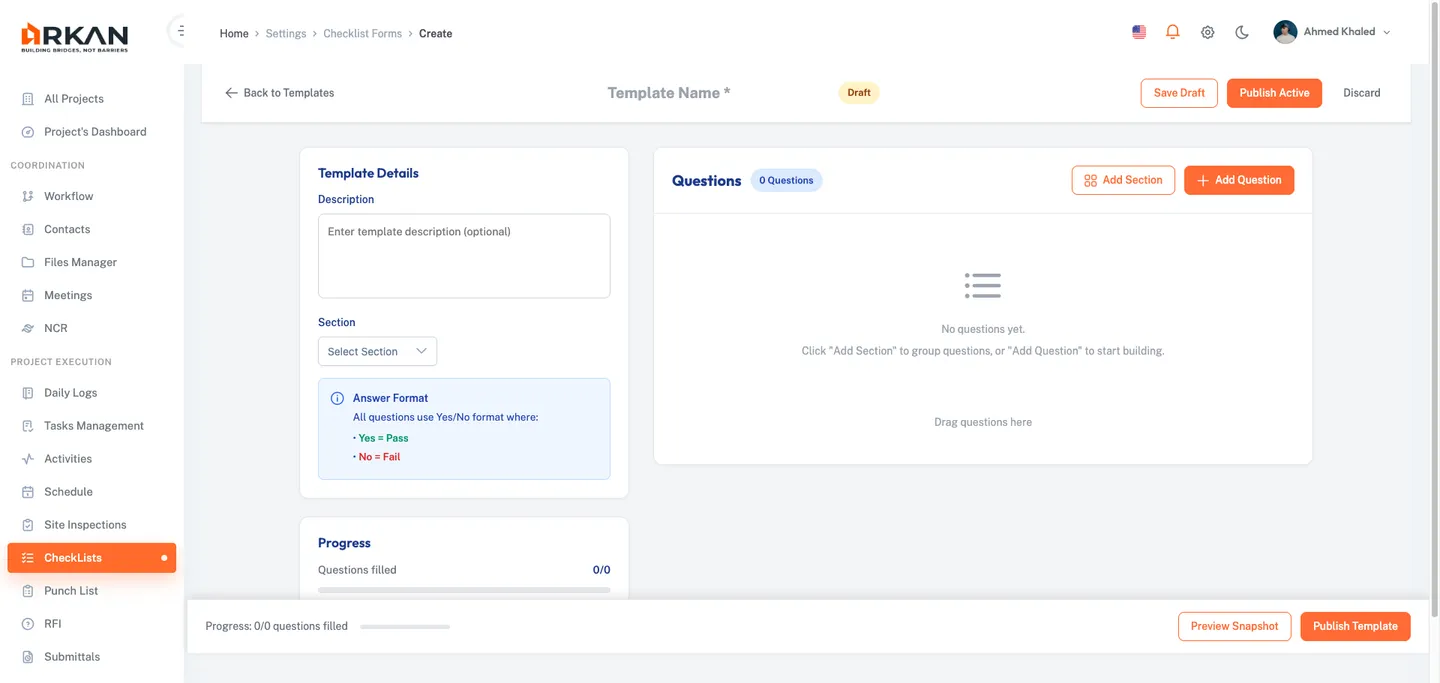
- Select a Classifications Form from the dropdown (optional). Use the built-in search to filter by name.
- Select a Group Form from the dropdown (optional). This dropdown is enabled only after selecting a classification. Groups are filtered based on the selected classification.
- Enter a Form Name (required).
- Enter a Model Description in the text area (required, 4 rows).
- Click Save to create the form, or Cancel to discard.
The form is created and appears in the grid. A success notification confirms the creation.
Warning: Required fields are marked with an asterisk (*). The dialog displays validation errors below each field if you attempt to save without completing them.
Managing Questions on a Form
After creating a form, you link questions from the Question Bank to build the checklist content.
- Locate the form in the Forms grid.
- Click the Add Questions button (purple question mark icon) on the form's row.
The Questions page loads, showing all questions currently linked to this form.

Questions Page Controls
- Back Arrow -- Returns to the Forms list.
- Add Question (blue button) -- Opens the Add Question dialog.
- Filter / Export -- Filter or download the questions list.
- Category and SubCategory dropdowns below the header filter displayed questions.
Questions Grid Columns
| Column | Description |
|---|---|
| ID | Auto-generated identifier |
| Checklist Description | The question text |
| Type | Question type displayed as a colored badge |
| Actions | Edit, Delete, or Restore buttons |
Adding a Question to the Form
- Click the Add Question button.
The Add Question dialog opens.
- Select a Question Category from the dropdown (required).
- Select a Question SubCategory from the dropdown (required, enabled after selecting a category).
- Select a Checklist Question from the dropdown (required, enabled after selecting a subcategory).
- Click Save to link the question to the form.
The question appears in the form's questions grid.
Tip: You can link multiple questions from different categories to the same form. Each question retains its original type and configuration from the Question Bank.
Previewing a Checklist Form
- Locate the form in the Forms grid.
- Click the Show Checklist button (orange eye icon).
A maximizable preview dialog opens showing all linked questions in their execution layout.
- Review the questions. Each displays its input control based on type:
- Boolean -- Yes/No radio buttons
- Multiple Choice (single) -- A filterable dropdown
- Multiple Choice (multi) -- A multi-select with checkboxes
- Numeric -- A number input field
- Text/Notes -- A text area (3 rows)
- Date -- A calendar date picker (dd/mm/yy format)
- Each question also includes an Extra Notes text area for supplementary remarks.
- Click Close to dismiss the preview.
Question Bank
The Question Bank is the central repository for all checklist questions. Questions created here are reusable and can be linked to multiple checklist forms.
Navigation: Sidebar > Checklists > Question Bank
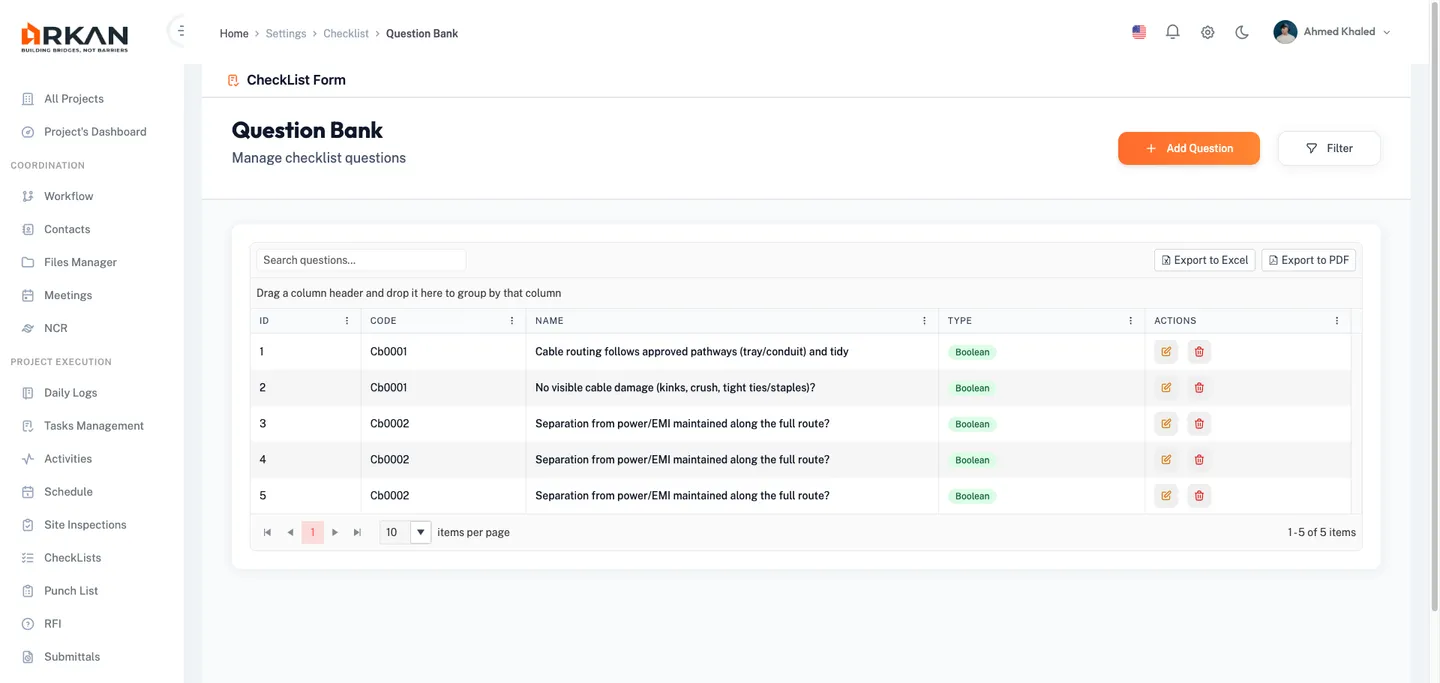
Grid Columns
| Column | Description |
|---|---|
| ID | Auto-generated identifier |
| Code | Unique question code |
| Name | The question text |
| Type | Question type as a colored badge |
| Actions | Edit, Delete, or Restore buttons |
Question Type Badges
| Type | Color | Description |
|---|---|---|
| Boolean | Green | Yes/No questions |
| Multiple Choice | Blue | Single or multi-select from predefined answers |
| Numeric | Purple | Number input with optional maximum validation |
| Text/Notes | Amber | Free-text response |
| Date | Cyan | Date picker response |
Creating a Question
- Click the Add New Question button in the header.
The Add Question dialog opens.

- Select a Category from the dropdown (required).
- Select a SubCategory from the dropdown (required).
- Enter a Code for the question (required, unique identifier).
- Enter a Name for the question (required, displayed during execution).
- Select a CheckList Type from the dropdown (required): Boolean, Multiple Choice, Numeric, Text, or Date.
Additional fields appear based on the selected type.
- If you selected Numeric: optionally enter a Max Numeric Value (0-100).
- If you selected Multiple Choice: select Is Multi Values (Yes or No) to allow single or multiple selections.
- If you selected Multiple Choice: add answer options using the Answers table: a. Click Add above the answers table. b. Enter the Answer text (required) in the dialog that opens. c. Click Save to add the answer. Repeat for each option. d. To remove an answer, click the Delete button (red trash icon) on the answer row.
- Click Save to create the question, or Close to discard.
The question is created and appears in the Question Bank grid.
Filtering Questions
- Click the Filter button in the header.
- Enter a Code, Name, or select a Type from the dropdown.
- Check Show Deleted to include soft-deleted questions.
- Click Apply to update the grid, or Clear to reset all filters.
Executing a Checklist
Checklists are executed in context -- typically from an inspection, site visit, or project activity. Each question is displayed as a card with a gray background.
Question Card Layout
Each question card displays a red asterisk, the question text followed by a question mark, the input control matching the question type, and an Extra Notes text area for additional observations.
Answering Questions by Type
Boolean (Type 1):
- Select either Yes or No using the radio buttons.
Multiple Choice -- Single Select (Type 2, single):
- Click the dropdown, use the filter to search, and select one answer.
The selected answer appears in the dropdown field.
Multiple Choice -- Multi Select (Type 2, multi):
- Click the multi-select dropdown and check one or more answers.
Selected answers appear as chips in the field.
Numeric (Type 3):
- Enter a number in the input field. If a maximum value is configured, the input will not accept values exceeding that limit.
Text/Notes (Type 4):
- Type your response in the text area (4 rows available).
Date (Type 5):
- Click the calendar picker and select a date.
The selected date appears in yy-mm-dd format.
Adding Extra Notes
For any question type, locate the Extra Notes text area below the answer field and type any additional observations (2 rows available).
Comparing Results
When a checklist has been executed multiple times (across different inspection stages or by different users), the system provides a side-by-side comparison view.
The comparison displays for each question:
| Field | Description |
|---|---|
| User | The person who answered the question |
| Job Title | The respondent's job title |
| Company | The respondent's company |
| Answer | The answer provided |
| Differences | Highlighted differences between previous and current answers |
Tip: The comparison view is useful for tracking how responses change between inspection stages and identifying areas where discrepancies occur.
Configuration Pages
The following pages support the organizational structure behind checklists. They are typically configured once during project setup by administrators.
Classification Form
Navigation: Sidebar > Checklists > Classification Form
Classifications provide the top-level grouping for checklist forms. Each classification can have multiple groups assigned to it.
- Click Add New to create a new classification.
- Enter the Code (required) and Description (required).
- Click Save.
Each classification row includes a button to manage its linked groups.
Group Form
Navigation: Sidebar > Checklists > Group Form
Groups are the second-level grouping within a classification.
- Click Add New, enter a Code and Description (both required), and click Save.
Purpose Definitions
Navigation: Sidebar > Checklists > Purpose Definitions
Purpose definitions specify reasons under which checklists are executed (e.g., routine inspection, follow-up visit, final verification).
- Click Add New, enter a Code and Description (both required), and click Save.
SubCategory Linking
Navigation: Sidebar > Checklists > SubCategory Linking
Establishes relationships between question categories and subcategories, determining which questions are available when building forms.
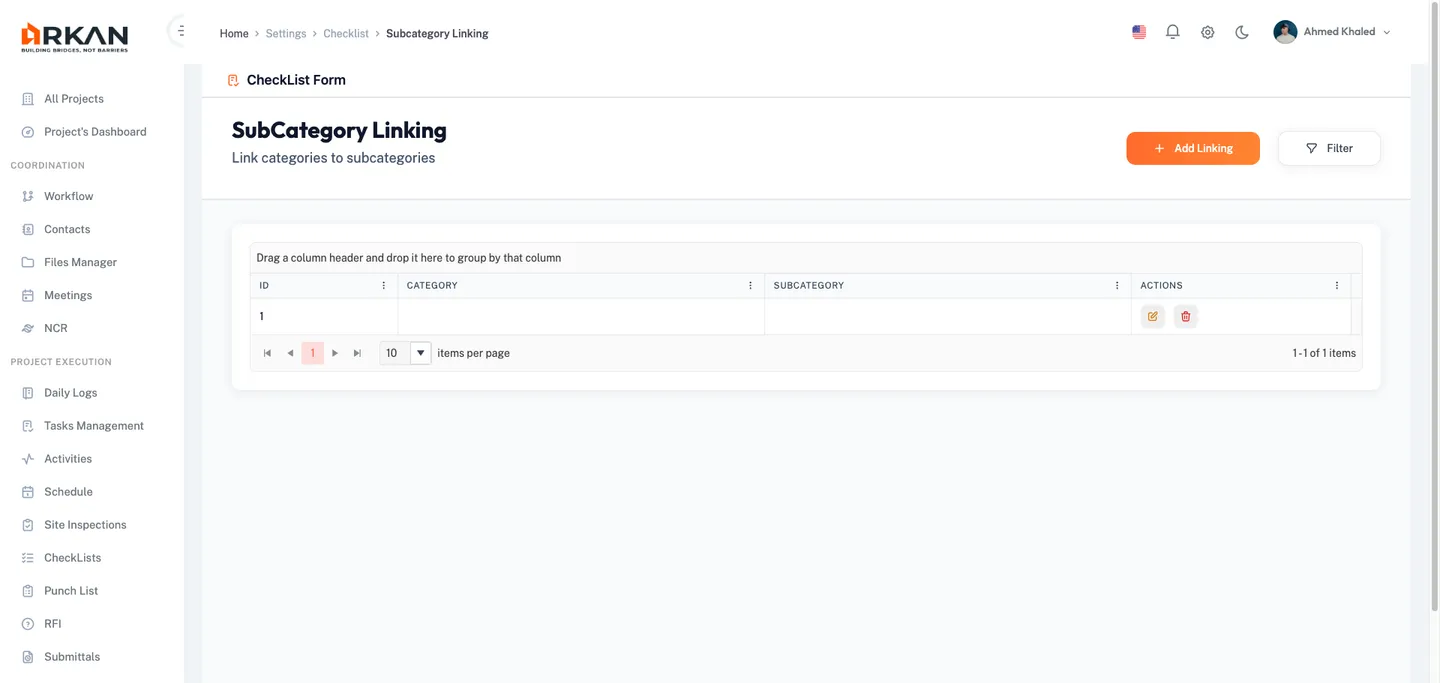
- Click Add Linking to create a new category-subcategory binding.
- Select a Category from the dropdown (required). Click the plus icon to create a new category inline.
- Select one or more SubCategories from the multi-select dropdown (required). Selected subcategories appear as chips. Click the plus icon to create a new subcategory inline.
- Click Save to create the binding.
Question Category and Question SubCategory
Navigation: Sidebar > Checklists > Question Category or Question SubCategory
Manage the lists of question categories and subcategories used to organize questions in the Question Bank. Subcategories are linked to categories via the SubCategory Linking page.
- Click Add New, enter a Code and Description (both required), and click Save.
General Follow-Up Forms
General follow-up forms create checklist-based follow-up records that track ongoing quality assessments. Each follow-up links to a checklist form and records responses along with the follow-up date and reason.
Grid Columns
| Column | Description |
|---|---|
| ID | Auto-generated identifier |
| Name | Name of the follow-up form |
| Notes | Additional notes attached to the follow-up |
| Follow Up Date | The date the follow-up was conducted |
| Actions | Edit, View, and Post buttons |
Row Actions
- Edit (amber pencil icon) -- Opens the edit dialog for an unposted follow-up.
- View (blue eye icon) -- Opens the follow-up in read-only mode.
- Post (green send icon) -- Finalizes the follow-up answers. Available only for unposted records.
Warning: Once a follow-up is posted, its answers become read-only and cannot be modified. Verify all responses before posting.
Filtering Follow-Up Forms
- Click Filter in the header.
- Enter an ID, select a Follow Up Date, or check Show Deleted.
- Click Apply to update the grid, or Clear to reset all filters.
Troubleshooting
| Issue | Possible Cause | Solution |
|---|---|---|
| Forms list is empty | No forms created for this project | Click Add New to create your first checklist form |
| Cannot select a Group Form | No classification selected or no groups linked | Select a Classifications Form first. If still empty, ask your administrator to link groups |
| SubCategory dropdown disabled | No category selected | Select a Category first; the subcategory dropdown activates automatically |
| No questions in preview dialog | No questions linked to the form | Use the Add Questions button and link questions from the Question Bank |
| Question type displays incorrectly | Question type changed after linking | Remove the question from the form and re-add it after updating in the Question Bank |
| Cannot delete a checklist form | Form referenced by active inspections | Complete or archive related inspections before deleting |
| Numeric input rejects values | Maximum value configured on the question | Enter a value within the allowed range (0 to configured maximum) |
| Multiple choice answers missing | Answers not added during question creation | Edit the question in the Question Bank and add options in the Answers table |
| Export file is empty | No records match current filters | Clear all filters and try the export again |
| Cannot restore a deleted form | Insufficient permissions | Contact your administrator to verify checklist management permissions |
| Follow-up cannot be edited | Follow-up has been posted | Posted follow-ups are read-only. Create a new follow-up form if changes are needed |
Next: Workflows
Back to: Help Center