Overview
The Documents & Files module in Arkan provides centralized document management for your project. Through the File Manager, you can organize files into a hierarchical folder structure, upload documents with rich metadata classifications, preview and download files, manage version history, and control access through visibility settings. The module supports three distinct upload types -- Supporting Evidence, Controlled Documents, and Temporary Files -- each with its own metadata requirements and lifecycle rules.
Prerequisites
Before working with documents and files, ensure the following:
- You have logged in and selected a project (see Getting Started)
- Your user role has the FilesManager permission with at least Retrieve access
- For uploading files, you need Insert permission
- For editing or renaming files, you need Update permission
- For deleting files, you need Delete permission
- For exporting or bulk downloading, you need Export permission
File Manager Overview
Navigating to the File Manager
- Navigate to Sidebar > File Manager.
- The system loads the Document Management interface at
/apps/file-manager.
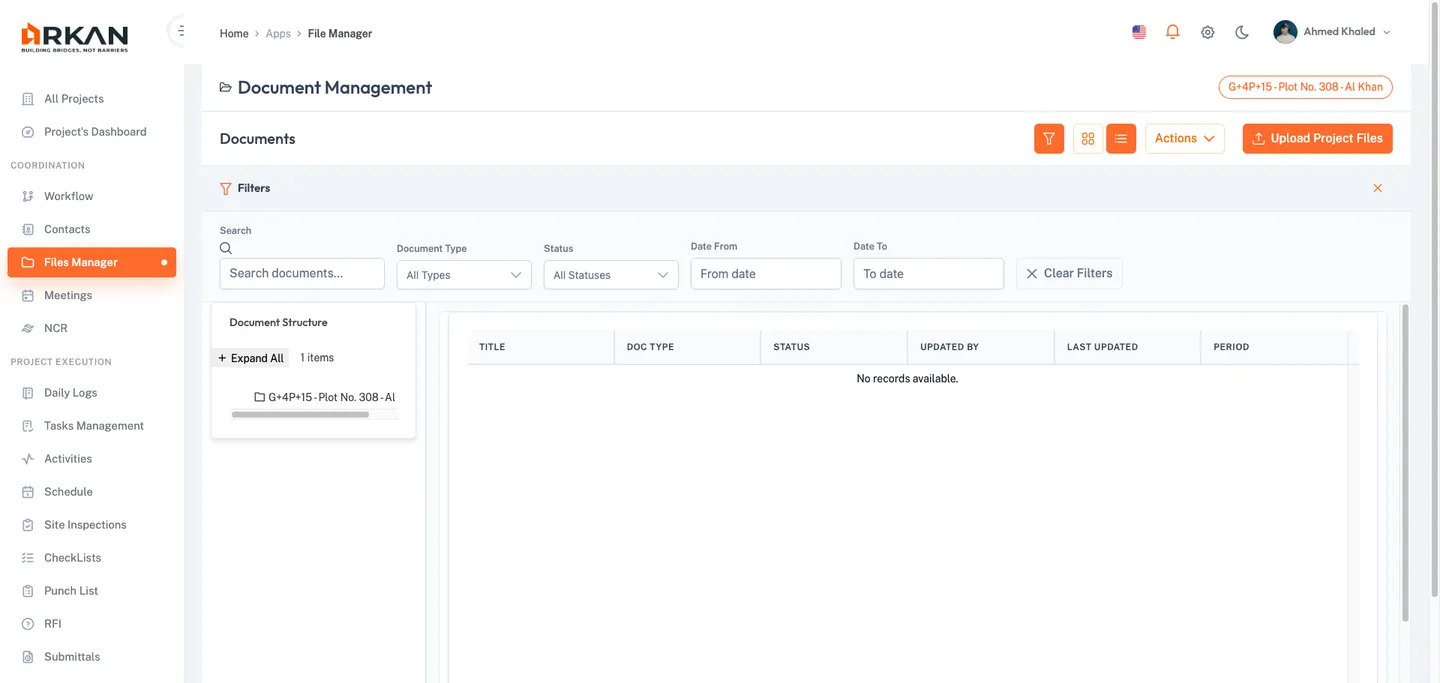
The File Manager displays a three-panel layout with a folder navigation tree on the left, a document grid in the center, and a document preview sidebar on the right.

Tip: If you see an "Access Denied" message with a lock icon, contact your administrator to grant you Retrieve permission for the Files Manager module.
Layout Structure
| Panel | Position | Purpose |
|---|---|---|
| Document Structure | Left | Hierarchical folder tree for navigation |
| Document List | Center | Grid or list of files and subfolders in the selected folder |
| Document Preview | Right | Metadata, actions, and version history for the selected file |
Folder Navigation
The left panel displays your project's folder structure as an expandable tree view.
Browsing Folders
- In the Document Structure panel, click any folder to expand it.
- Click a folder name to load its files in the center panel.
The center panel updates to display files and subfolders. The tree shows an item count next to each folder.
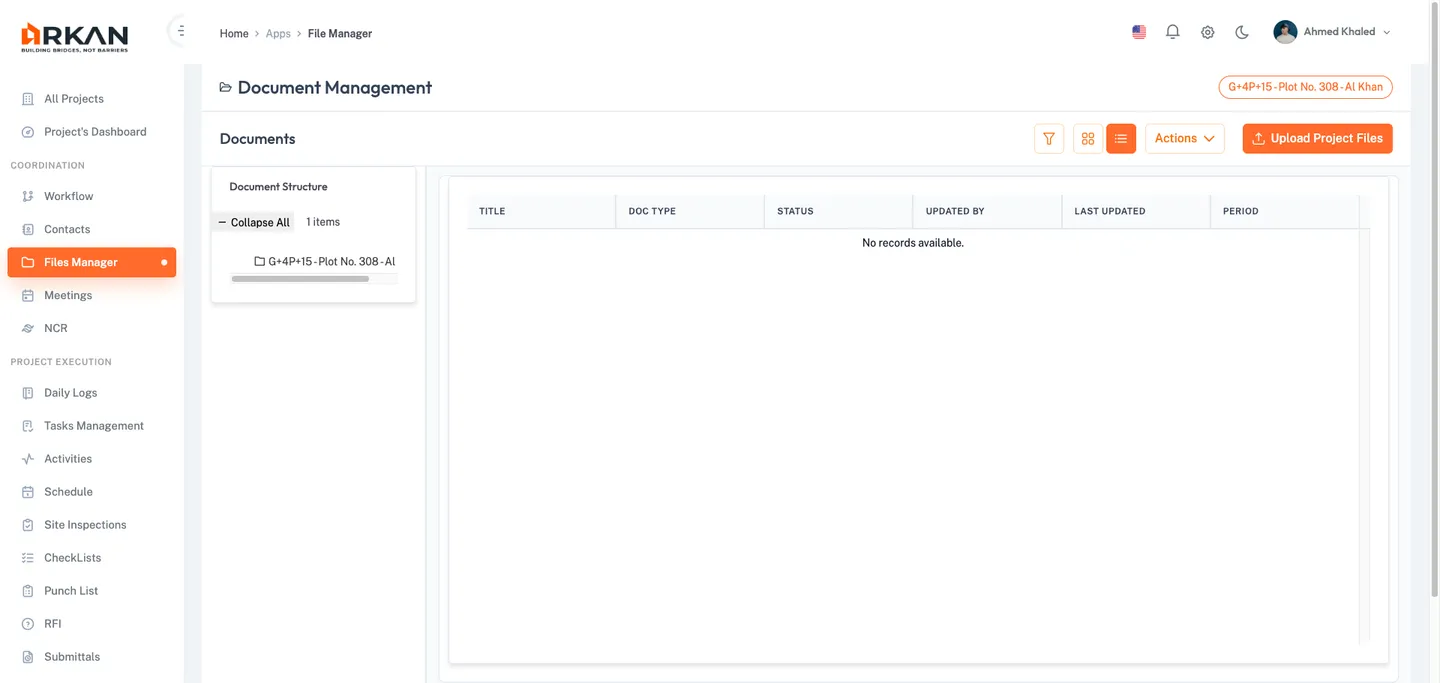
Expanding and Collapsing the Tree
- Click the Expand All button at the top of the tree panel to open all folder nodes.
- Click the Collapse All button to close all folder nodes.
The button label toggles between Expand All and Collapse All.
Creating a New Folder
- Select a parent folder in the tree view by clicking on it.
- Click the New Folder button above the document grid.
- In the New Folder dialog, enter:
- Folder Name (required)
- Folder Code (required)
- Encryption toggle (optional) -- enable for encrypted storage
- Allowed Extensions (optional) -- restrict which file types can be uploaded
- Required Expiry Date toggle (optional) -- forces an expiry date on all files
- Allowed File Size (optional) -- set a maximum file size limit
- Click Submit to create the folder.
The new folder appears in the tree view under the selected parent. A success notification confirms the creation.

Note: The New Folder button is hidden for project-level system folders that do not allow manual subfolder creation.
Drag and Drop Reorganization
- Click and hold a folder node in the tree view.
- Drag it to the desired parent folder.
- Release the mouse button to drop the folder into its new location.
A drag indicator shows whether the drop position is valid.
Warning: Reorganizing folders may affect file paths for documents that reference specific folder locations.
Document Grid
The center panel displays documents and subfolders for the currently selected folder.
Switching View Modes
- Click the Grid View icon (tile layout) or the List View icon (table layout) in the section header to switch between display modes.
The active view button appears highlighted.
Filtering Documents
- Click the Filter icon button in the section header to expand the filter panel.
- Use any combination of filters:
- Search -- keyword search across document names
- Document Type -- All Types, PDF, Excel, Word, or Image
- Status -- All Statuses, Active, Draft, or Archived
- Date From / Date To -- date range for upload dates
- Click Clear Filters to reset all criteria.
The document grid updates in real time as you apply each filter.

Sorting and Column Management
- Click any column header to sort by that column (click again to toggle order).
- Drag a column border to resize its width.
- Drag a column header to reorder columns.
Selecting Documents
- Click a row to select a single document and open the preview sidebar.
- Use checkboxes in the leftmost column to select multiple documents for bulk actions.
Folders display their contents when clicked instead of opening the preview.
Uploading Documents
Arkan supports two upload workflows: Upload Project Files (classified uploads with metadata) and Upload New Document (direct upload to the current folder).
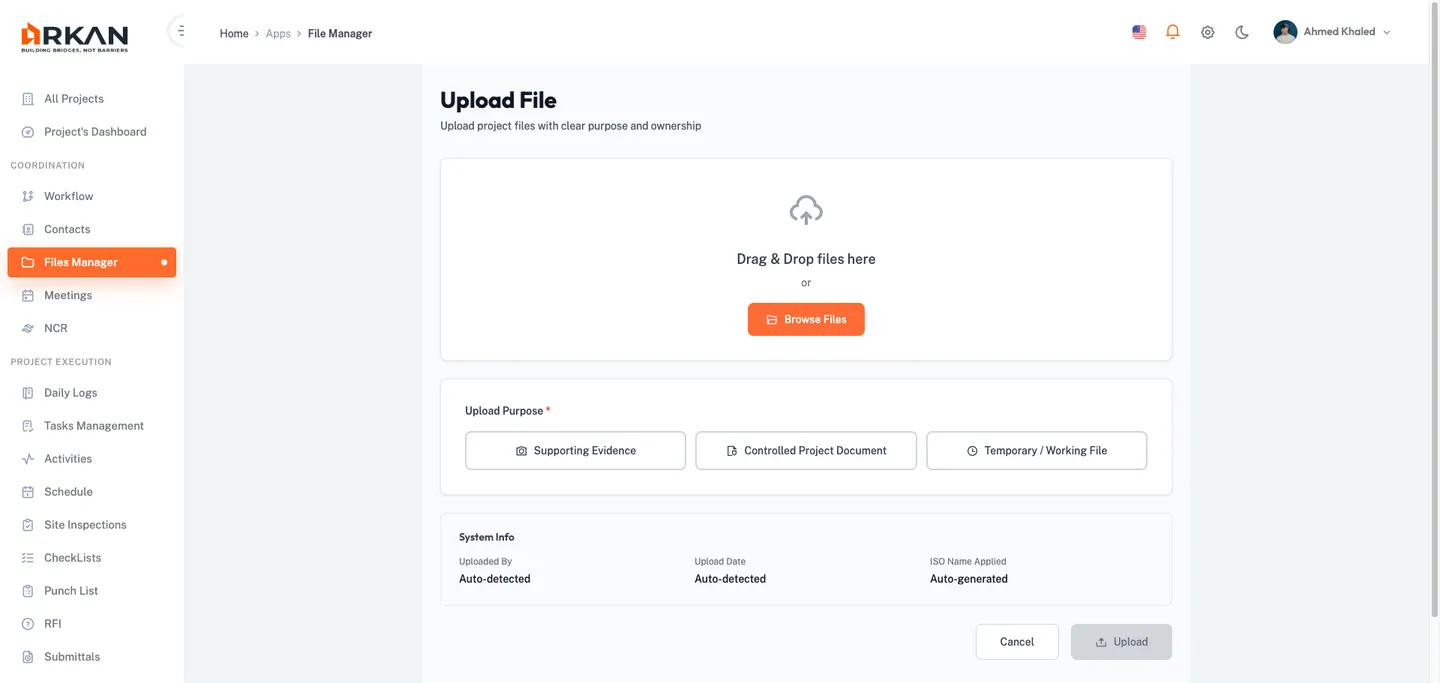
Upload Project Files
- Click the Upload Project Files button in the section header.
- The system opens a full-page upload view.

Step 1: Select Files
- Drag files into the drop zone, or click Browse Files to select files from your computer.
- Review the file list showing name and size. Click X to remove any file.
Step 2: Choose Upload Purpose
Select one of three upload types:
- Supporting Evidence -- site photos, test results, sketches, screenshots
- Controlled Document -- letters, approvals, method statements, HSE, policies, reports
- Temporary File -- drafts, review copies, working files, quick-share items
The appropriate metadata form appears below once you select a purpose.
Step 3: Add Tags (Optional)
- Type a tag keyword in the Tags field and press Enter.
- Tags appear as chips. Click X on a chip to remove it.
Supporting Evidence (Type 2)
After selecting Supporting Evidence:
- Fill in the Evidence Details form:
- Related Context (required) -- evidence context type dropdown
- Evidence Type (required) -- Site Photo, Test Result, Clarification Sketch, Screenshot, or Other
- Discipline Category (required) -- engineering discipline dropdown
- Purpose Note (required) -- text description of the evidence purpose
- Review the System Info section (auto-detected: Uploaded By, Upload Date, ISO Name).
- Click Upload to submit.
Files are uploaded to Supporting Evidence storage. A success notification confirms the upload.
Tip: Supporting Evidence files are visible to the project team by default.
Controlled Document (Type 3)
After selecting Controlled Document:
- Fill in the Controlled Document Details form:
- Document Purpose (required) -- Letter, Approval, Method Statement, HSE, Policy, Report, or Other
- Discipline Category (required) -- engineering discipline dropdown
- Originator Company (required) -- the company that created the document
- Owner Role (required) -- the job title responsible for this document
- Visibility Level (required) -- AdminOnly or ProjectTeam
- Related Companies (optional) -- multi-select additional associated companies
- Notes (optional) -- additional context or remarks
- Click Upload to submit.
Controlled Documents are stored with version tracking and full audit trail.

Warning: The Visibility Level determines who can access this document. Choose AdminOnly for sensitive documents such as contracts or financial reports. This cannot be changed after upload without administrator intervention.
Temporary File (Type 4)
After selecting Temporary File:
- Review the warning banner about automatic deletion.
- Fill in the Temporary File Details form:
- Temporary Purpose (required) -- Review, Draft, Working File, or Quick Share
- Owner (required) -- the project user who owns this file
- Auto-Expiry Days (required) -- days before automatic deletion (default 14)
- Visibility (required) -- OwnerOnly or ProjectUsers
- Click Upload to submit.
Temporary files are stored with an expiry date and a warning banner reminder.

Warning: Temporary files are automatically deleted after the configured expiry period. Upload as a Controlled Document or Supporting Evidence for permanent storage.
Upload New Document (Direct to Folder)
- Select a folder in the tree view.
- Click the Upload New Document button above the document grid.
- In the upload form dialog, provide:
- File (required) -- select or drag a file
- Volume (required) -- select the document volume
- Reference Number (optional), Issue Date (optional), Expiry Date (optional), Comment (optional)
- Click Submit to upload.
The file appears in the document grid. A success notification confirms the upload.
Note: This button is hidden for auto-generated system folders that do not allow manual uploads.
Document Preview Sidebar
When you select a file in the document grid, the preview sidebar opens on the right.
Document Metadata
The sidebar displays: Title, Status Badge (Active, Review, Sent, Approved, Draft, or Archived), Document Type, Period, File Size, Last Updated, and Expiry Date (for temporary files, with Expired/Expiring Soon indicators).
Additional badges appear for archived documents and expired temporary files.

Primary Actions
| Action | Description |
|---|---|
| View Document | Opens the document in a preview dialog (PDFs render natively; Office files use Microsoft Office Online Viewer; images display directly) |
| Download Document | Downloads the file via a secure SAS URL in a new browser tab |
Secondary Actions
| Action | Description |
|---|---|
| Upload New Version | Opens the version upload form for a new revision |
| Rename | Renames the document title |
| Archive to Cold Storage | Moves the file to long-term storage (active documents only) |
| Unarchive | Restores from cold storage (archived documents only) |
| Submit | Submits for review or approval |
| Approve | Approves the document |
| Reject | Rejects the document |
Note: If your visibility level or role does not permit access, action buttons are hidden and an "Access Restricted" message appears.
Archiving and Unarchiving
- To archive: select the document, click the Archive icon, and confirm.
- To unarchive: select the archived document, click the Unarchive icon, and confirm.
Archived files are moved to cold storage. Unarchived files are restored to the active tier.
Warning: Archived files may take additional time to retrieve. Archive only when documents are no longer needed for day-to-day operations.
Version History
Arkan tracks version history for all documents, enabling you to trace changes and restore previous versions.
Viewing Version History
- Select a document to open the preview sidebar.
- Click the Version History toggle button to expand the version list.
Each version entry shows: version number, upload date and user, action type (Upload, Update, or Refresh), comment, and a current version indicator badge. A counter badge shows total versions.
Uploading a New Version
- Select a document and click the Upload New Version icon in the secondary action bar.
- The system pre-fills existing metadata (reference number, issue date, expiry date).
- Select the new file and enter a Comment (required).
- Click Submit.
The new version becomes the current version. Previous versions remain accessible in version history.
Restoring a Previous Version
- Expand Version History and locate the desired version.
- Click the Restore button next to that version.
The selected version becomes current. A loading indicator displays during restoration.
Tip: The Restore button only appears for non-current versions.
Bulk Actions
- Select multiple documents using checkboxes in the document grid.
- Click the Actions dropdown button in the section header.
- Choose from: Bulk Download, Bulk Delete, Move Selected, or Refresh.

Document Statuses
| Status | Description |
|---|---|
| Active | Current and available for use |
| Review | Under review |
| Sent | Submitted |
| Approved | Formally approved |
| Draft | Work in progress |
| Archived | Moved to cold storage |
Troubleshooting
| Problem | Possible Cause | Solution |
|---|---|---|
| "Access Denied" message on File Manager page | Missing Retrieve permission | Contact your administrator to grant permission |
| Upload Project Files button does nothing | No project selected | Navigate to Projects and select a project first |
| New Folder button not visible | Selected folder is a system folder | Select a different folder that allows manual subfolders |
| Upload New Document button not visible | Auto-generated system folder | Use Upload Project Files instead, or select a non-system folder |
| Download fails with "File path is missing" | Missing blob path | Contact administrator to verify the file upload |
| "Access Restricted" in preview sidebar | Insufficient visibility or role | Request access from the document owner or administrator |
| Expired badge on temporary file | Auto-expiry period elapsed | Re-upload with a new expiry, or upload as Controlled Document |
| Version restore button disabled | Another restore in progress | Wait for the current restoration to complete |
| Filters not returning expected results | Multiple filters stacked | Click Clear Filters to reset and reapply one at a time |
| Preview shows "Loading..." indefinitely | Network issue or large file | Refresh the page; for large files, use Download instead |
Next: Contacts & Notifications
Back to: Help Center