Prerequisites
- You must be logged in to Arkan with a valid user account (see Getting Started)
- A project must be selected before accessing the RFI module
- Your user role must have RFI permissions assigned by the system administrator
- To view all RFI records (not only your own), your role must include the AllRecords permission
Overview
The RFI (Request for Information) module allows project teams to formally raise questions, request clarifications, and track responses throughout the project lifecycle. RFIs can be routed internally through a configurable workflow or sent externally to third-party contacts. Each RFI tracks its full history, including responses, attachments, and workflow transitions.
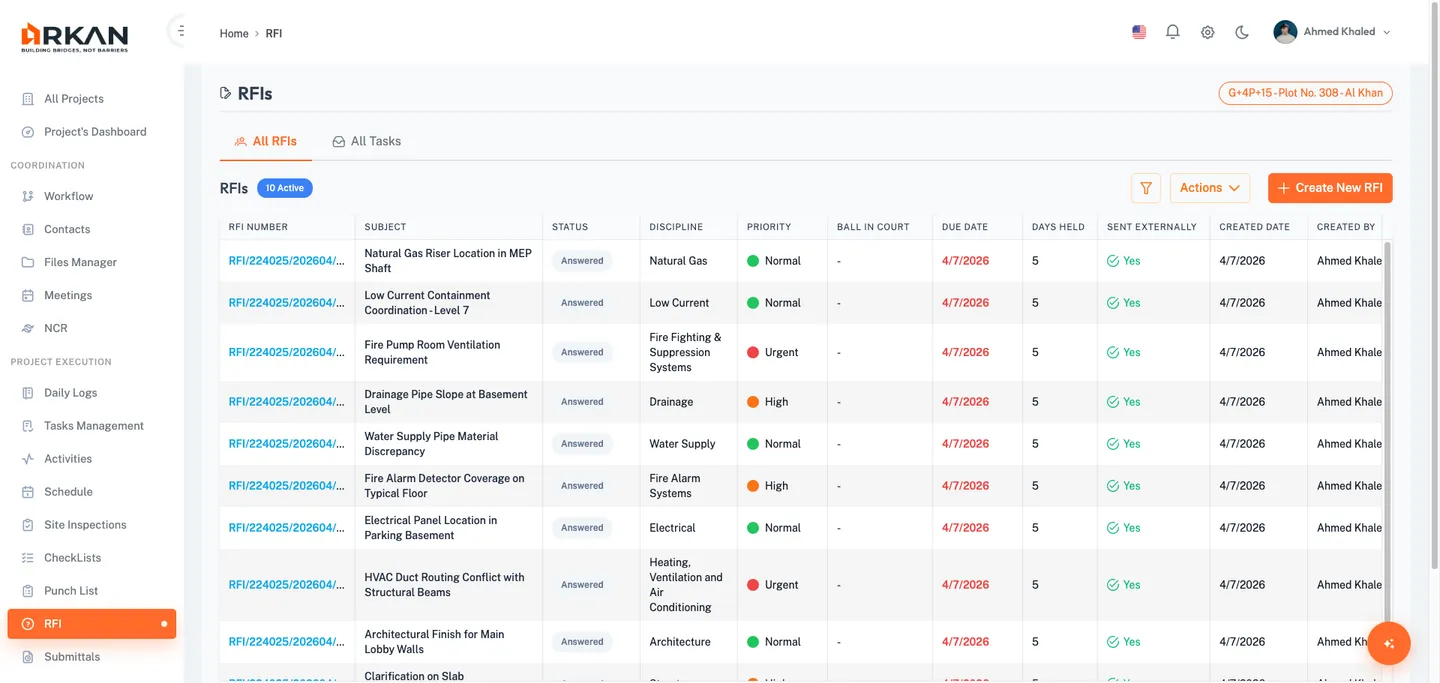
RFI List View
Navigate to the RFI module by clicking Sidebar > RFI. The list view loads, displaying all RFIs for the currently selected project in a paginated data grid with filtering, sorting, and export capabilities.
Tab Navigation
At the top of the list, two tabs control the data scope:
- All RFIs -- Shows all RFI records you have access to.
- All Tasks -- Filters the list to show only RFIs where you are the current ball-in-court (items requiring your action).
Click a tab to switch between views.
Grid Columns
The data grid displays the following columns. All columns are sortable and resizable.
| Column | Description |
|---|---|
| RFI Number | The unique reference number. Click to open the RFI detail view. |
| Subject | Brief description of the information request. |
| Status | Current status badge (Draft, Open, In Review, Answered, Closed, etc.). |
| Discipline | The engineering or project discipline associated with the RFI. |
| Priority | Priority level with a color-coded icon: green for Normal, orange for High, red for Urgent. |
| Ball In Court | The party or team currently responsible for action. |
| Due Date | The expected response date. Overdue dates appear highlighted in red. |
| Days Held | Number of days the RFI has been open. |
| Sent Externally | Indicates whether the RFI was sent to an external party (Yes/No with icon). |
| Created Date | The date the RFI was first created. |
| Created By | The user who created the RFI. |
| Actions | Action buttons: View, Edit (Draft only), Send (Draft only). |
Filtering the List
-
Click the Filter icon button in the section header to expand the filters panel.
-
Use any combination of the following filters:
- Search -- Free text search across RFI number, subject, and ID.
- Status -- Dropdown: All Statuses, Draft, Open, In Review, Answered, Closed, Rejected, Sent External, Response Received, Returned, Void.
- Discipline -- Dropdown populated from project-specific disciplines.
- Priority -- Dropdown: All Priorities, Normal, High, Urgent.
- Ball In Court -- Dropdown: All, Architect, Engineer, Contractor, Owner, Internal Team.
- Due Date From / Due Date To -- Date pickers to define a date range.
- Overdue Only -- Checkbox to show only RFIs that are past their due date and not yet closed or voided.
-
Filters apply immediately as you change them.
-
To reset all filters, click Clear Filters.
The grid updates to show only records matching your filter criteria.

Tip: The My RFIs and My Tasks toggle buttons let you quickly narrow results to RFIs you created or RFIs where you are the ball-in-court, respectively. These toggles reload data from the server to ensure accuracy.
Quick Actions
The section header provides three action controls:
- Filter button -- Toggles the filter panel visibility.
- Actions dropdown menu -- Contains:
- Refresh -- Reloads the grid data from the server.
- Export to Excel -- Downloads the current data as an Excel spreadsheet.
- Export to PDF -- Initiates a PDF export of the current data.
- Create New RFI button -- Opens the RFI creation form.
Pagination
The grid supports pagination with configurable page sizes of 10, 20, 50, or 100 records per page. Use the page navigation controls at the bottom of the grid to move between pages.
Creating an RFI
Prerequisites
- A project must be selected.
- You must have permission to create RFIs in the current project.
Steps
- From the RFI list view, click the Create New RFI button.
- The Create RFI form opens with four sections.
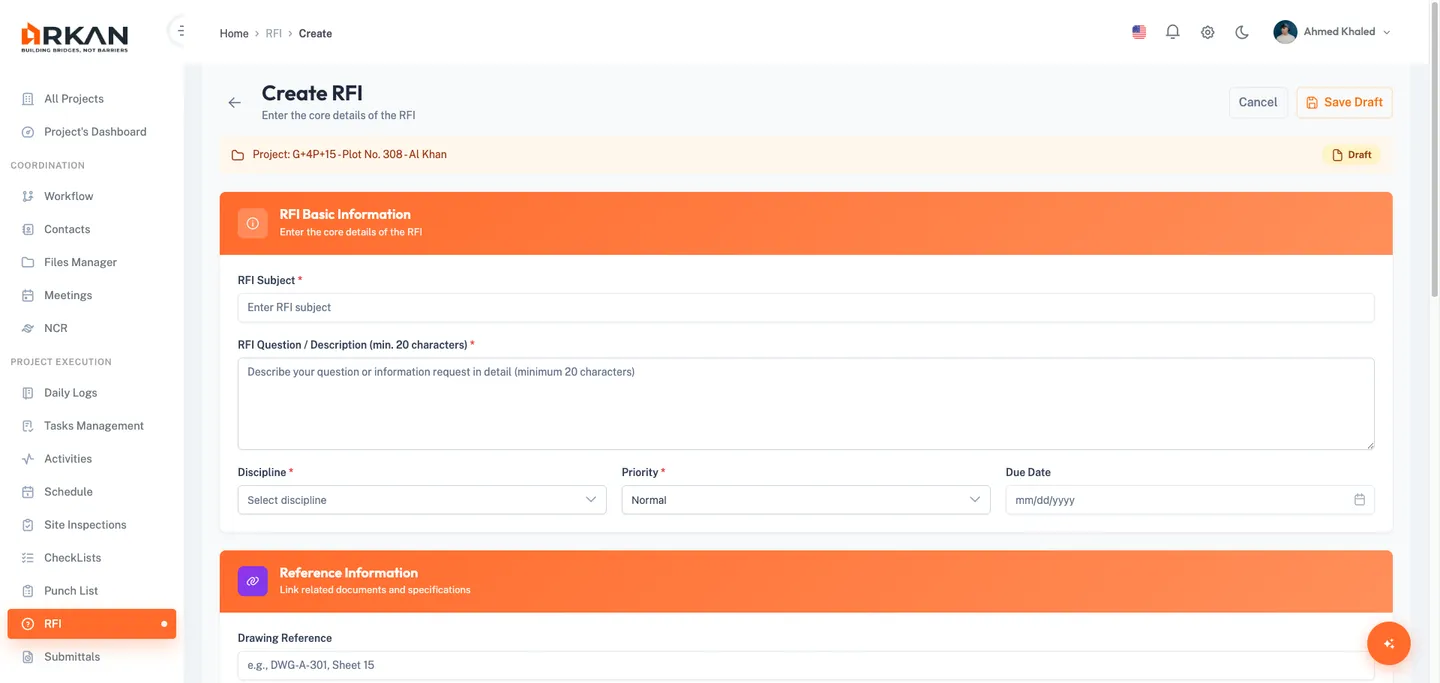
Section 1: Basic Information
- Enter the RFI Subject (required). This is a brief title for the information request.
- Enter the RFI Question/Description (required). Provide a detailed explanation of the information you need. A minimum of 20 characters is required.
- Select a Discipline (required) from the dropdown. The options are configured per project.
- Select a Priority (required) from the dropdown:
- Normal -- Standard priority, no urgency.
- High -- Elevated priority requiring prompt attention.
- Urgent -- Critical priority requiring immediate attention.
- Optionally, set a Due Date using the date picker. This is the expected response deadline.
Section 2: Reference Information
- Optionally, enter a Drawing Reference to link the RFI to specific drawings.
- Optionally, enter a Specification Reference to link the RFI to project specifications.
- Optionally, enter Other References for any additional context or background information.
Section 3: Attachments
- Click the upload area or the Choose button to select files.
- Accepted formats: images (PNG, JPG), PDF, DOC, DOCX, XLS, XLSX.
- Maximum file size: 10 MB per file.
- Multiple files can be added.
- Selected files appear in a Pending list with an amber indicator. They will be uploaded when you save the draft.
- To remove a pending file before saving, click the red X button next to it.
Tip: Files are not uploaded to the server until you click Save Draft. If you navigate away without saving, pending files will be lost.
Section 4: Actions
- Review the draft mode information box. It reminds you that:
- The RFI is saved as a draft and is not yet submitted.
- You can edit the draft at any time before sending.
- To submit the RFI, use the Send action from the list or detail view.
- Click Save Draft to save the RFI.
The RFI is saved as a Draft. Pending files are uploaded, and you are redirected to the RFI list view.
- To discard your changes, click Cancel to return to the RFI list without saving.
Warning: The Subject and Question fields are mandatory. The form will not save if either is empty or if the question is shorter than 20 characters.
Editing a Draft RFI
Only RFIs in Draft status can be edited.
- In the RFI list view, locate the Draft RFI you want to edit.
- Click the Edit button in the Actions column, or click the RFI number to open the detail view and then use the edit option.
The RFI form opens pre-filled with the existing data.
- Modify any fields as needed.
- To manage attachments:
- Add new files using the upload area.
- Download existing attachments by clicking the Download icon.
- Delete existing attachments by clicking the Delete icon.
- Click Save Draft to save your changes.
The updated RFI draft is saved, and you are redirected to the RFI list.
Sending an RFI
Sending an RFI transitions it from Draft status into an active workflow. You can send an RFI either internally (through a workflow) or externally (to a third-party contact).
Prerequisites
- The RFI must be in Draft status.
- For internal sending, at least one workflow template must be configured for the project.
Steps
- From the RFI list, click the Send button on a Draft RFI, or open the RFI detail view and click the Send button in the summary card.
The Send RFI dialog opens.

- Choose the send method using the radio buttons:
Sending Internally
- Select Internal as the send method.
- Choose a Workflow Template from the dropdown. Templates define the approval and review sequence.
- Select an Assign To team member from the dropdown. This is the first person in the workflow who will receive the RFI.
- Click Send RFI.
The RFI status changes to Open and enters the selected workflow. The assigned team member is notified.
Sending Externally
- Select External as the send method.
- Select a Company Contact from the dropdown.
- Select a Person Contact from the dropdown (filtered by the selected company).
- The Recipient Name, Recipient Company, and Recipient Email fields are auto-populated from the selected contacts.
- Confirm the Send Date (defaults to today).
- Check the confirmation checkbox to confirm the RFI has been sent externally.
- Click Send RFI.
The RFI status changes to Sent External. The external tracking information is recorded.
Tip: You can also add or remove attachments in the send dialog before sending. Attachments will be included with the RFI.
RFI Detail View
The detail view provides a comprehensive view of a single RFI. Open it by clicking the RFI Number link or the View button from the list.
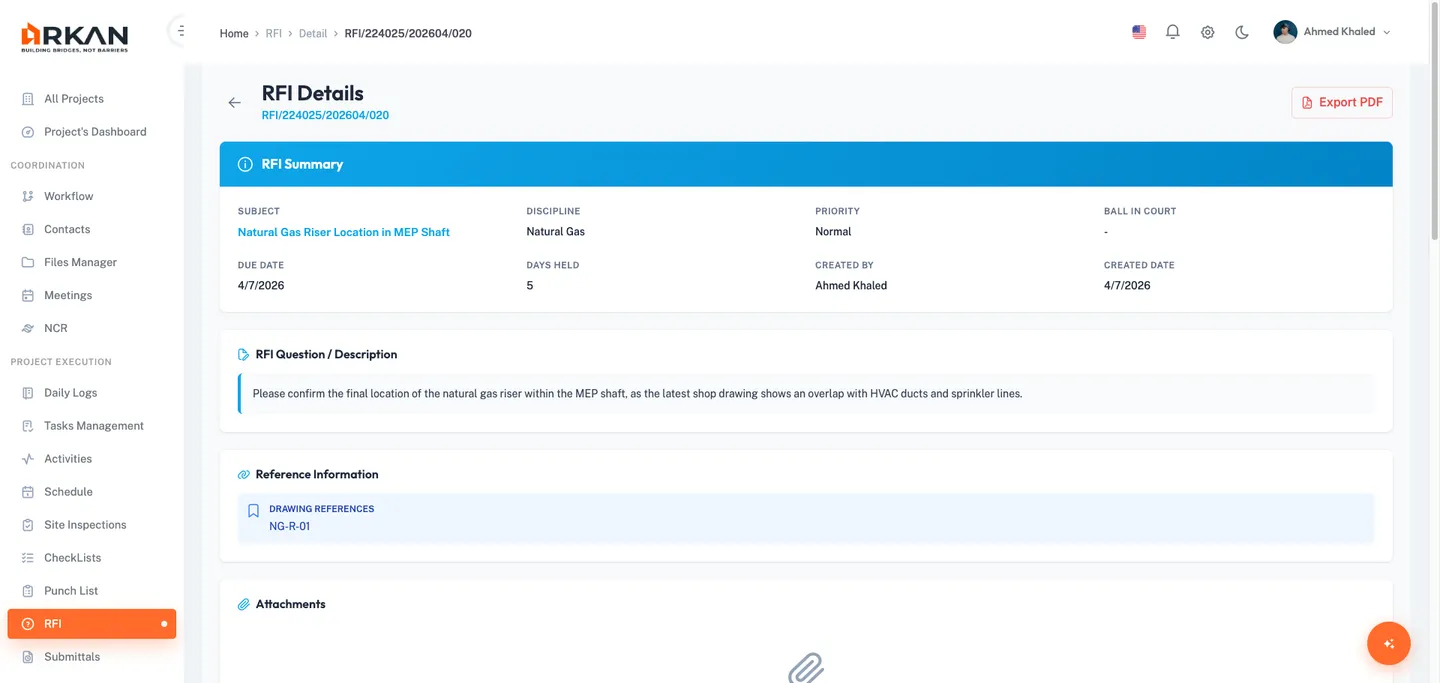
Summary Card
The summary card displays: Subject, Discipline, Priority (color-coded badge), Ball In Court, Due Date, Days Held, Created By, Created Date, and Status badge. If the RFI is in Draft status, a Send button appears in the card header.
Content Sections
- RFI Question -- The full question/description text.
- Reference Information -- Drawing, specification, and other references (if provided).
- Attachments -- Listed with file name, type, and size. Click Download to save any attachment.
- Checklists -- Associated checklists. Become fully read-only when the RFI is Closed.
Workflow Action Buttons
For Internal RFIs active in a workflow, the header displays action buttons based on your permissions:
- Forward -- Advances the RFI to the next workflow step.
- Return -- Sends the RFI back to the previous step.
- Reject -- Rejects the RFI.
These buttons only appear when you are the ball-in-court user and the current step has the corresponding transition configured.
Click Export PDF in the header to generate a downloadable PDF version of the RFI.
Responding to an RFI
Responses allow team members and external parties to provide answers, clarifications, or additional information.
Prerequisites
- The RFI must be in an active status (not Draft, Closed, or Void).
- For internal RFIs, you must be in the current ball-in-court group.
- For external RFIs, the status must be Sent External or Response Received.
Adding an Internal Response
- Open the RFI detail view.
- Scroll to the Responses section.
- Click the Add Response button.
The Add Response dialog opens.
- Ensure Internal is selected as the response type.
- Enter your Response Text (required).
- Optionally, check Mark as Official to designate this as the official answer.
- Optionally, attach files by clicking the upload area. Accepted formats and size limits are the same as for RFI creation.
- Click Submit.
The response is added and appears in the responses list with an "Internal" badge.
Adding an External Response
Note: Only users with RFI Admin permissions can add external responses.
- Open the RFI detail view.
- Scroll to the Responses section and click Add Response.
- Select External as the response type.
- Select the Company Contact from the dropdown.
- Select the Person Contact from the dropdown.
- The Respondent Name and Company fields are auto-populated.
- Select the Received Date -- the date the external response was received.
- Enter the Response Text (required).
- Optionally, attach supporting files.
- Click Submit.
The response is added with an "External" badge and the respondent's details.
Marking a Response as Official
- In the Responses section, locate the response you want to designate as the official answer.
- Click the Official Response button (star icon) next to that response.
The response is highlighted with an official badge and a star icon. The official answer is also displayed in a highlighted box.
Tip: Only one response can be marked as official at a time. Marking a new response as official replaces the previous one.
RFI Status Values
| Status | Description |
|---|---|
| Draft | RFI has been created but not yet sent. Can be edited and deleted. |
| Open | RFI has been submitted and is awaiting review in the workflow. |
| In Review | RFI is actively being reviewed by the assigned party. |
| Answered | A response has been provided and marked as official. |
| Closed | RFI has been fully resolved and closed. No further actions allowed. |
| Sent External | RFI has been sent to an external party and is awaiting their response. |
| Returned | RFI has been sent back to a previous workflow step for revision. |
| Void | RFI has been voided and is no longer active. |
| Response Received | An external response has been received and is pending review. |
Priority Levels
| Priority | Icon | Description |
|---|---|---|
| Normal | Green circle | Standard priority with no special urgency. |
| High | Orange circle | Elevated priority requiring prompt attention. |
| Urgent | Red circle | Critical priority requiring immediate response. |
Closing an RFI
An RFI can be closed after a satisfactory response has been received and marked as official. Closing is handled through the workflow:
- Open the RFI detail view.
- If you are the ball-in-court and the workflow step supports it, click Forward to advance the RFI to the final approval step.
- The final approver reviews the official response and advances the RFI through any remaining workflow steps.
When the workflow completes, the RFI status changes to Closed. All checklists become read-only and no further responses can be added.
Note: Once an RFI is closed, it cannot be reopened. Ensure all necessary information has been captured before closing.
Exporting RFI Data
Export to Excel
- From the RFI list view, click the Actions dropdown and select Export to Excel.
An Excel file containing the current grid data is downloaded to your computer.
Export to PDF (Individual RFI)
- Open the RFI detail view and click Export PDF in the page header.
The PDF preview page opens. Use your browser's print or download function to save the file.
Workflow History
Every action taken on an RFI is recorded in the Workflow History timeline at the bottom of the detail view. Each entry shows a Timestamp, the Action performed (Created, Updated, Submitted, Sent External, Response Added, Forwarded, Returned, Marked Official, Voided, Exported), the User who performed it, and an optional Description. Entries are color-coded by action type.
Troubleshooting
What if I cannot see the Create New RFI button? Your user role may not have RFI creation permissions. Contact your system administrator to verify your role includes RFI create access.
What if I see "No Project Selected" when opening the RFI module? You must select a project before accessing RFIs. Navigate to Projects, select a project, and then return to the RFI module via the sidebar.
What if my file upload fails? Ensure the file is under 10 MB and in an accepted format (PNG, JPG, PDF, DOC, DOCX, XLS, XLSX). If the file meets these requirements and the upload still fails, check your network connection and try again.
What if the Forward, Return, or Reject buttons do not appear? These workflow action buttons only appear when you are in the ball-in-court group for the current workflow step, and the step has the corresponding transition configured. If you believe you should see these buttons, contact your project administrator to verify the workflow configuration and your group membership.
What if I cannot add a response to an RFI? Responses can only be added to RFIs that are in an active workflow state. Draft, Closed, and Void RFIs do not accept responses. For internal RFIs, you must be in the current ball-in-court group. For external RFIs, the status must be Sent External or Response Received.
What if the Discipline dropdown is empty? Disciplines are configured per project. Contact your project administrator to ensure disciplines have been set up for the current project.
What if I accidentally void an RFI? Voiding is permanent and cannot be undone. If the information is still needed, create a new RFI with the relevant details.
What if the Send dialog does not show any workflow templates? Workflow templates must be configured for the project by an administrator. Contact your project administrator to set up RFI workflow templates.
Next: Tasks
Back to: Help Center