Overview
The Settings & Administration area in Arkan provides centralized control over system-wide configuration and project-specific setup. It is divided into two main sections: Global Settings (system-wide configuration accessible to administrators) and Project Settings (project-scoped configuration accessible to project managers and administrators). From these panels you manage lookups, companies, users, permissions, email configuration, geographic data, document settings, project structure, workflows, and more.
Prerequisites
- You have an active Arkan account with Administrator or Project Manager role.
- For Global Settings, you must have system-level admin access.
- For Project Settings, a project must be selected in the project selector (top navigation bar). See Getting Started.
- Your browser supports the application requirements (modern Chrome, Edge, or Firefox).
Tip: If you cannot see the Settings menu items, contact your system administrator to verify that your role has the appropriate permissions assigned under Permission Per Screen.
Navigating to Settings
- Global Settings: Click your user name in the top navigation bar, then select Global Settings. The system navigates to
/settings/global-settings. - Project Settings: Navigate to Sidebar > Project Settings. The system navigates to
/project-settings. A project must be selected first.
Section 1: Global Settings
Global Settings is the system-wide administration hub. It is organized into dropdown navigation menus across the top of the page: Project, Activity, Companies, General, Financial, and Permissions.
1.1 Project Menu
The Project menu provides access to project-level configuration and lookup types.
Projects and Templates
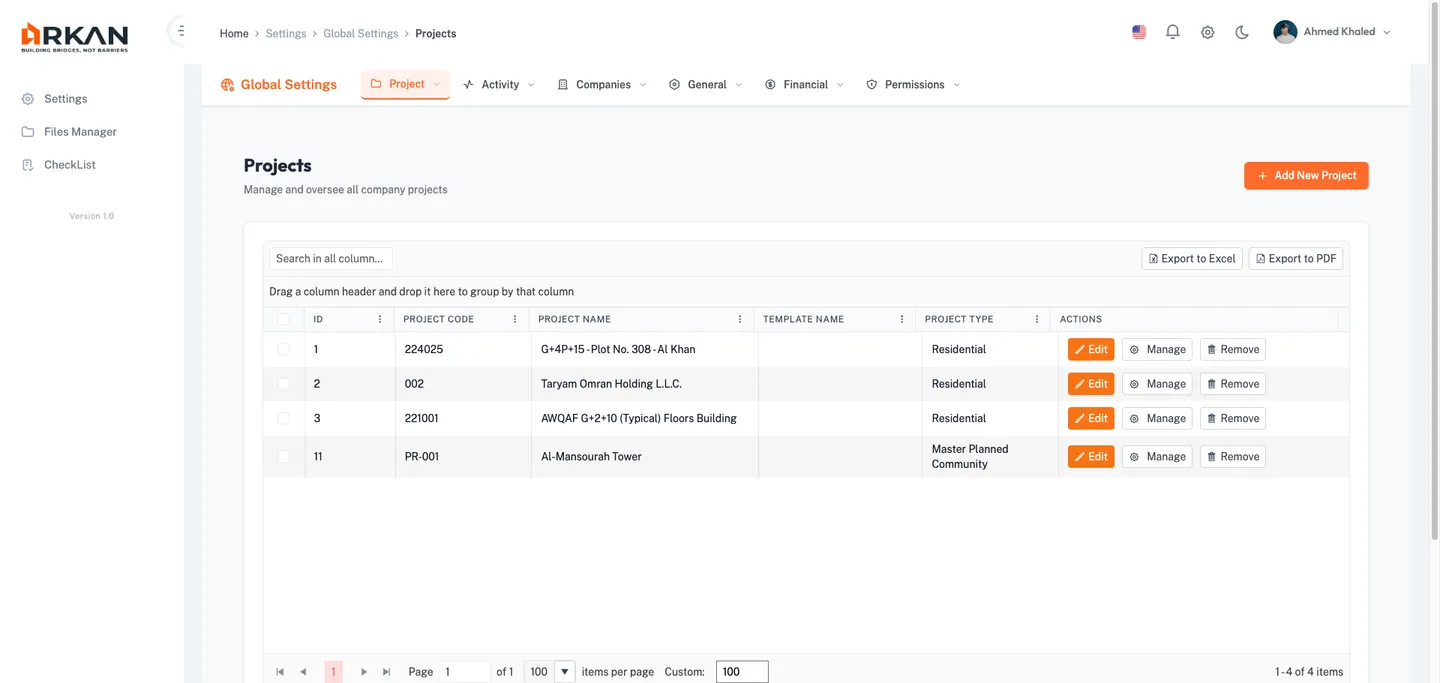
- Click Project > Projects to view and manage all system projects in a searchable grid.
- Click Project > Project Template to manage reusable project templates at
/settings/global-settings/project-templates. - To create a template, click Add New, complete the wizard, and click Save.
Project templates are available for selection when creating new projects.
Lookup Types (Project Type, Building Type, Floor Type)
- Click Project > Project Type, Building Type, or Floor Type.
- The system displays the corresponding lookup grid with ID, Code, and Description columns.
- Click the Add New button (orange) to create an entry.
- In the edit modal, enter the Code and Description fields. Click Save.
- To edit an existing entry, click the edit icon on the row.
- To delete, click the delete icon and confirm in the dialog. System-defined items cannot be deleted.
The lookup entry is saved and available for selection throughout the system.
Warning: Deleting a lookup value in use by existing records may cause data integrity issues. The system displays a warning for system-defined items (status 62).
Tip: The same generic lookup interface is reused for all lookup categories across Global Settings. The steps above apply universally to Building Type, Floor Type, Company Type, Job Title, Phase, Status, Trade, Punch List Category, and other lookup types.
1.2 Activity Menu
The Activity menu manages activity definitions, classifications, and phase configuration.
- Click Activity > Activity Definition to manage activity definitions at
/settings/global-settings/Activity. Use the grid to add, edit, or delete definitions. - Click Activity > Classifications to manage classification lookup entries.
- Click Activity > Phase Classification at
/settings/global-settings/PhaseClassificationto manage bindings between phases and classifications. - Click Activity > Phase to manage construction project phases via the standard lookup interface.
Activity definitions and phase classifications drive project scheduling and work breakdown structures.
1.3 Companies Menu
The Companies menu manages organizational data including job titles, company types, company records, and user accounts at the system level.
Job Title and Company Type Lookups
- Click Companies > Job Title to manage job title entries via the standard lookup interface.
- Click Companies > Company Type to manage company type categories (e.g., Major, Consultant, Subcontractor, Supplier).
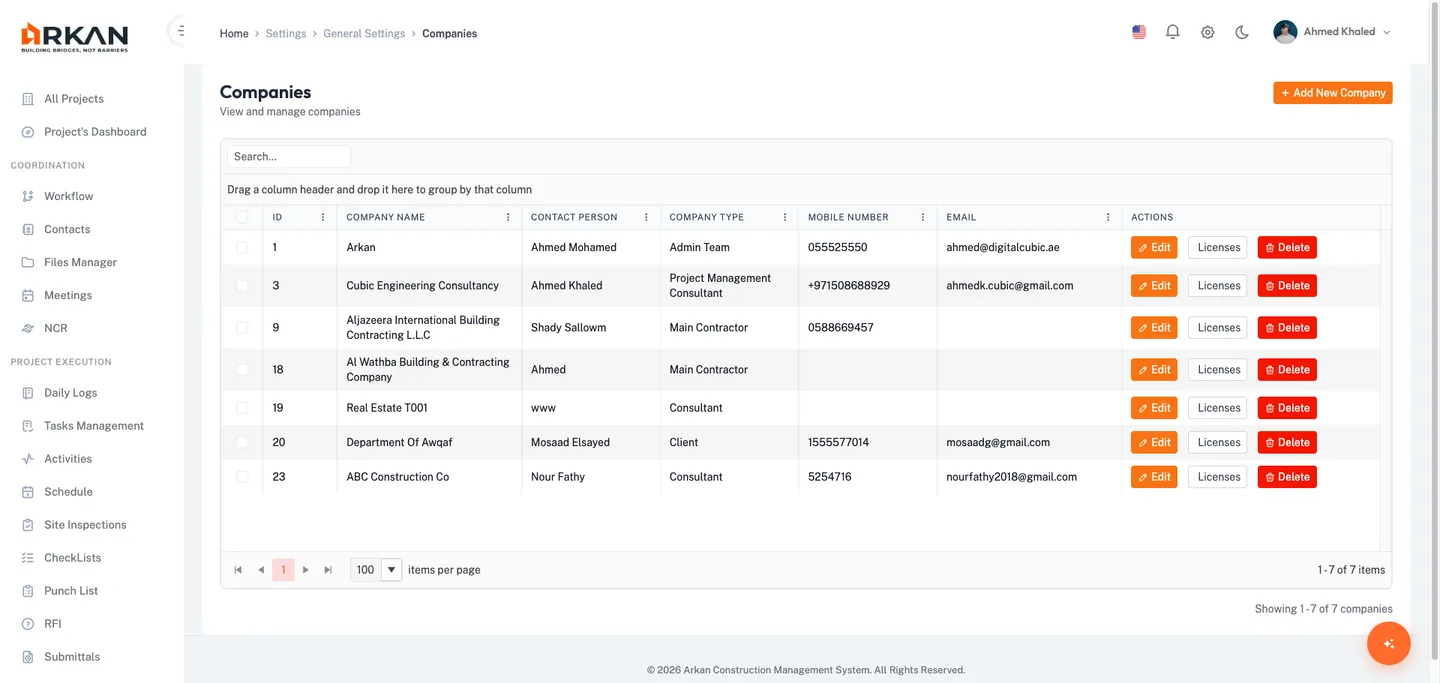
Companies Management
- Click Companies > Companies to open the Companies grid at
/settings/global-settings/companies. - The grid shows columns: ID, Company Name, Contact Person, Company Type, Mobile Number, and Email.
- Use the search bar to filter companies. Use pagination controls (10, 20, 50, or 100 per page) to navigate.
Adding a Company
- Click the Add New button (orange, with plus icon).
- In the edit modal, complete the following fields:
- Company Name (required, max 200 characters)
- Company Type (required dropdown)
- Contact Person, Email, Mobile Number
- Logo (file upload)
- Website, Address (max 500 characters)
- Registration Number, Tax ID
- Status (Active/Inactive)
- Click Save.
The new company appears in the companies grid.
Editing a Company
- Click the edit icon on the company row.
- The edit modal opens pre-populated with the company data.
- Modify the desired fields and click Save.
The company record is updated.
Deleting and Restoring a Company
- Click the delete icon on the company row and confirm in the dialog by clicking Yes.
- To view deleted companies, toggle the Show Deleted filter.
- To restore a deleted company, click the restore icon on the deleted row and confirm.
The company is soft-deleted or restored.
Company Licenses
- Click the licenses icon on a company row to navigate to the licenses page.
- Click Add New to create a license entry with the following fields:
- License Name, License Number
- Issue Date, Expiry Date
- Issuing Authority, License Type
- Emirate, Tags
- License Document upload (PDF, JPG, or PNG, max 20 MB)
- Click Save.
The license is attached to the company record.
Users Management
- Click Companies > Users to open the Users grid at
/settings/global-settings/Users. - Grid columns: Full Name, Email, Company, Job Title, Role, Status.
- Use pagination controls (10, 20, 50, or 100 per page) to navigate.
- Click Export to download the grid as PDF or Excel.
Adding a User
- Click the Add User button (visible based on permissions).
- In the dialog, complete:
- Full Name (required)
- Email (required, validated format)
- Phone, Mobile
- Company (required dropdown)
- Job Title (required dropdown)
- Department
- User Role (required: Project Manager, Team Member, Viewer, or Admin)
- Status
- Click Save.
The new user account is created and the user can log in with the provided email.
1.4 General Menu
The General menu provides access to geographic settings, unit management, email configuration, tags, and other system-wide lookup values.
Geographic Settings (Countries, Cities)
- Click General > Countries -- grid with Name, Country Code, Telephone Code, Status.
- Click General > Cities -- grid with Name, Country (required dropdown), Code, Status. This route also manages emirates/states.
Geographic data is used for addresses, company registrations, and project locations.
Unit Management
- Click General > Unit Management at
/settings/global-settings/UnitMangment. - Grid columns: ID, Symbol, Name, Description. Export available as PDF/Excel.
- Click Add New or the edit icon to open the edit modal:
- Unit Name (required, max 100 characters)
- Symbol (required, max 10 characters)
- Description
- Conversion Factor
- Status (Active/Inactive)
- Base Unit
- Click Save.
Units are available for BOQ and measurement configurations.
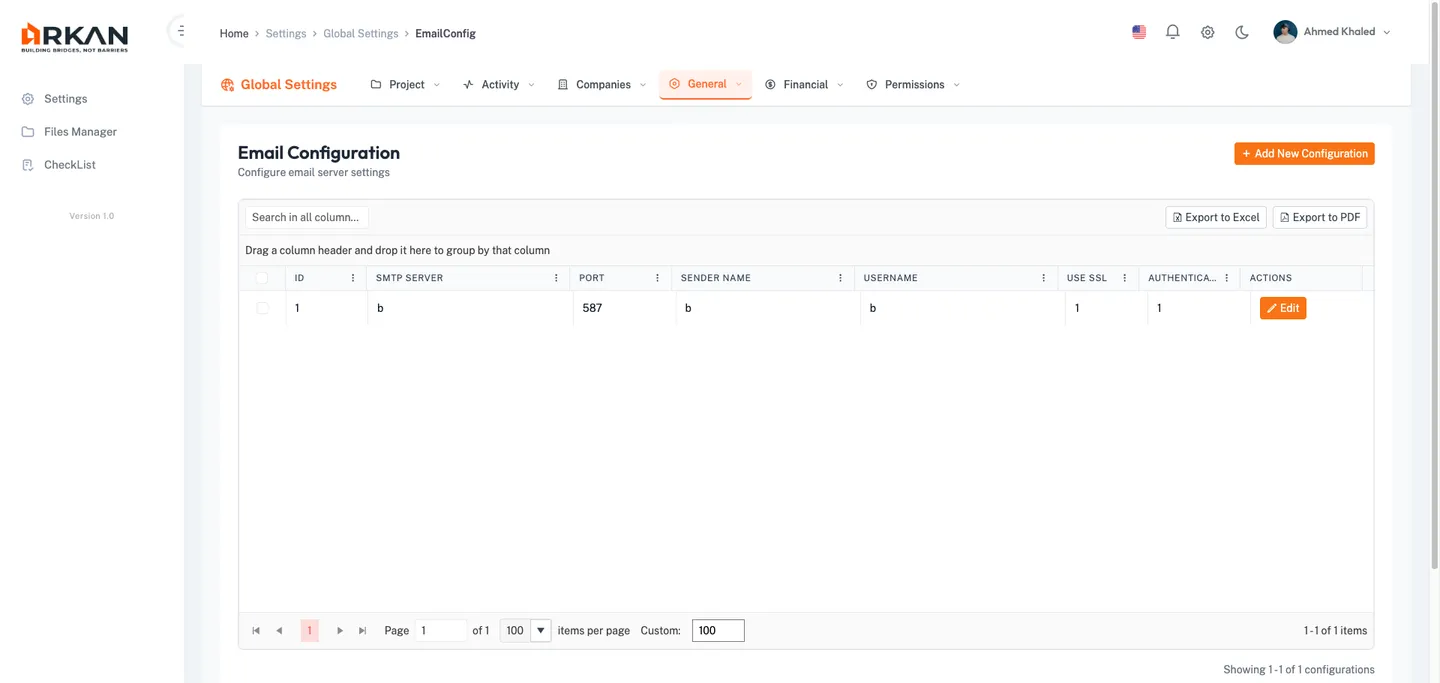
Email Configuration
- Click General > Email Configuration at
/settings/global-settings/EmailConfig. - Grid columns: ID, SMTP Server, Port, Sender Name, Status.
- Click the edit icon on a row to open the edit modal. Note: delete is not available for email configurations.
Basic Authentication Setup
- Click the edit icon on an existing email configuration row.
- Complete the following fields:
- SMTP Server (required, max 200 characters)
- Port (required, numeric, default 587)
- Sender Name (required, max 200 characters)
- Username (required, max 200 characters)
- Enable SSL/TLS checkbox (enabled by default)
- Authentication Type: Select Basic Authentication
- Password (optional -- leave blank to keep the current password)
- Click Save.
The email configuration is updated. The system uses these settings for all outgoing notifications.
OAuth 2.0 (Microsoft 365) Setup
- In the edit modal, set Authentication Type to OAuth (Microsoft 365).
- The form displays additional OAuth fields:
- Client ID (required)
- Tenant ID (required)
- Client Secret (optional -- leave blank to keep current)
- Complete all required fields and click Save.
The system switches to OAuth 2.0 authentication for outgoing email.
Warning: Incorrect SMTP or OAuth credentials will prevent the system from sending email notifications, workflow alerts, and password reset messages. Test the configuration after saving.
Additional General Lookups
The General menu also includes the following items, all managed through the standard lookup grid interface:
- Request SubCategory -- Manage request category bindings
- Tags -- Tags that can be applied to various entities across the system
- Evidence Context Types -- Context types for evidence collection in inspections and checklists
- Status -- Workflow statuses for company sequences
- Document Purpose -- Document purpose options for controlled project documents
- Punch List Category -- Categories for deficiency tracking
- Trade -- Trade types for punch list items
- Checklist Sections -- Global checklist section definitions
1.5 Financial Menu
Currency Management
- Click Financial > Currency Management at
/settings/global-settings/currency-management. - Add or edit currency definitions including currency code, symbol, name, and exchange rate.
Currencies are available for selection in project financial configurations.
1.6 Permissions Menu
Permission Templates
- Click Permissions > Permission Templates at
/settings/global-settings/permission-templates. - Permission templates define reusable sets of permissions that can be applied to multiple users.
- Create or edit templates to establish standard permission profiles for common roles.
Permission templates reduce administrative overhead when onboarding new users with similar access needs.
Section 2: Project Settings
Project Settings provides project-scoped configuration. Access it via Sidebar > Project Settings. The page uses a sidebar navigation organized into sections: General Information, Project Structure, Stakeholder, Workflow, Drawing Settings, and Policies.
2.1 General Information
Project Information
- Navigate to Project Settings > General > Information.
- The system displays the Project Information form at
/project-settings/general/information. - Review and edit project details including name, description, dates, and configuration.
- Click Save to update the project information.
The project metadata is updated across the system.
Project Reschedule
- Navigate to Project Settings > General > Reschedule.
- The system displays the Project Reschedule page at
/project-settings/general/reschedule. - View existing reschedule entries in the grid.
- Click Add New to create a reschedule record with dates and justification.
- Click Save.
The reschedule entry is recorded and reflected in project timelines.
2.2 Project Structure
- Navigate to Project Settings > Structure.
- The system displays the Project Structure page with five tabs: Areas, Buildings, Floors, Zones, and Locations.
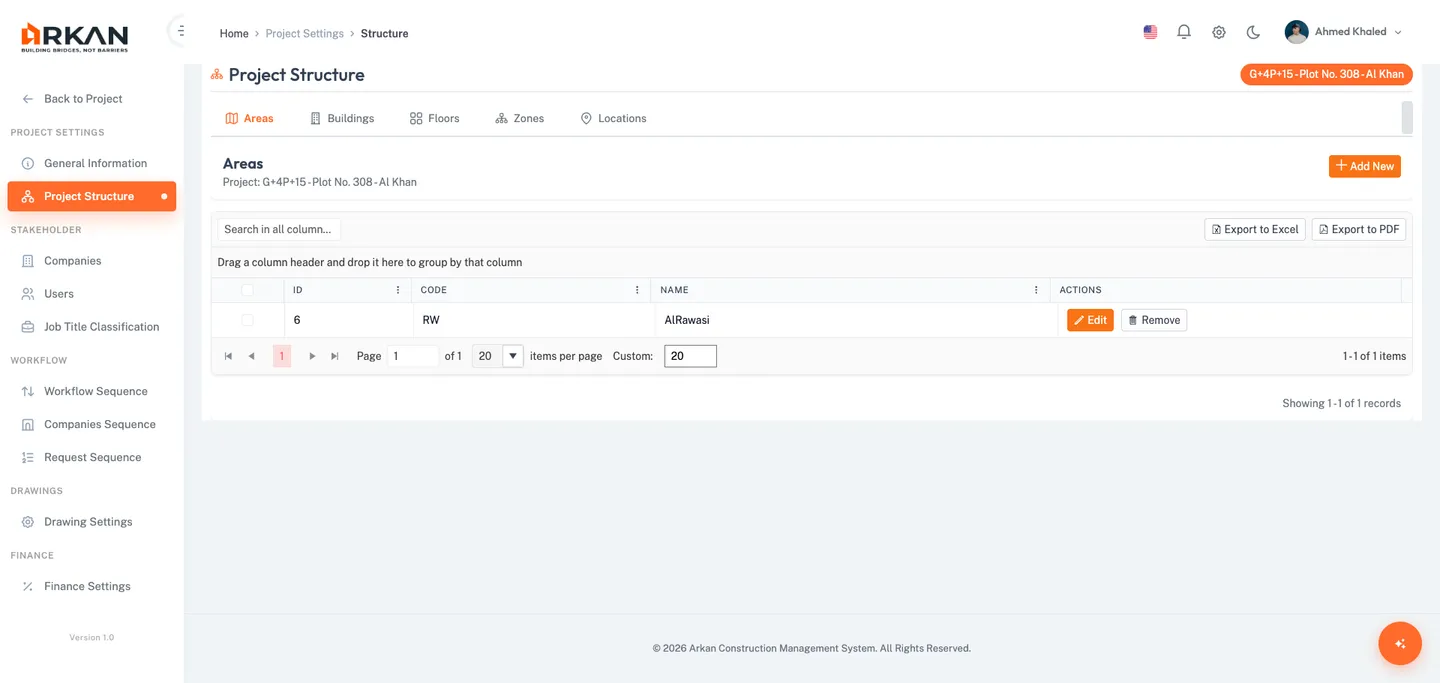
Areas Tab
- Select the Areas tab.
- The grid displays all areas defined for the current project.
- Click Add New to create an area with a name and optional description.
- Click the edit or delete icons on existing rows to modify or remove areas.
Buildings Tab
- Select the Buildings tab.
- Click Add New to add a building, specifying its name, area assignment, and building type.
Floors Tab
- Select the Floors tab.
- Click Add New to add a floor, specifying its name, building assignment, floor type, and level number.
Zones and Locations Tabs
- Select the Zones tab to manage zone subdivisions within the project structure.
- Select the Locations tab to manage specific locations within zones and floors.
Project structure entries are used throughout the system for filtering submittals, inspections, punch list items, and other module data.
Tip: Define the project structure hierarchy from top to bottom: Areas first, then Buildings, Floors, Zones, and finally Locations. Each level references its parent.
2.3 Stakeholder Management
Navigate to Project Settings > Stakeholder. This section has three sub-routes: Companies, Users, and Job Title Classification.
Project Companies
- Navigate to Stakeholder > Companies.
- The system displays a tabbed interface with three tabs: Companies, Company Groups, and Notification Groups.
- Companies tab -- Assign companies from the global list to this project. Filter by company type, select one or more companies, and save.
- Company Groups tab -- Create logical groupings of companies for workflow and notification purposes.
- Notification Groups tab -- Configure which users receive notifications for specific events. Add users to groups from the user notification list.
Project Users
- Navigate to Stakeholder > Users.
- The system displays a tabbed interface with four tabs: Project Users, Project Managers, Project Teams, and Business Admin.
- Project Users tab -- Assign and manage users for the project. Use the edit icon to modify assignments or the permissions icon to configure per-user permissions.
- Project Managers tab -- Designate users as project managers with elevated project-level access.
- Project Teams tab -- Organize users into functional teams for the project.
- Business Admin tab -- Manage users with business administration access for the project.
Job Title Classification
- Navigate to Stakeholder > Job Title Classification.
- The grid displays classification entries for the project.
- Click on a classification entry to view its Company Bindings or User Assignments (via sub-routes).
- Click Add New to create a new classification category.
Job title classifications organize users by their functional roles within the project hierarchy.
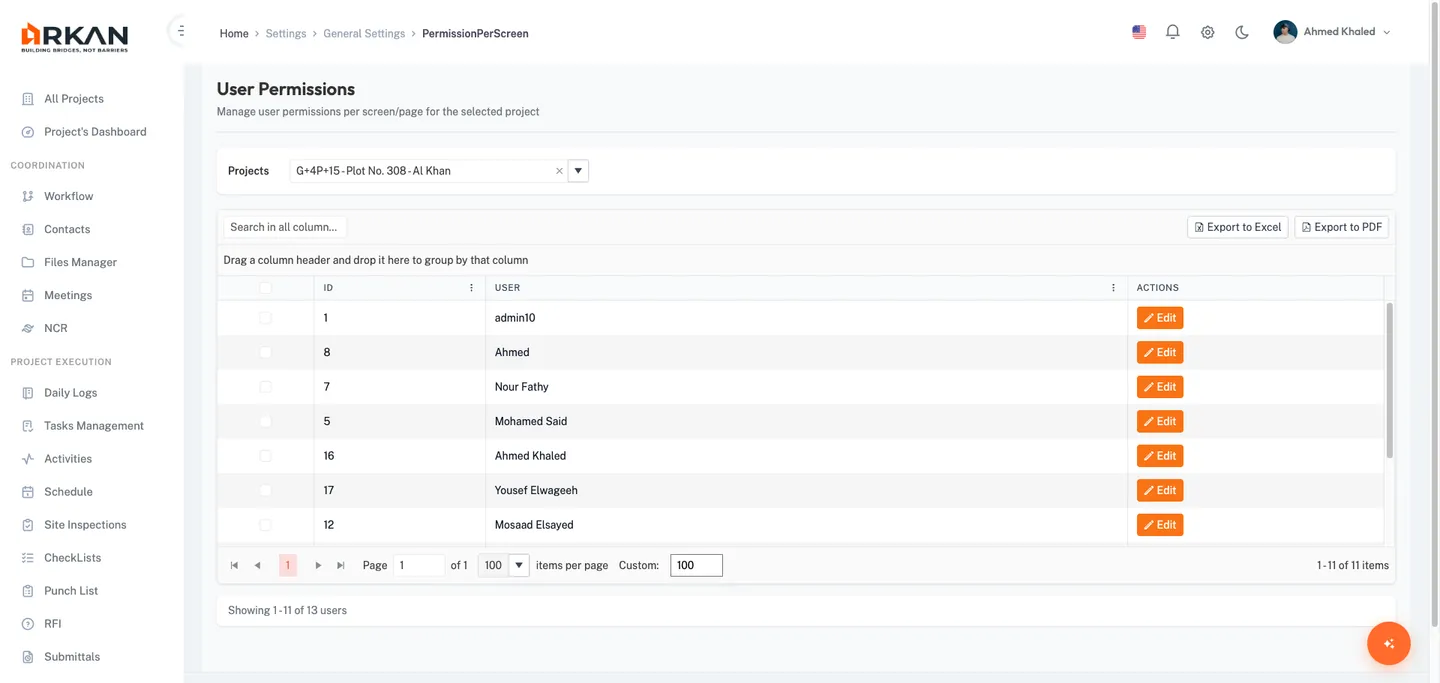
2.4 Permission Per Screen
- Navigate to
/settings/global-settings/PermissionPerScreen. - Select a Project from the required dropdown at the top of the page.
- The grid loads all users for the selected project, showing User ID and Full Name columns.
- Click the edit icon on a user row to open the Edit Permissions modal.
Editing User Permissions
- The Edit Permissions modal opens (80% viewport width, max 1200px).
- The modal displays a scrollable table (400px height) with two column areas:
- Page/Screen Name (40% width) -- Lists every system page with its route
- Permission Checkboxes (60% width) -- Individual checkboxes for: Retrieve, Insert, Update, Delete, Print, Export, Approver, Owner
- Use the All checkbox at the start of each row to select or deselect all permissions for that page. The checkbox shows an indeterminate state when only some permissions are selected.
- Check or uncheck individual permission checkboxes as needed.
- Click Save to apply the permission changes.
- Click Cancel to discard changes and close the modal.
The user's permissions are updated. Changes take effect on the user's next login or page refresh.
Warning: Removing the Retrieve permission for a page prevents the user from accessing that page entirely. Be cautious when modifying permissions for active users.
2.5 Workflow Configuration
- Navigate to Project Settings > Workflows for approval sequence configuration.
- Workflow Sequence at
/project-settings/workflows/workflow-sequence-- Define the step-by-step approval chain for submittals, inspections, and other workflow-driven modules. - Additional workflow tabs provide configuration for company sequences and request sequences.
Workflow sequences determine how documents and requests route through the approval chain. See Workflows for detailed instructions.
2.6 Drawing Settings
- Navigate to Project Settings > Drawing Settings at
/project-settings/drawing-settings. - Configure drawing-related settings including numbering conventions, revision controls, and distribution settings.
Drawing settings affect how drawings are managed in the Documents & Files module.
2.7 Policies and Governance
- Navigate to Project Settings > Policies for the governance configuration page.
- Sub-routes include:
- Policies & Governance -- Define project governance rules
- User Policies -- Assign policies to specific users
- Access Levels -- Configure hierarchical access levels
- Access Level Users -- Assign users to access levels
2.8 Page Objects (Read-Only)
- Navigate to
/settings/global-settings/PageObjects. - The system displays a read-only grid of all system pages.
- Columns include: ID, Page Name, and Route Link.
- Use the search field to filter pages by name.
Page Objects is a reference-only view used when configuring permissions. No modifications can be made.
Section 3: Document Settings
Navigate to the Documents section under Global Settings for document-related configuration.
3.1 Document Classification
- The grid displays all document classification entries.
- Click Add New or the edit icon to open the edit modal:
- Name (required, max 500 characters)
- Description (optional)
- Status (Active/Inactive)
- Click Save.
3.2 Document Settings
- The grid displays configured document settings.
- Click the edit icon to modify:
- Code (required)
- Name (required, max 200 characters)
- Category (required)
- Retention Period (in days)
- Status (Active/Inactive)
- Click Save.
3.3 Template Settings
- Navigate to Template Settings to manage document templates for generating standardized project documents.
- Use the grid to view, add, or edit template configurations.
Troubleshooting
| Problem | Possible Cause | Solution |
|---|---|---|
| Cannot access Global Settings | Insufficient admin privileges | Contact your system administrator to grant admin access |
| Project Settings shows "No Project Selected" | No project selected in the top bar | Select a project from the project selector dropdown |
| Lookup item cannot be deleted | Item is system-defined | System-defined items (status 62) cannot be removed. Create a new item instead |
| Email notifications not sending | Incorrect SMTP/OAuth configuration | Verify SMTP server, port, credentials, and SSL settings in Email Configuration |
| User cannot log in after creation | Email not verified or account inactive | Check the user's status in the Users grid and ensure the email is correct |
| Permission changes not taking effect | User session cached | Ask the user to log out and log back in, or refresh the browser |
| Cannot add company to project | Company not created in Global Settings | First create the company in Global Settings > Companies, then assign it in Project Settings |
| Edit Permissions modal is empty | No page objects configured | Verify that Page Objects are populated in the system |
| Company delete fails | Company is referenced by active records | Remove company references from projects, workflows, and users before deleting |
| Export buttons not working | Browser popup blocker | Allow popups from the Arkan application domain |
Related Sections
- Getting Started -- Initial login and project selection
- Projects -- Creating and managing projects
- Workflows -- Detailed workflow sequence configuration
- Documents & Files -- Document management and drawing settings
Next: Troubleshooting & FAQ
Back to: Help Center