Prerequisites
- You are logged in to Arkan with a valid account (see Getting Started)
- Your user role has permission to view and/or create projects
- You know the basic project details (name, code, location, dates) you plan to enter
- For project structure setup, you must have a project already created and selected
Project List View
After logging in, the Projects page is the first screen you see. It displays all projects assigned to your account and lets you select one to work in.
Accessing the Project List
- Click All Projects in the sidebar menu (the first item, with the building icon).
The Projects page loads, showing all projects available to you.

View Modes
The project list supports two view modes. Use the view toggle buttons in the top-right corner to switch between them.
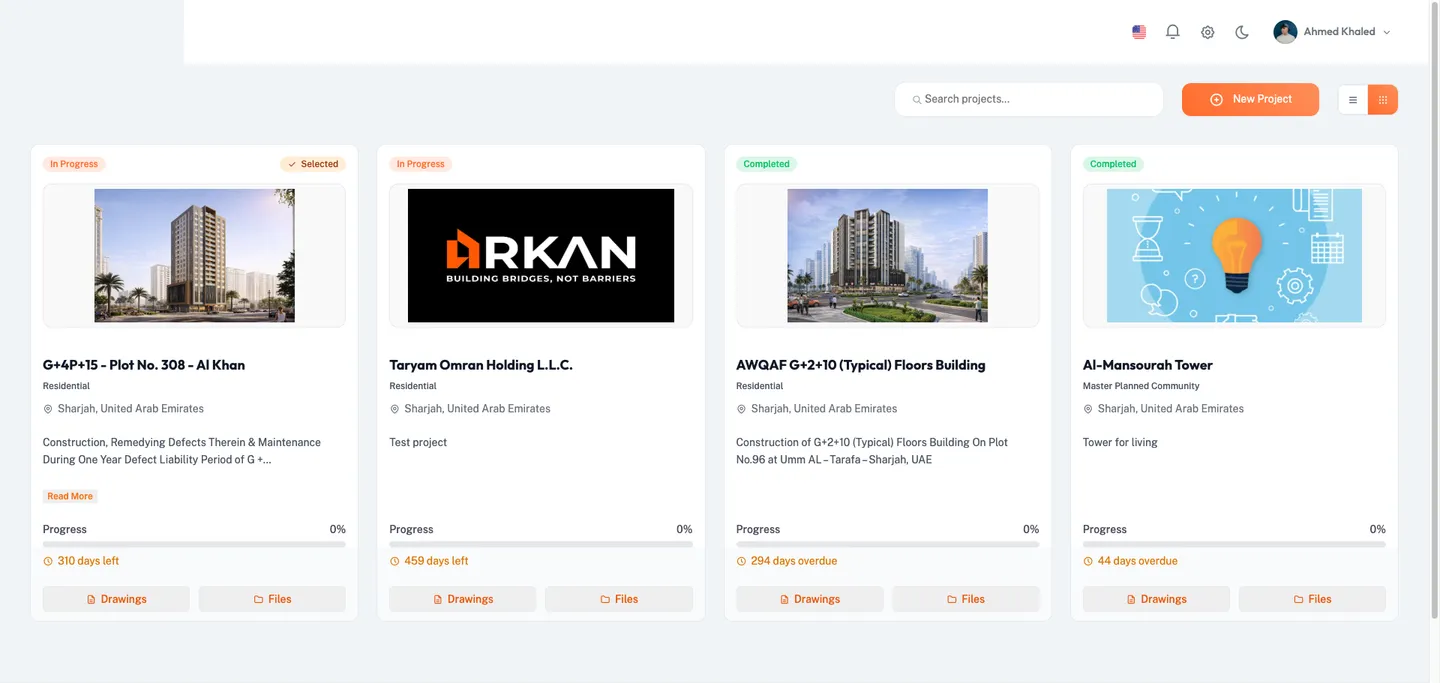
Grid View
Grid view arranges projects in a responsive multi-column card layout (up to four columns on wide screens).
Each project card displays the following information:
- Status Badge -- A colored label at the top-left of the card indicating the project's current status:
- Completed (green) -- The current date is past the final handover date
- In Final Handover (blue) -- The current date is past the initial handover date but before the final handover date
- In Progress (primary) -- The current date is on or after the commencement date
- Scheduled (amber) -- The commencement date is in the future
- Not Started (secondary) -- No commencement date is set
- Selected Badge -- An orange badge at the top-right reading Selected if this project is your currently active project
- Project Image -- A photo of the project (or a default placeholder image if none was uploaded)
- Project Name -- The full name of the project, displayed as a bold heading
- Project Type -- The project type classification, shown below the name
- Location -- State and country, displayed with a map pin icon
- Description -- A truncated preview of the project description (first 100 characters). Click Read More to expand the full text, or Show Less to collapse it
- Progress Bar -- A horizontal bar showing the project's overall progress percentage. Progress is calculated from financial data when available; otherwise it falls back to a time-based calculation using commencement and final handover dates
- Days Left -- A countdown displayed in amber text with a clock icon, showing the number of days remaining until the final handover date
- Drawings Button -- Opens the Drawings module for this project
- Files Button -- Opens the File Manager for this project
List View
List view shows the same project information in a single-column horizontal layout. Each row contains:
- A small project thumbnail image (64x64 pixels)
- Project name, Selected badge (if applicable), and status badge on the first line
- Project type, state, and country on the second line
- A progress bar below the text
- Days left counter
- Files and Drawings icon buttons on the right
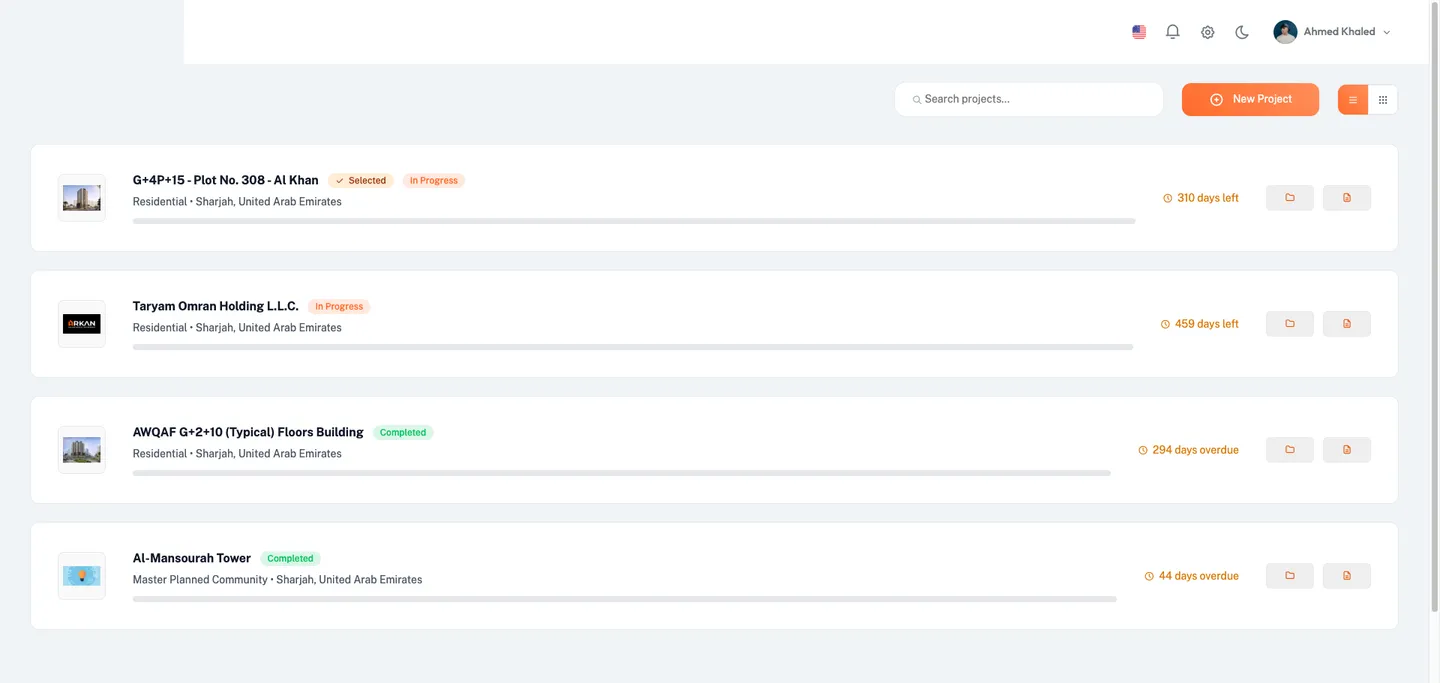
Tip: Grid view is best for visual browsing when you have many projects. Switch to list view for a compact, scannable overview.
Searching Projects
- Locate the search input field at the top of the page, to the left of the New Project button.
- Type a project name or keyword into the Search Projects field.
The project list filters in real time to show only matching projects.
Tip: The search field filters across all visible project data. Clear the field to restore the full list.
Toggling the View Mode
- Locate the view toggle buttons to the right of the New Project button.
- Click the list icon (horizontal lines) to switch to list view.
- Click the grid icon (dots grid) to switch to grid view.
The project list re-renders in the selected layout. Grid view is the default.
Selecting a Project
Before you can work with any module (submittals, inspections, finance, etc.), you must select a project. Selecting a project sets it as the active context for all operations.
- Navigate to the Projects page by clicking All Projects in the sidebar.
- Locate the project you want to work with.
- Click anywhere on the project card (grid view) or project row (list view).
Arkan loads your permissions for the selected project, then redirects you to the Project Dashboard.

Tip: Your most recently selected project is remembered. When you log in again, you may go directly to that project's dashboard without needing to re-select.
Warning: If you click the Drawings or Files button on a project card, that project is automatically selected and you are taken directly to the corresponding module instead of the dashboard.
Switching Projects
To switch from your current project to a different one:
- Click All Projects in the sidebar menu. This is always the first item in the sidebar, shown with a building icon.
You are taken back to the Projects page.
- Click on the project you want to switch to.
The new project is selected, permissions are loaded, and you are redirected to the Project Dashboard.
Tip: You can tell which project is currently selected by looking for the orange Selected badge on a project card.
Creating a Project
To create a new project, you fill out a multi-section form with the project's details, classification, financial information, location, timeline, and optional photo.
Opening the Create Project Form
- Navigate to the Projects page by clicking All Projects in the sidebar.
- Click the New Project button in the top-right corner of the page (displayed with a plus icon).
The Create New Project form opens.
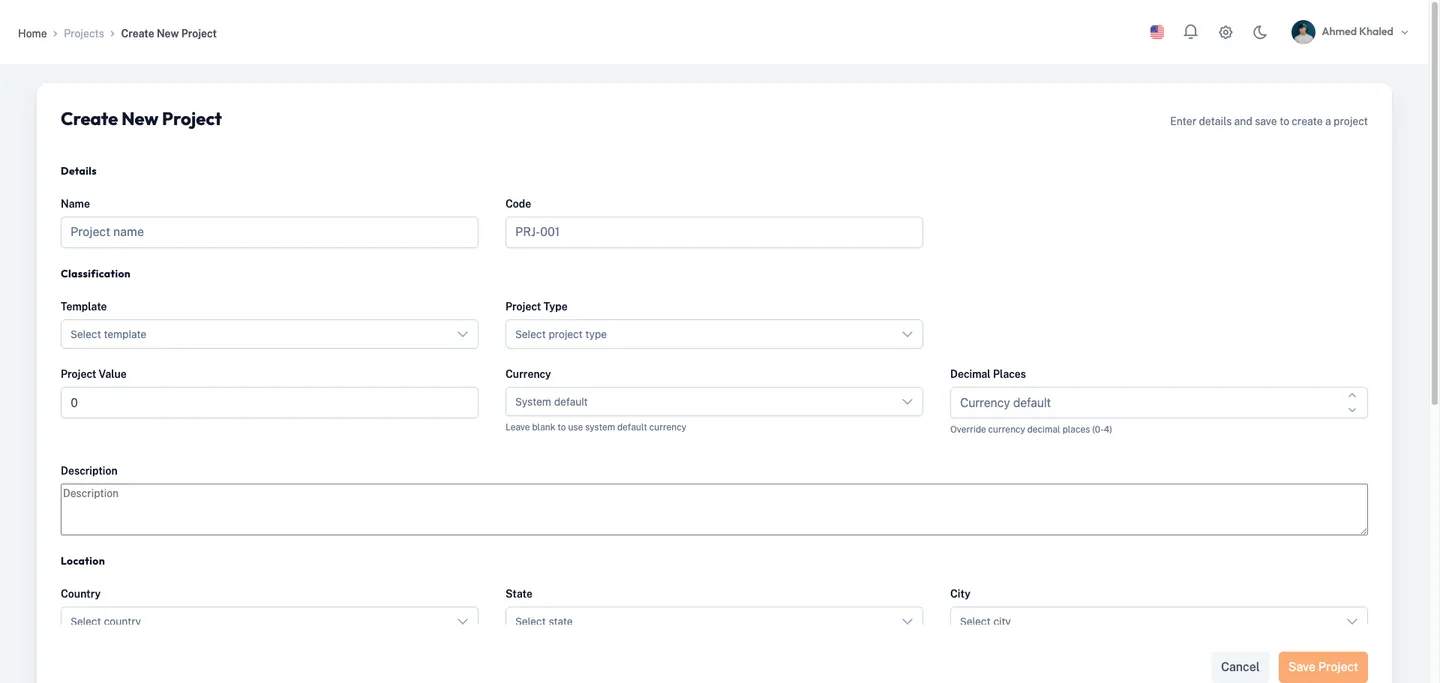
Section 1: Project Details
- In the Project Details section, enter the Project Name (required).
- This is the display name used throughout the system.
- Enter the Project Code (required).
- Use a short, unique identifier for the project (e.g.,
PRJ-001,BLDG-ALPHA).
- Use a short, unique identifier for the project (e.g.,
Both fields show a red error message if left empty and you attempt to save.
Section 2: Classification
- Select a Project Template from the dropdown (required).
- Templates define the default configuration for the project, including workflow settings.
- Select a Project Type from the dropdown (optional).
- Project types are predefined categories configured in system settings (e.g., Residential, Commercial, Industrial).
Tip: If the template or project type you need does not appear, ask your administrator to add it in Settings > Lookup > Project Types.
Section 3: Financial Information
- Enter the Project Value (required).
- This is the total estimated value of the project. Use the numeric input (minimum value is 0).
- Select the Currency from the dropdown (optional).
- If left blank, the system default currency is used.
- The dropdown shows currencies in the format
ISO Code - Currency Name(e.g.,SAR - Saudi Riyal).
- Set the Decimal Places (optional, range 0 to 4).
- This controls how many decimal places are used for currency values within this project.
- Use the increment/decrement buttons or type the value directly.
- Enter a Description in the text area (optional).
- Provide a brief summary of the project scope, objectives, or other relevant details.
Section 4: Location
- Select the Country from the dropdown (required).
When you select a country, the State dropdown is populated with states/regions for that country.
- Select the State from the dropdown (required).
- This list is filtered based on the selected country.
When you select a state, the City dropdown is populated with cities for that state.
- Select the City from the dropdown (required).
- This list is filtered based on the selected state.
Warning: If you change the country after selecting a state or city, both the state and city selections are cleared. You must re-select them.

Section 5: Coordinates
- Enter the Latitude (optional).
- Use decimal degrees format (e.g.,
24.7136).
- Use decimal degrees format (e.g.,
- Enter the Longitude (optional).
- Use decimal degrees format (e.g.,
46.6753).
- Use decimal degrees format (e.g.,
Tip: Coordinates can be useful for integrations with mapping tools or for identifying the physical location of a project.
Section 6: Timeline
- Select the Commencement Date (required).
- Click the calendar icon to open the date picker. You can navigate by month and year.
- Date format:
YYYY-MM-DD.
- Select the Initial Handover Date (optional).
- The expected first handover milestone.
- Select the Final Handover Date (optional).
- The expected project completion date. This date is used to calculate the progress bar and "Days Left" counter on the project card.
Tip: You can use the Today button in the date picker to quickly set today's date, or the Clear button to remove a selected date.
Section 7: Photo
- Click the Choose File button in the Photo section to upload a project photo (optional).
- Accepted formats: JPG, PNG, and other standard image types.
- Select an image file from your computer.
A confirmation message appears below the upload field showing the file name with a green check icon.

Saving the Project
- Review all entered information.
- Click Save at the bottom-right of the form.
- The Save button is disabled until all required fields are filled and valid.
A success notification appears: "Project created successfully!" You are redirected to the Projects page after a brief delay.
Warning: If any required field is missing or invalid, the form highlights the errors in red. Correct them before saving.
- (Alternative) Click Cancel to discard all changes and return to the Projects page without saving.
Editing a Project
To modify an existing project's details:
From the Project List (Grid View)
The project list also has an administrative grid view accessible at Sidebar > All Projects, which shows a data grid with columns for ID, Project Code, Project Name, Template Name, and Project Type.
- Navigate to Sidebar > All Projects.
- In the project data grid, locate the project you want to edit.
- Click the Edit button in the row's action column.
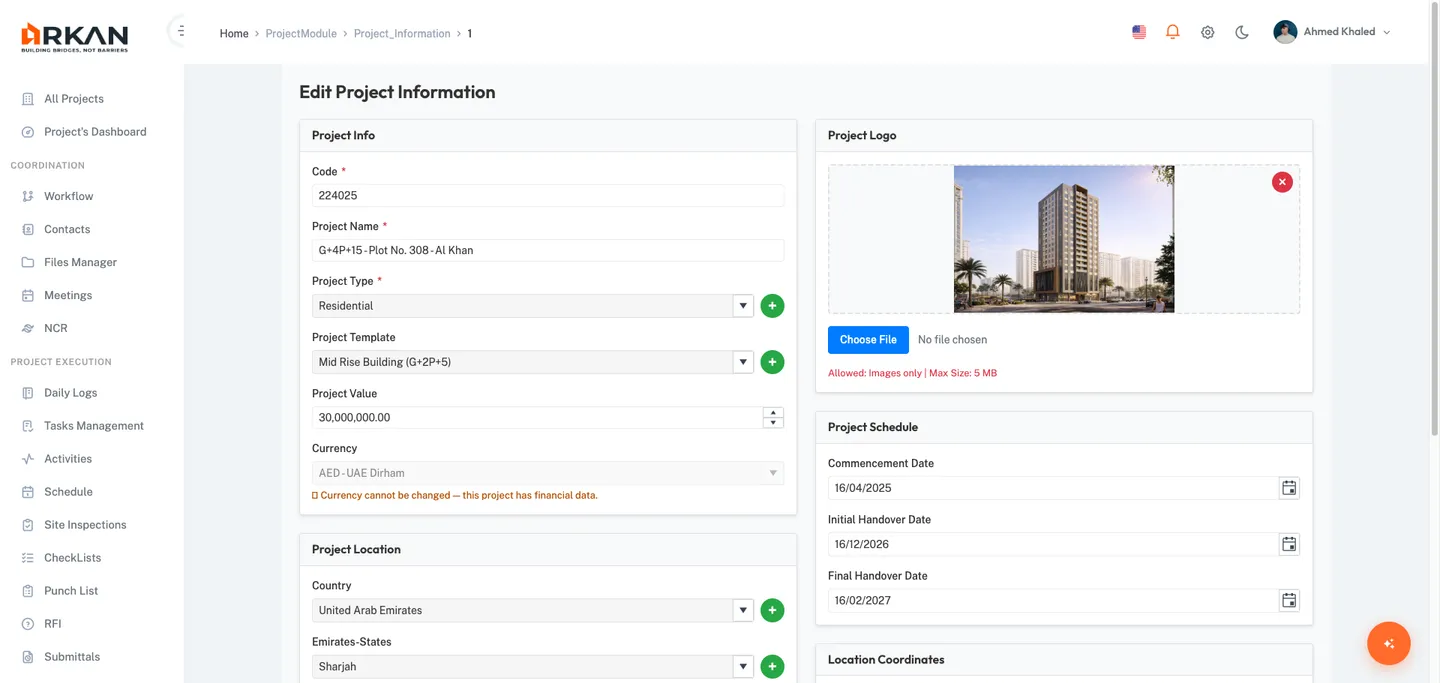
The Edit Project form opens, pre-populated with the existing project data.
- Modify any fields as needed. The form sections are identical to the Create Project form described above.
- Click Save to apply your changes.
A success notification appears: "Project updated successfully!" You are redirected to the Projects page.
Tip: In edit mode, the page title changes to "Edit Project" and the save button text reflects the update action.
From Project Settings
If you are already working inside a project:
- Navigate to Sidebar > Project Settings > General > Information.
The Project Information page loads, showing the current project's details in a read/edit view.
- Make the desired changes.
- Save your changes.
Deleting a Project
Warning: Deleting a project is permanent and cannot be undone. All data associated with the project (submittals, inspections, files, etc.) may be lost. Only administrators should perform this action.
- Navigate to the project data grid at Sidebar > All Projects.
- Locate the project you want to delete in the grid.
- Click the Delete button in the row's action column.
A confirmation dialog appears: "Are you sure you want to delete this item?"
- Click Yes to confirm the deletion, or No to cancel.
If confirmed, the project is removed and a success message appears. The grid refreshes automatically.
Managing Project Participants
From the project data grid, you can manage companies, users, and administrators assigned to a project.
- Navigate to the project data grid at Sidebar > All Projects.
- Locate the project in the grid.
- Click the Manage dropdown button in the row's action column.
- Select one of the following options:
- Companies -- Opens the Project Companies page for this project
- Users -- Opens the Project Users page for this project
- Admins -- Opens the Project Admins page for this project
You are navigated to the selected management page with the project context pre-loaded.
Project Structure
The project structure defines the physical hierarchy of your project. It is organized into five levels: Areas, Buildings, Floors, Zones, and Locations. This structure is used throughout the system for inspections, submittals, punch lists, and other modules that reference physical locations.
Accessing Project Structure
- Select the project you want to configure (see Selecting a Project).
- Navigate to Sidebar > Project Settings > Structure.
The Project Structure page loads, showing a tabbed interface with five tabs.
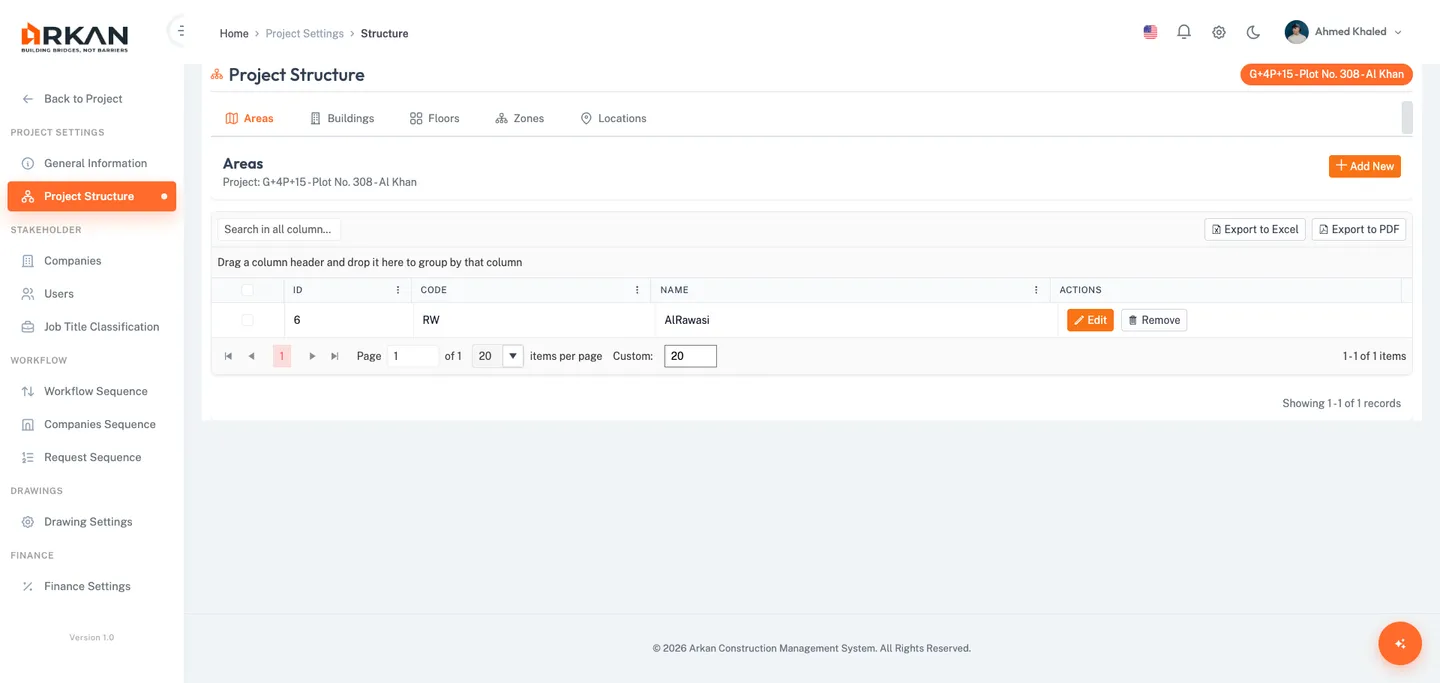
Warning: You must have the appropriate permissions to view and modify the project structure. If you see an "Access Denied" message, contact your administrator.
Areas
Areas are the top-level grouping in the project structure. They typically represent distinct geographical sections or zones of a construction site.
- Click the Areas tab (the first tab, selected by default).
- To add a new area, click the Add button.
- Enter the area Name and Code.
- Click Save.
The new area appears in the areas list.
Buildings
Buildings belong to an area and represent individual structures within the project.
- Click the Buildings tab.
- To add a new building, click the Add button.
- Enter the building Name, Code, and select the Building Type and parent Area.
- Click Save.
The new building appears in the buildings list.
Floors
Floors belong to a building and represent vertical levels within a structure.
- Click the Floors tab.
- To add a new floor, click the Add button.
- Enter the floor Code, select the parent Building, and select the Floor Type.
- Click Save.
The new floor appears in the floors list.
Zones
Zones belong to a floor and represent subdivisions within a floor level.
- Click the Zones tab.
- To add a new zone, click the Add button.
- Enter the zone Name, Code, and select the parent Floor.
- Click Save.
The new zone appears in the zones list.
Locations
Locations are the most granular level in the project structure. They belong to a zone and represent specific points or rooms.
- Click the Locations tab.
- To add a new location, click the Add button.
- Enter the location details and select the parent Zone.
- Click Save.
The new location appears in the locations list.
Tip: Set up your project structure before creating submittals, inspections, or punch list items. Many forms reference the project structure hierarchy for location selection.
Project Information and Rescheduling
Once a project is created and selected, you can view and manage its information and reschedule timeline through the Project Settings.
Viewing Project Information
- Select the project you want to view.
- Navigate to Sidebar > Project Settings > General.
- Click the Project Information tab.
The project's current details are displayed.
Rescheduling a Project
If project dates change, you can record reschedule events to maintain a history of timeline modifications.
- Navigate to Sidebar > Project Settings > General.
- Click the Project Reschedule tab.
- Enter the updated commencement, initial handover, and/or final handover dates.
- Save the reschedule record.
The reschedule is logged. The project list and dashboard will reflect the updated dates.
Tip: Rescheduling creates a historical record of date changes. Use this feature instead of directly editing dates when you want to maintain an audit trail.
Viewing Project Drawings
You can jump directly to a project's drawings from the project card without first navigating to the dashboard.
- On the Projects page, locate the project card.
- Click the Drawings button at the bottom of the card (grid view) or the drawings icon button (list view).
The selected project is set as active, and you are taken to the Drawings module.
Viewing Project Files
Similarly, you can access a project's file manager directly from the project card.
- On the Projects page, locate the project card.
- Click the Files button at the bottom of the card (grid view) or the folder icon button (list view).
The selected project is set as active, and you are taken to the File Manager.
Exporting the Project List
The project data grid supports exporting project data.
- Navigate to the project data grid at Sidebar > All Projects.
- Use the grid toolbar to export:
- Click the PDF export option to download the project list as
Projects.pdf. - Click the Excel export option to download the project list as
Projects.xlsx.
- Click the PDF export option to download the project list as
The file is downloaded to your browser's default download folder.
Troubleshooting
What if the Projects page shows "Loading projects..." indefinitely?
Check your network connection. If the issue persists, click the Retry button that appears. If you are still unable to load projects, contact your administrator to verify that the API server is running and accessible.
What if I see "Failed to load projects. Please try again."?
This error indicates a server communication failure. Click Retry to attempt loading again. If the problem continues, ensure you are logged in with a valid session. Try logging out and back in.
What if the Save button is disabled on the Create Project form?
The Save button remains disabled until all required fields are filled with valid values. Check the following:
- Project Name is not empty
- Project Code is not empty
- Project Template is selected
- Project Value is entered (must be zero or greater)
- Country, State, and City are all selected
- Commencement Date is selected
Scroll through the form to find any fields highlighted in red with error messages.
What if the State dropdown is empty after selecting a Country?
The State dropdown populates based on the selected country via a cascading API call. If it remains empty:
- Wait a moment; the data may still be loading (a spinner appears during loading)
- Try selecting a different country and then re-selecting the original one
- Contact your administrator to verify that states are configured for the selected country in system settings
What if the City dropdown is empty after selecting a State?
Similar to states, cities are loaded based on the selected state. If no cities appear, the state may not have cities configured in the system. Contact your administrator.
What if I get "Failed to load data. Please refresh the page and try again."?
This error appears when the lookup data (templates, project types, currencies, countries) fails to load. Refresh the browser page. If the error persists, there may be a server-side issue.
What if I cannot see the Manage dropdown on the project grid?
The Manage dropdown (Companies, Users, Admins) only appears in the administrative data grid view, not in the card/list view. Ensure you are looking at the correct grid. Your user role must also have the appropriate permissions.
What if I see an "Access Denied" message on the Project Structure page?
You do not have permission to view the project structure. Contact your administrator to request the appropriate access level for the Project Areas page permission.
What if my project shows 0% progress even though work has started?
Progress is calculated using financial data when available. If no financial data exists, it falls back to a time-based calculation using the commencement date and final handover date. Ensure that:
- The Commencement Date is set and is in the past
- The Final Handover Date is set and is in the future
- Financial overview data is available for the project (see Finance)
What if the project photo does not display on the project card?
If a photo upload failed or no photo was uploaded, a default placeholder image is shown. To upload or replace a photo, edit the project and use the Photo section in the project form.
What if deleting a project fails?
Project deletion may fail if there are dependent records or if you lack the required permissions. The error message from the server is displayed in a notification. Contact your administrator if you need to force-delete a project.
Next: Project Dashboard
Back to: Help Center