Overview
The Finance module in Arkan provides a centralized hub for managing all financial aspects of a construction project. From the Finance Dashboard you can monitor contract values, track payment progress, manage inspection bills, create payment requests through a guided wizard, configure advanced payments, and handle retention releases. The module integrates with BOQ data, inspection records, and workflow approvals to ensure financial accuracy across the project lifecycle.
Prerequisites
- You have an active Arkan account with the Finance permission (Retrieve at minimum).
- A project has been selected in the project selector (top navigation bar).
- BOQ items have been uploaded for the selected project (required for payment requests).
- Inspection requests exist if you plan to create inspection bills.
- Workflow configurations are in place if payment requests require approval routing.
Tip: If you see an "Access Denied" message, contact your system administrator to verify the Retrieve permission is enabled for your role under Settings > Roles & Permissions.
Navigating to Finance
Sidebar > Finance
You can also access the module directly at the route /finance.
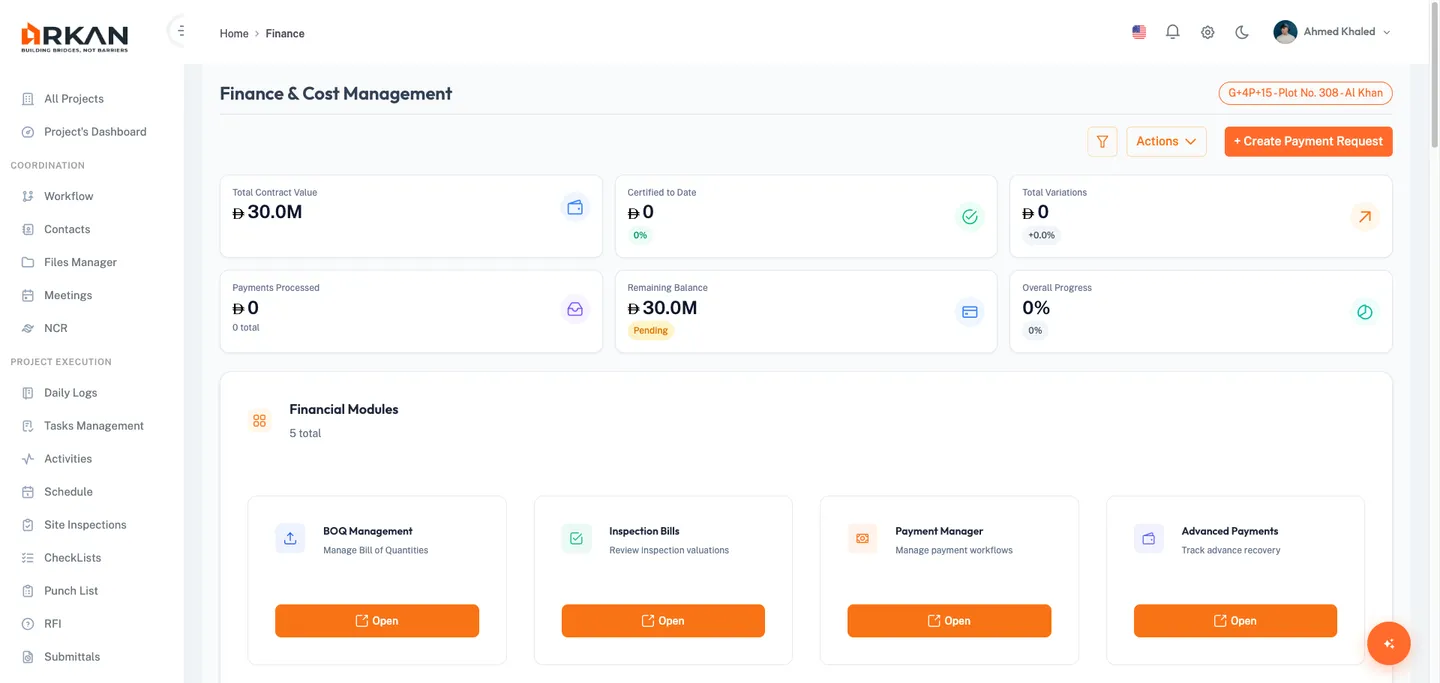
Section 1: Finance Dashboard
The Finance Dashboard (route: /finance) provides a comprehensive overview of the project's financial health.
1.1 Financial Overview Cards
Six KPI cards display key financial metrics at the top of the dashboard:
| Card | Description |
|---|---|
| Total Contract Value | Effective contract value including variations |
| Certified to Date | Total certified amount with progress percentage |
| Total Variations | Sum of contract variations as a percentage of the original |
| Payments Processed | Total value and count of processed payment requests |
| Remaining Balance | Outstanding balance yet to be certified |
| Overall Progress | Project completion percentage based on certified work |
Values update automatically on page load. Currency values respect the project's configured currency with compact formatting for large numbers.
1.2 Financial Modules Navigation
Below the KPI cards, navigation cards link to four sub-modules. Click Open on any card:
- Inspection Bills -- Manage bills linked to inspections
- Payment Requests -- Create and track payment requests
- Advanced Payments -- Configure upfront payments and installments
- Retention -- Manage retention withholdings and releases
1.3 Dashboard Analytics
The dashboard displays analytics in a three-column layout with sections for BOQ Items Overview, Financial Summary, Trend Visualization, Variations Overview, BOQ Breakdown, Progress Overview, Advance Payments summary, VAT Overview, Deductions, and BOQ Status.
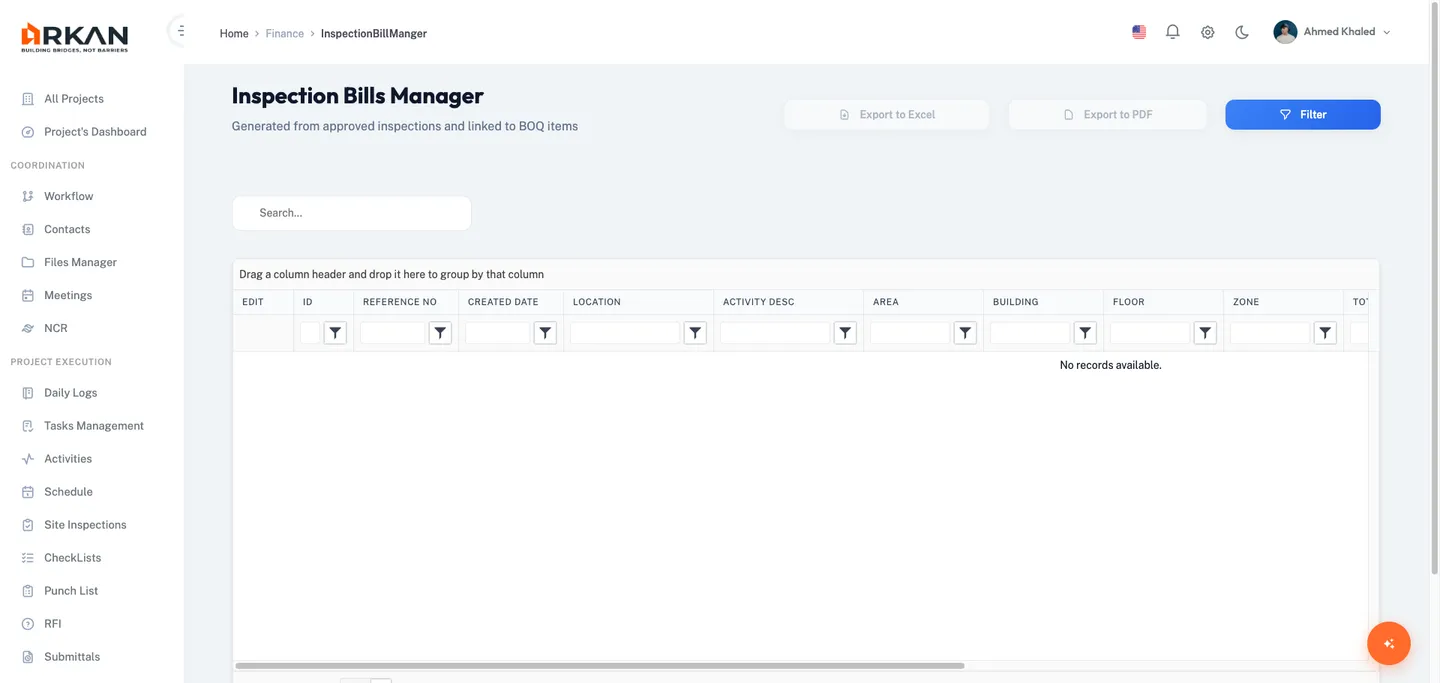
Section 2: Inspection Bills
2.1 Accessing Inspection Bills
- Navigate to Sidebar > Finance.
- Click Inspection Bills, or go directly to
/finance/bills.
2.2 Inspection Bills Grid
| Column | Description |
|---|---|
| Edit | Pencil icon to edit the bill |
| ID | Unique bill identifier |
| Reference No | System-assigned reference number |
| Created Date | Bill creation date (dd-MM-yyyy) |
| Location / Activity Description | Location and activity linked to the bill |
| Area / Building / Floor / Zone | Location hierarchy details |
| Total Amount | Original bill amount (currency formatted) |
| Total Changes | Sum of changes applied (currency formatted) |
| Net Total | Final total after changes (currency formatted) |
The grid supports pagination (5/10/20/50/100), column filtering, resizing, grouping, and text search. Header buttons provide Export Excel, Export PDF, and Filter (advanced filter dialog).
2.3 Advanced Filter Dialog
Click Filter to open a dialog with fields: Reference No (text), ID (numeric), Inspection Ref No (text), and Inspection ID (numeric). Click Retrieve to apply.
2.4 Creating a New Inspection Bill
- Navigate to the new bill form (route:
/finance/bills/new-bill). - Complete the Bill Information section:
| Field | Required | Description |
|---|---|---|
| Reference No | Yes | Unique reference number |
| Select Inspection | Yes | Linked inspection from dropdown |
| Bill Date | Yes | Calendar picker (dd/mm/yy) |
| Due Date | Yes | Payment due date (calendar picker) |
| Amount | Yes | Bill amount with decimal precision |
| Status | Yes | Draft, Pending Approval, or Approved |
- Optionally add Description and Notes in the Additional Details section.
- Click Save.
The bill is created and a success notification confirms the operation.
Warning: Fields marked with a red asterisk are required. The Save button is disabled during submission to prevent duplicates.
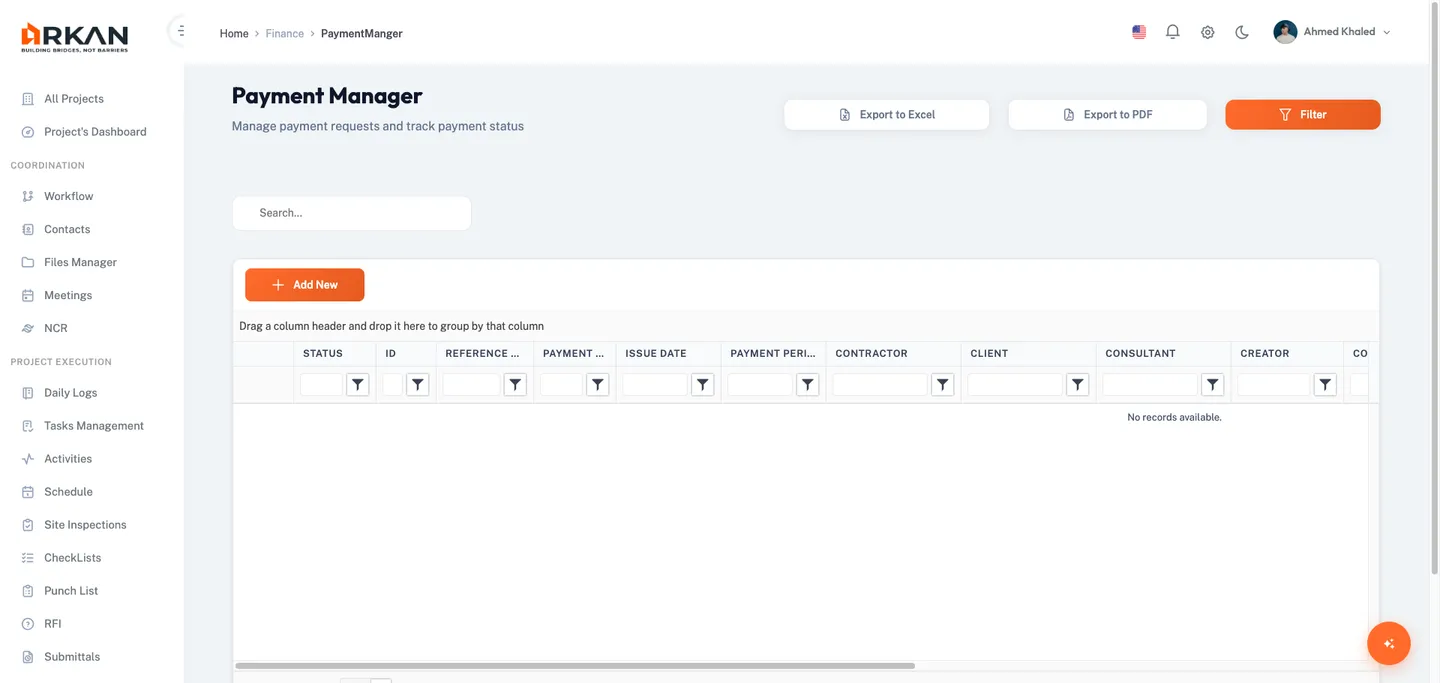
Section 3: Payment Requests
3.1 Accessing Payment Requests
- Navigate to Sidebar > Finance.
- Click Payment Requests, or go directly to
/finance/payment-requests.
3.2 Payment Requests Grid
| Column | Description |
|---|---|
| Actions | Pencil (edit Draft), Eye (view non-Draft), Trash (delete Draft) |
| Status | Color-coded badge: Draft, New, Approved, Rejected, Return |
| ID / Reference No / Payment No | Identifiers |
| Issue Date / Payment Period | Date fields (dd-MM-yyyy) |
| Contractor / Client / Consultant / Creator | People fields |
| Contract Value / Effective Value / Variation / Previous Total | Financial fields (currency) |
Status behavior: Draft (code -1) items are editable and deletable. New (0), Approved (1), Rejected (2), and Return (3) items are read-only.
Header buttons: Export Excel, Export PDF, Filter, and Add New (requires Insert permission).
3.3 Advanced Filter Dialog
Click Filter to open a dialog with: Reference No, ID, Payment No, Status (dropdown), From/To Issue Date, and From/To Payment Period (date pickers). Click Apply or Clear.
3.4 Creating a Payment Request (4-Step Wizard)
Click Add New to launch the wizard.
Step 1: Main Information
| Field | Required | Editable | Description |
|---|---|---|---|
| Request No | Auto | No | Auto-generated after saving |
| Issue Date | Yes | Yes | Calendar picker |
| Request Initiator / Company | Auto | No | Current user info |
| Reference No | No | Yes | Optional reference |
| Payment No | Yes | Yes | Sequential payment number |
| Payment Period | Yes | Yes | Billing period; changing reloads contract values |
| Contractor / Client / Consultant | Auto | No | From project settings |
| Contract Value / Effective Value / Variation / Previous Payments | Auto | No | Read-only financial data |
| Action Date | No | Yes | Optional date |
- Fill in Issue Date, Payment No, and Payment Period.
- Click Next to proceed.
Tip: Changing the Payment Period automatically reloads contract values, variations, and previous payment data.
Step 2: BOQ Selection
Select BOQ items to include in the payment request:
- Use Search, Category, and Progress Status filters, then click Apply.
- Use Select All or pick individual items via checkboxes.
- Optionally click Import Progress to import data from inspection reports.
BOQ Items Table: Item Code, Description, Quantity, Unit, Unit Rate, Total Value, Previous Amount.
Summary Panel: Selected Items count, Total Work Done, Certified Amount, Overall Progress (with progress bar), and Net Payable.
- Click Next to proceed.
Step 3: Advanced Payments
Link advanced payments to the request for recovery deductions. Review linked advances, configure recovery amounts for mobilization and material advances, then click Next.
Step 4: Preview and Submission
The preview step provides a comprehensive summary:
- Inspection Summary -- Reference, inspector, work area approval percentage
- Certificate Summary -- Line-by-line breakdown with Net Payment and Progress Completion
- BOQ Items Summary -- All selected items with completion percentages and subtotals
- Payment Summary -- Advanced payment recoveries and deductions (retention, VAT)
- Certification -- Accuracy checkbox, digital signature, recommendation, department, and notes
- Pre-Submission Validation -- Checklist of all requirements
- Supporting Documents -- Attached files with download buttons
- Approval Workflow Preview -- Approval chain, timeline, priority, notifications
To submit:
- Verify all validation checks pass (green checkmarks).
- Select the certification checkbox.
- Click Submit Request, Save Draft, or Export PDF.
The request is submitted to the workflow and its status changes from Draft to New.
Warning: Submit Request remains disabled until all validations pass and the certification checkbox is selected.
Section 4: Advanced Payments
4.1 Accessing Advanced Payments
Navigate to Sidebar > Finance > Advanced Payments, or go to /finance/advanced-payments.
4.2 Advanced Payments Grid
| Column | Description |
|---|---|
| Actions | Edit (pencil) and Delete (trash, hidden for posted items) |
| ID / Name / Reference No | Identifiers |
| Payment Date | Date (dd-MM-yyyy) |
| Type | Amount or Percentage |
| Total / Hold / Paid / Remaining Amount | Financial fields (currency) |
| Number of Payments | Installment count |
| BOQ Linked | Yes/No |
| Posted Status / Date / User | Posting information |
| Canceled Status / Date / User | Cancellation information |
Toolbar: Filter, Clear, Export Excel, Export PDF, Add New.
4.3 Filter Dialog
Fields: Reference No, Name, Type (dropdown), Posted Status (dropdown), From/To Payment Date, From/To Post Date. Click Retrieve to apply or Close to dismiss.
4.4 Creating an Advanced Payment
- Click Add New and complete the dialog:
| Field | Required | Description |
|---|---|---|
| Name | Yes | Descriptive name |
| Reference No | Yes | Unique reference |
| Payment Date | Yes | Payment date |
| Type | Yes | Amount (fixed) or Percentage (of contract) |
| Total Amount | Yes | Total advance amount |
| Number of Payments | No | Installment count |
| BOQ Items | No | Link BOQ items to the advance |
- If installments are specified, configure the schedule grid with amounts, months, and notes.
- Click Save.
Tip: Once posted, an advanced payment cannot be deleted. Verify all details before posting.
Section 5: Retention Management
5.1 Accessing Retention
Navigate to Sidebar > Finance > Retention, or go to /finance/retention.
5.2 Dashboard Summary Cards
| Card | Description |
|---|---|
| Retention Percentage | Configured retention rate (e.g., 10%) |
| Total Withheld | Total withheld across all payments |
| Total Released | Total released to date (green) |
| Retention Balance | Outstanding balance (amber) |
5.3 Retention Grid
| Column | Description |
|---|---|
| ID | Release identifier |
| Reference No | Reference (blue text) |
| Release Date | Date (dd/MM/yyyy) |
| Release Type | Color-coded badge |
| Release Amount | Amount released (green, currency) |
| Created By | Creator name |
| Notes | Truncated with hover tooltip |
| Actions | View (eye icon) |
Grid supports pagination, filtering, resizing, sorting, and search. Header: Export Excel, Export PDF, New Release.
5.4 Creating a Retention Release (2-Step Wizard)
Click New Release (route: /finance/retention/new).
Step 1: Main Information -- Review auto-populated fields (Request No, Created By, Company, Contractor/Client/Consultant, Contract Value, Effective Value, Variation, Previous Payments). Edit Issue Date, Reference No, Payment No, Payment Period, and Action Date. Click Next.
Step 2: Preview and Confirm -- Specify release details:
| Field | Required | Description |
|---|---|---|
| Release Type | Yes | First Half (at completion) or Second Half (one year after) |
| Release Amount | Yes | Amount to release from retention balance |
| Notes | No | Optional notes |
Review the preview summary, read the information panel about release rules, acknowledge the confirmation warning, then click Submit Release.
The release is processed and the system redirects to the retention grid.
Warning: Retention releases are processed immediately and cannot be undone.
Section 6: Exporting Data
All sub-modules support Export Excel (.xlsx) and Export PDF (A4 landscape .pdf) via header toolbar buttons.
Tip: Apply filters before exporting to limit output to relevant records.
Troubleshooting
What if I cannot see the Finance page?
Verify your role has Retrieve permission for Finance under Settings > Roles & Permissions.
What if "Add New" is not visible on Payment Requests?
Your role needs the Insert permission. Contact your administrator.
What if I see "No Project Selected"?
Select a project from the top navigation bar before accessing Finance.
What if KPI cards show zero values?
Upload BOQ items and process payment requests first. KPI cards aggregate existing financial records.
What if the Payment Period does not reload contract values?
Check your network connection and verify contract values are configured. Refresh and retry.
What if the Submit button is disabled on the preview step?
All pre-submission validation checks must pass and the certification checkbox must be selected. Return to earlier steps to resolve issues.
What if I cannot delete a payment request?
Only Draft requests can be deleted. Submitted requests (New/Approved/Rejected/Return) cannot be removed. You also need the Delete permission.
What if an advanced payment cannot be deleted?
Posted advanced payments cannot be deleted. Check the Posted Status column.
What if retention balances appear incorrect?
The balance is calculated from the retention percentage applied to certified payments minus processed releases. Verify all payment approvals are complete.
Related Sections
- Inspections -- Inspection requests linked to inspection bills
- BOQ -- Bill of Quantities data used in payment requests
- Workflows -- Workflow configuration for payment approvals
Next: BOQ
Back to: Help Center